Unlocking Greenery: Learn How to Grow ZZ Plant Like a Pro

How to grow ZZ plant

Introduction to ZZ Plant Cultivation

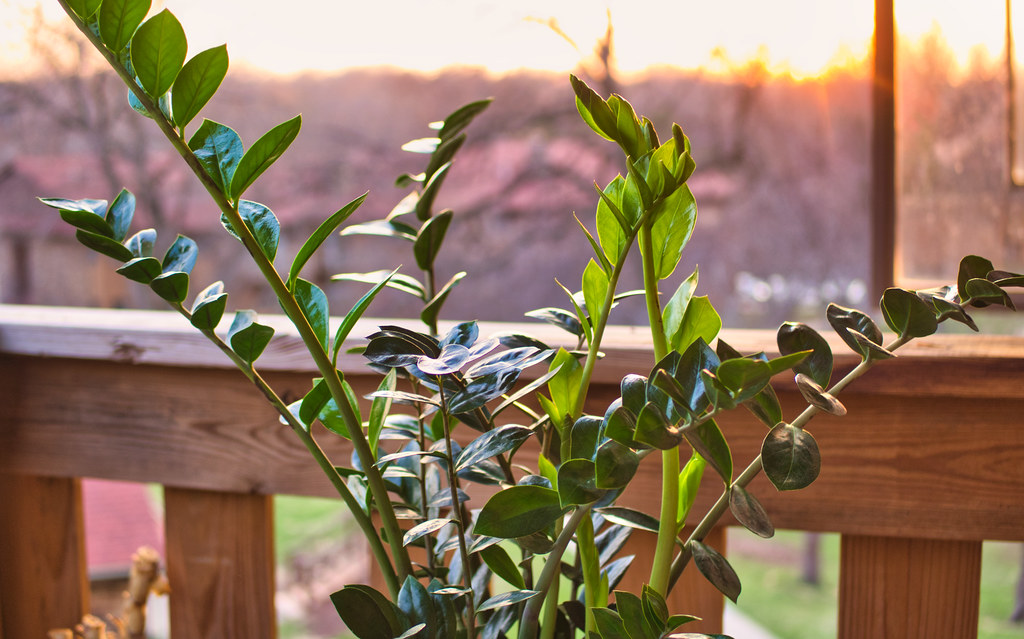
How to grow ZZ plant, In the realm of indoor gardening, the ZZ plant (Zamioculcas zamiifolia) has emerged as a beloved choice for both novice and seasoned gardeners alike. Revered for its resilience, low maintenance requirements, and striking appearance, this tropical gem has found its way into countless homes and offices around the globe. If you’re keen on introducing a touch of greenery into your space, mastering the art of ZZ plant cultivation is an excellent starting point.

Around the House | zz plant | Rusty Clark ~ 100K Photos | Flickr

How to grow ZZ plant, Understanding

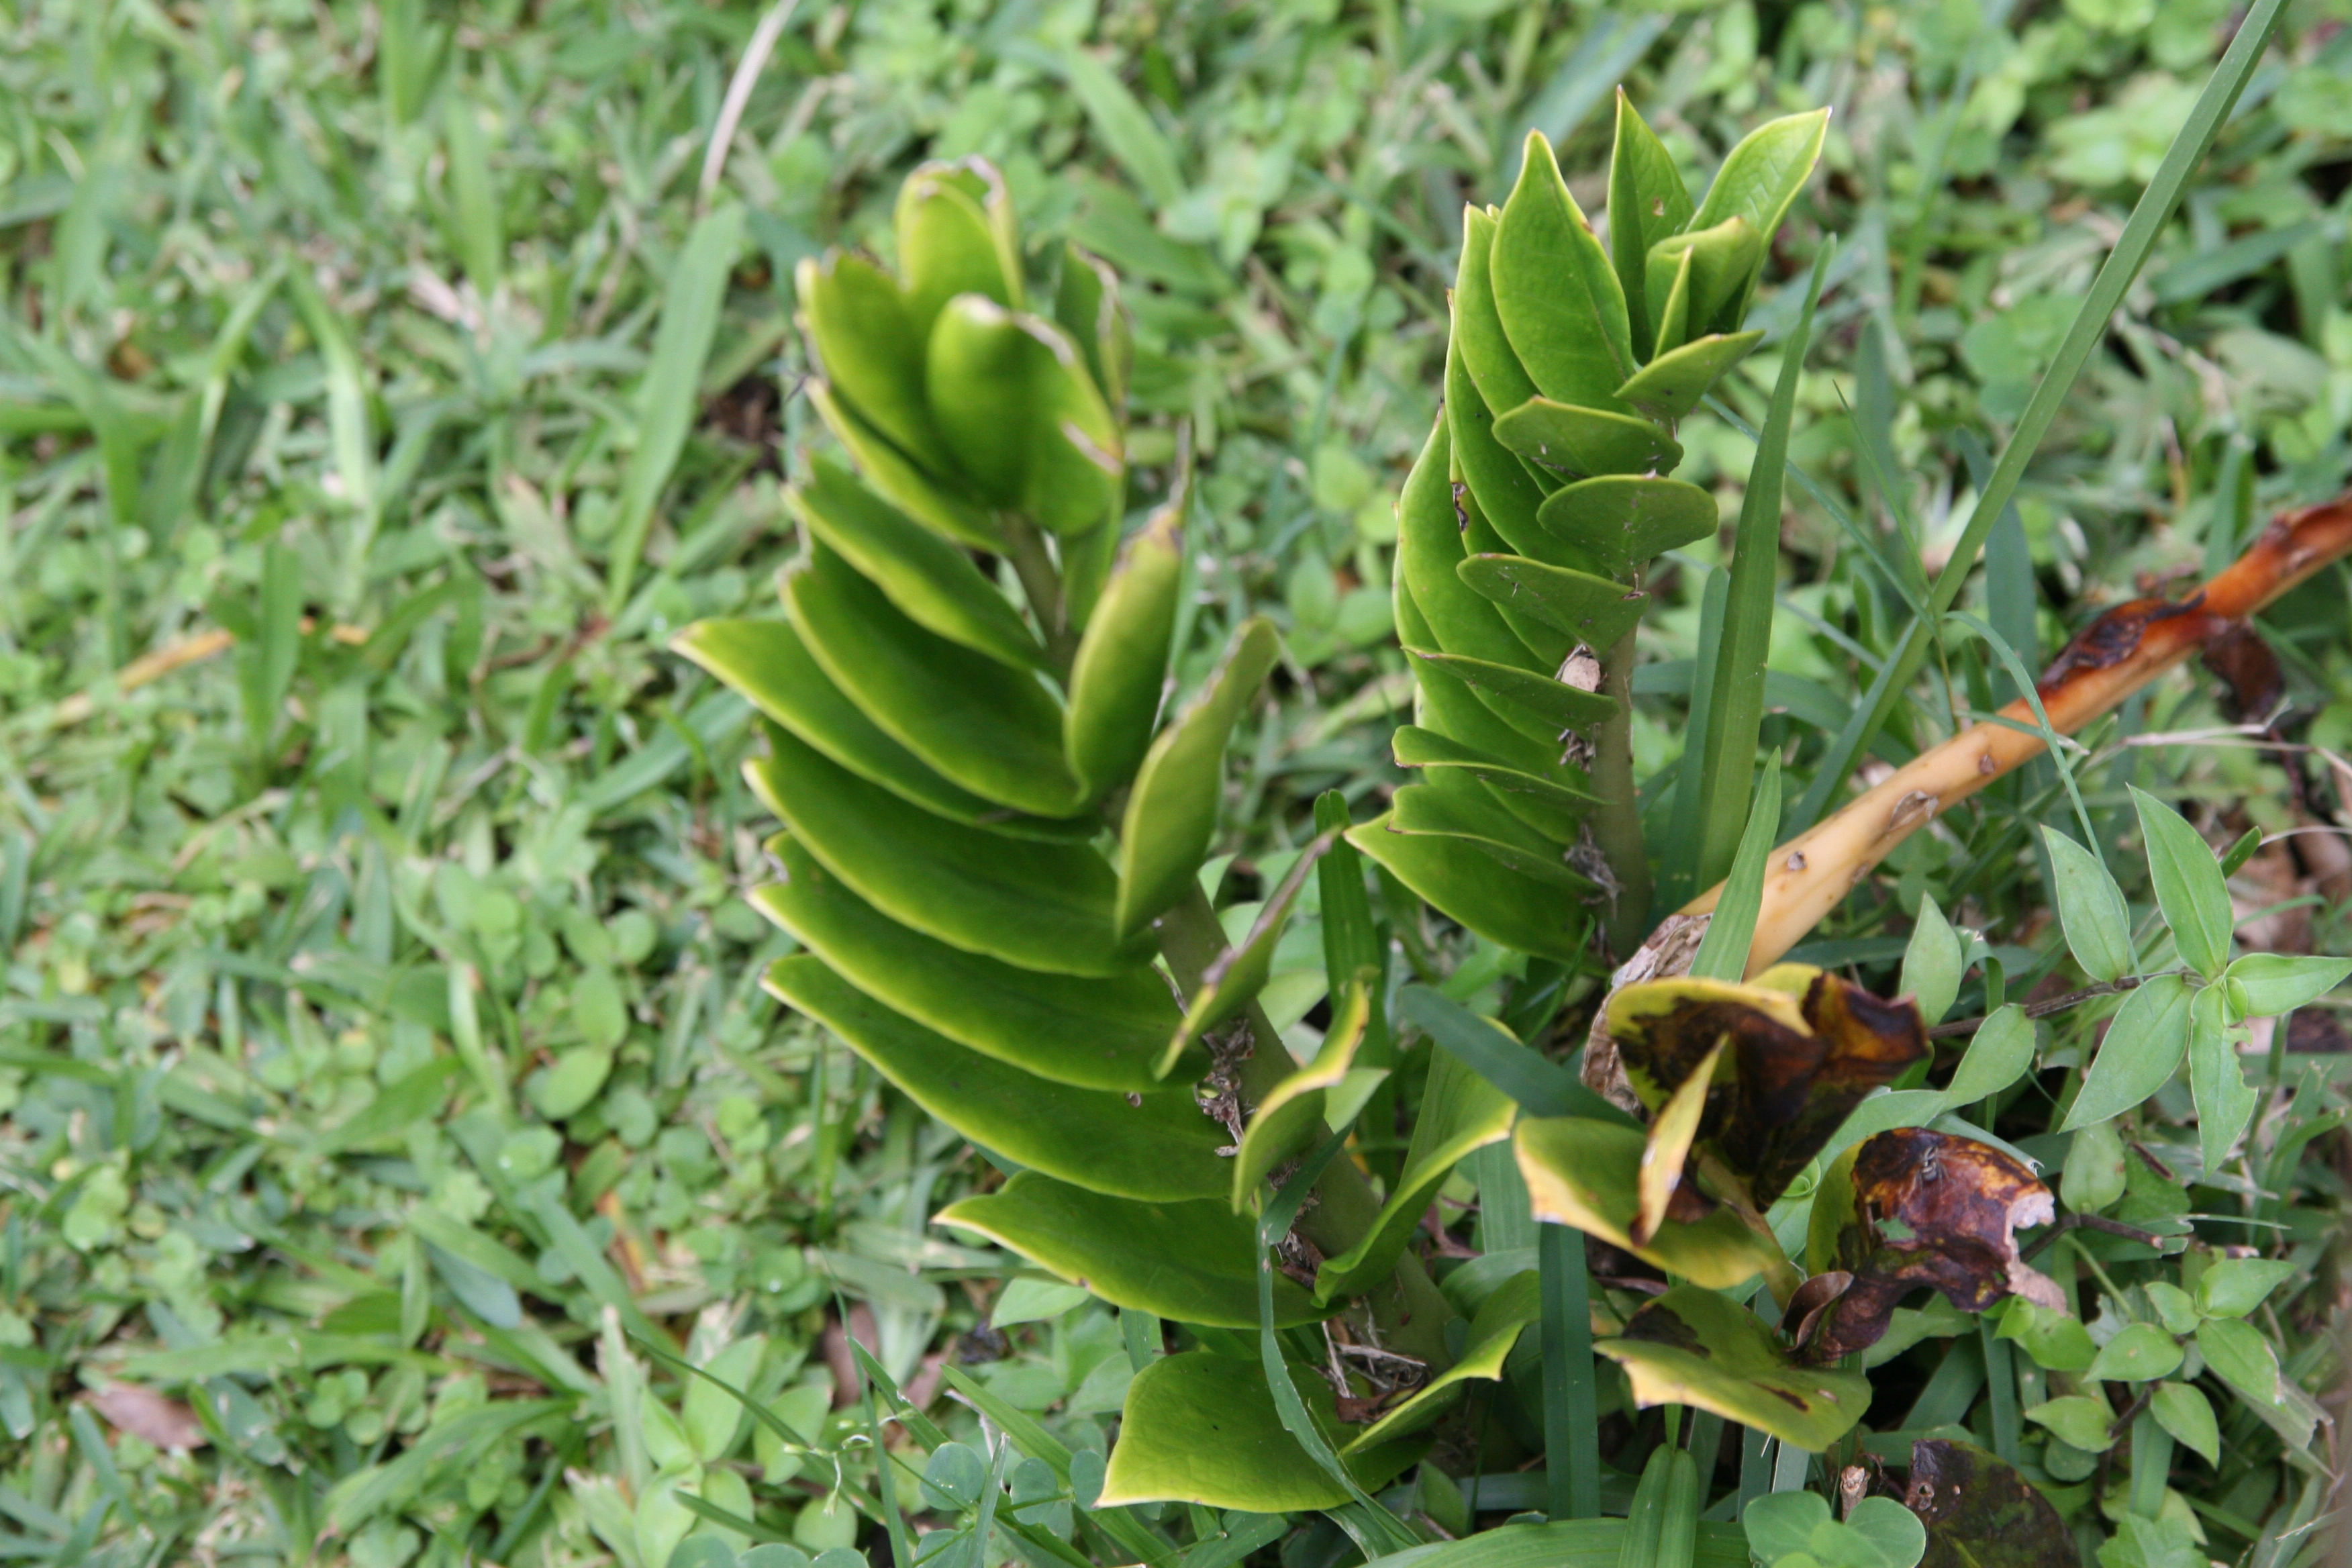
Native to Eastern Africa, particularly Tanzania and Kenya, the ZZ plant is a member of the Araceae family. Its glossy, deep green foliage features distinctive feather-like leaflets that grow alternately along its stems. While it’s primarily grown as an indoor plant, it can thrive outdoors in warmer climates.

Creating the Ideal Environment

How to grow ZZ plant, One of the keys to successfully growing a ZZ plant is providing it with the right environment. These plants prefer indirect light, making them perfect for offices or rooms with filtered sunlight. However, they can tolerate low light conditions, albeit with slower growth. Avoid placing them in direct sunlight as it can scorch their leaves.

ZZ plants thrive in average room temperatures ranging from 65°F to 75°F (18°C to 24°C). They’re not too fussy about humidity levels but do best in environments with moderate humidity. Adequate airflow is also crucial, so avoid placing them in overly stuffy or stagnant spaces.

Selecting the Right Pot and Soil

Choosing the correct pot and soil is essential for ZZ plant health. Opt for a well-draining potting mix to prevent waterlogged roots, as ZZ plants are susceptible to root rot in overly moist conditions. A mixture of potting soil, perlite, and peat moss works well. Ensure the pot has drainage holes to allow excess water to escape.

When repotting, select a container that’s just slightly larger than the plant’s root ball to prevent over-potting, which can lead to waterlogged soil. ZZ plants prefer to be slightly root-bound, so they don’t require frequent repotting.

Zamioculcas zamiifolia (Lodd.) Engl., ZZ Plant (Useful plants) - Pl@ntNet  identify

Watering and Fertilizing

ZZ plants are drought-tolerant and prefer to dry out between waterings. Overwatering is a common issue that can cause root rot, so it’s crucial to err on the side of underwatering rather than overwatering. Allow the top inch or two of soil to dry out completely before watering thoroughly, ensuring excess water drains away.

During the growing season in spring and summer, fertilize your ZZ plant monthly with a balanced, water-soluble fertilizer diluted to half strength. Avoid fertilizing during the winter months when growth slows down.

Pruning and Maintenance

ZZ plants are relatively low-maintenance when it comes to pruning. Simply trim away any yellowed or damaged leaves using clean, sharp scissors or pruning shears. Regularly dusting the leaves with a damp cloth will help keep them clean and free of dust, allowing for optimal photosynthesis.

Dealing with Common Pests and Issues

While ZZ plants are generally resistant to pests and diseases, they can occasionally attract mealybugs, spider mites, or aphids. If you notice any signs of pest infestation, gently wipe the affected areas with a cotton swab dipped in rubbing alcohol or treat the plant with insecticidal soap.

Yellowing leaves are often a sign of overwatering, while drooping leaves may indicate underwatering. Adjust your watering schedule accordingly to address these issues promptly.

File:Zamioculcas zamiifolia 9zz.jpg - Wikimedia Commons

Propagation

Propagating ZZ plants is relatively straightforward and can be done through division or leaf cuttings. To propagate via division, carefully separate the plant into smaller sections, ensuring each section has a healthy root system. Plant the divisions in separate pots with well-draining soil and care for them as you would mature plants.

Leaf cuttings can also be taken from healthy, mature ZZ plants. Simply cut a leaf into sections, ensuring each section has a portion of the stem attached. Plant the cuttings in a well-draining soil mix, keeping the soil lightly moist until new growth emerges.

Conclusion

With its striking appearance and minimal care requirements, the ZZ plant is an excellent choice for anyone looking to add a touch of greenery to their indoor space. By providing the right environment, proper care, and attention to detail, you can cultivate thriving ZZ plants that will enhance your home or office for years to come. Whether you’re a seasoned gardener or just starting out, mastering the art of ZZ plant cultivation is sure to bring joy and satisfaction to your gardening endeavors.

Mastering Onion Seed Harvesting: A Comprehensive Guide for Gardeners

Onion Seed Harvesting

Onions, with their distinctive flavor and culinary versatility, are a staple in many gardens. While most gardeners focus on growing onions for their bulbs, harvesting onion seeds opens up a world of possibilities for seed saving and experimentation with different varieties. In this comprehensive guide, we’ll delve deep into the process of onion seed harvesting, providing valuable insights and practical tips for gardeners of all levels.

Onion Seed Starting - How To Grow Onions From Seeds | Gardening Know How

Understanding Onion Seed Production:

Before diving into the intricacies of onion seed harvesting, it’s essential to grasp the fundamentals of onion seed production. Onions are biennial plants, meaning they complete their life cycle over two years. During the first year, onions focus their energy on bulb development, storing essential nutrients for the plant’s future reproductive phase. In the second year, triggered by changing environmental conditions such as increasing daylight hours and warmer temperatures, onions transition from bulb development to seed production.

Timing is Key:

Timing plays a crucial role in successful onion seed harvesting. As the second year progresses and temperatures begin to rise, onions undergo a process known as bolting. Bolting is characterized by the rapid growth of a flower stalk from the center of the onion plant, eventually culminating in the formation of seed heads. It’s essential to monitor your onion plants closely during this stage, as harvesting onion seeds at the optimal time ensures seed viability and quality.

Harvesting Onion Seeds:

The key to harvesting onion seeds lies in patience and observation. As summer gives way to early fall, keep a watchful eye on your onion plants for signs of seed head development. Mature seed heads will gradually turn brown and begin to dry out, indicating that the seeds are ready for harvesting. Use sharp scissors or pruning shears to carefully cut the seed heads from the plant, taking care not to damage the seeds in the process.

Threshing and Cleaning:

Once you’ve harvested the seed heads, the next step is to extract the seeds and prepare them for storage. Threshing is the process of separating the seeds from the seed heads and any accompanying debris. You can accomplish this by gently rubbing the seed heads between your hands or by tapping them against a clean, hard surface. After threshing, winnow the seeds to remove any remaining chaff or impurities. A simple method involves pouring the seeds from one container to another in front of a gentle breeze, allowing the lighter chaff to be carried away while the heavier seeds remain behind.

Onion seeds for planting, High germination (50 Seeds)

Drying and Curing:

Proper drying and curing are essential for preserving the quality and viability of onion seeds. Spread the cleaned seeds out in a single layer on a paper towel or a fine mesh screen, ensuring good airflow around each seed. Place the seeds in a well-ventilated area away from direct sunlight and moisture, allowing them to dry thoroughly over the course of several days to a week. Once dry, transfer the seeds to airtight containers such as glass jars or paper envelopes, making sure to label each container with the onion variety and harvest date.

Storage:

Storing onion seeds properly is vital for maintaining their viability over time. Choose a cool, dry location for seed storage, away from temperature fluctuations and humidity. A basement or pantry shelf is ideal for this purpose. When stored correctly, onion seeds can remain viable for several years, allowing you to save money and preserve your favorite onion varieties for future growing seasons.

Tips for Success:

Start with high-quality onion plants from reputable sources to ensure healthy seed production.
Consider growing open-pollinated or heirloom onion varieties for greater seed diversity and adaptability.
To prevent cross-pollination, isolate different onion varieties from one another or stagger planting times.
Hand pollination can help ensure seed purity, especially when growing multiple onion varieties in close proximity.
Regularly inspect your onion plants for signs of pests or diseases that could affect seed production, and take appropriate measures to address any issues promptly.

Knight onion seeds - Price €1.95

Conclusion:

Harvesting onion seeds is a rewarding endeavor that allows gardeners to deepen their connection to the natural world and preserve the rich diversity of onion varieties for generations to come. By following the guidelines outlined in this comprehensive guide, you’ll be well-equipped to master the art of onion seed harvesting and enjoy a bountiful harvest of seeds for years to come.

How to Grow Tea Plant: Expert Tips for a Thriving Garden

How to Grow Tea Plant

How to grow tea plant, Tea is not just a beverage; it’s a tradition, a culture, and for many, a way of life. Imagine being able to step into your garden, pluck fresh tea leaves, and brew yourself a cup of tea straight from nature’s bounty. Growing your own tea plant can be a rewarding experience, both spiritually and gastronomically. In this comprehensive guide, we’ll delve into the art and science of cultivating tea plants, ensuring they thrive in your garden and provide you with an abundant harvest for years to come.

Understanding Tea Plants

Before delving into the specifics of cultivation, let’s acquaint ourselves with the tea plant (Camellia sinensis). Originating from East Asia, this evergreen shrub is the foundation of the world’s most cherished beverage. Tea plants flourish in subtropical climates, but with proper care, they can thrive in diverse environments. Various types of tea plants exist, each boasting distinct flavors and traits, yet they all adhere to similar cultivation standards for “How to Grow Tea Plant“.

How To Grow Tea: Guide To Growing Tea At Home

Choosing the Right Location

Tea plants prefer well-drained, acidic soil and partial shade. When selecting a location in your garden, aim for an area that receives morning sunlight but is sheltered from intense afternoon rays. Avoid areas prone to waterlogging, as excessive moisture can harm the plants’ roots. If you’re unsure about your soil’s pH level, consider conducting a soil test and amending it accordingly to create optimal growing conditions for your tea plants.

Planting Techniques

Now that you’ve identified the perfect spot, it’s time to get your hands dirty. Tea plants can be propagated from seeds or cuttings, though cuttings are preferred for their genetic consistency. Prepare the planting site by loosening the soil and incorporating organic matter to improve its texture and fertility. Dig a hole slightly larger than the plant’s root ball and gently place the tea plant into the hole, ensuring it sits at the same depth as it did in its container. Backfill the hole and water thoroughly to settle the soil around the roots.

Pinkies Up! A Local Tea Movement Is Brewing | Iowa Public Radio

How to Grow Tea Plant, Caring for Your Tea Plants

Like any living organism, tea plants require care and attention to thrive. Here are some essential tips for ensuring your tea plants remain healthy and productive:

Watering:
Tea plants prefer consistent moisture, so water them regularly, especially during dry spells. Avoid overwatering, as soggy soil can lead to root rot.

Fertilization:
Feed your tea plants with a balanced fertilizer formulated for acid-loving plants. Apply fertilizer in early spring and again in late summer to promote vigorous growth and abundant foliage.

Pruning:
Prune your tea plants annually to maintain their shape and encourage new growth. Remove any dead or diseased branches, as well as any crossed or overcrowded stems.

Pest and Disease Control:
Keep an eye out for common pests such as aphids and mites, and treat infestations promptly to prevent damage to your tea plants. Neem oil and insecticidal soap are effective natural remedies for controlling pests. Additionally, practice good garden hygiene to minimize the risk of fungal diseases.

Harvesting and Processing Tea Leaves

The moment you’ve been waiting for has arrived – it’s time to harvest your tea leaves! Tea leaves can be harvested once the plants reach maturity, typically after two to three years of growth. To harvest tea leaves, pluck the tender young shoots, known as flushes, from the tips of the branches. Avoid harvesting more than one-third of the plant’s foliage at a time to ensure continued growth and productivity.

Into The Bloom: How To Grow Tea Plant At Home | HerZindagi

Once harvested, tea leaves undergo a series of processing steps to transform them into the beverage we know and love. These steps may vary depending on the type of tea you wish to produce, whether it’s green, black, oolong, or white tea. Common processing techniques include withering, rolling, oxidizing, and drying, each imparting unique flavors and characteristics to the final product.

Conclusion

Growing tea plants in your garden is a fulfilling endeavor that connects you to nature’s bounty and allows you to savor the true essence of tea. By understanding the needs of tea plants and providing them with the care they deserve, you can cultivate a thriving tea garden that delights your senses and nourishes your soul. So roll up your sleeves, dig in the dirt, and embark on your journey to tea-growing success with confidence and enthusiasm!

How to Grow Elaichi: A Beginner’s Guide

How to Grow Elaichi

How to grow Elaichi, also known as cardamom, is not just a popular spice used in culinary delights but also a delightful addition to any garden. Its aromatic pods and lush green foliage make it a prized possession for gardeners. In this comprehensive guide, we will delve into the intricacies of growing elaichi plants, suitable for beginners and seasoned gardeners alike. Whether you’re embarking on your gardening journey or seeking to enhance your existing skills, mastering the art of cultivating elaichi promises a rewarding experience filled with aromatic abundance and aesthetic appeal.

Cardamom - Wikipedia

Understanding Elaichi:

Elaichi, a member of the ginger family, is renowned for its aromatic pods and thrives in tropical climates. Its cultivation demands warmth, consistent moisture, and well-drained soil to ensure optimal growth and flavor development. Green cardamom (Elettaria cardamomum) and black cardamom (Amomum subulatum) are the two primary varieties, each possessing distinct flavors and specific environmental requirements essential for successful cultivation.

Choosing the Right Location:

Selecting the ideal location is crucial for ensuring the successful growth of elaichi plants. When determining the site, prioritize areas that receive partial shade to full sunlight, allowing for optimal photosynthesis without exposing the plants to harsh direct sunlight. Additionally, it’s essential to choose soil rich in organic matter to facilitate nutrient absorption and promote robust root development. Adequate drainage is equally important to prevent waterlogging, a prevalent factor contributing to root rot in elaichi plants.

How to Grow Cardamom | Growing Cardamom (Elaichi) | Growing vegetables, Growing vegetables indoors, Indoor vegetable gardening

How to Grow Elaichi, Planting Elaichi:

The process of planting elaichi involves either propagating from seeds or dividing existing clumps, offering flexibility to growers. When starting from seeds, shallow sowing in well-drained soil is advised, with consistent moisture upkeep until germination occurs. Transplant seedlings once they’ve developed several sets of leaves, ensuring their delicate roots are undisturbed. For clump division, ensure each division has ample healthy roots and transplant into prepared soil to foster seamless growth.

Caring for Elaichi Plants:

Effective care for elaichi plants entails regular watering, especially during dry periods, to maintain optimal moisture levels crucial for growth and flavor development. Mulching around the base of plants serves multiple purposes, including moisture retention, weed suppression, and soil insulation. Additionally, fertilizing with a balanced fertilizer throughout the growing season is pivotal for stimulating healthy foliage growth and ensuring a bountiful harvest of flavorful pods.

Harvesting Elaichi:

Patience is key when it comes to harvesting elaichi, as plants typically take two to three years to reach maturity and yield pods. Harvest the pods when they attain full size and vibrant green coloration, indicating ripeness. The harvesting process can involve either individual pod plucking or cutting entire stems for subsequent drying. Storing harvested pods in airtight containers shields them from direct sunlight exposure, preserving their delicate flavor and aroma for extended periods.

Common Pests and Diseases:

Despite their resilience, elaichi plants are susceptible to various pests and diseases, necessitating vigilant monitoring and proactive pest management strategies. Common adversaries include aphids, spider mites, and fungal infections, which can compromise plant health and yield if left unchecked. Regular inspections enable early detection, facilitating timely intervention through the application of organic pesticides and fungicides to maintain a conducive growing environment and ensure optimal plant health.

Cardamom | Diseases and Pests, Description, Uses, Propagation

Conclusion:

Growing elaichi plants can be a rewarding experience, especially when you master the art of “how to grow elaichi.” These plants offer aromatic pods for culinary delights and lush green foliage for aesthetic appeal. By following the tips outlined in this guide, you can embark on a successful journey of cultivating this prized spice in your garden. Remember, patience and diligence are key virtues in gardening. With proper care and attention, your elaichi plants will thrive and reward you with bountiful harvests for years to come. Happy gardening!

Step-by-Step Guide: How to Grow Areca Palm Successfully

How to Grow Areca Palm

How to grow Areca Palm, known for its graceful fronds and air-purifying qualities, is a popular choice among indoor gardeners. Its vibrant green foliage adds a touch of tropical elegance to any space, making it a prized possession for both novice and seasoned plant enthusiasts alike. If you’re new to gardening or simply looking to expand your indoor greenery collection, learning how to grow Areca Palm can be an enriching experience. In this comprehensive guide, we’ll delve into everything you need to know to cultivate and care for this stunning plant.

File:Areca palm 1.jpg - Wikimedia Commons

Understanding Areca Palm

Areca Palm, scientifically known as Dypsis lutescens or Chrysalidocarpus lutescens, is native to Madagascar and is often referred to as the Butterfly Palm or Golden Cane Palm. Its slender, yellowish-green stems are crowned with feathery, arching fronds, creating a lush canopy that resembles a tropical paradise. In optimal conditions, Areca Palm can grow up to 6 to 7 feet indoors, adding a touch of luxury to your home or office space.

Selecting the Right Location

Before diving into the intricacies of cultivation, it’s essential to choose the ideal location for your Areca Palm. This tropical beauty thrives in bright, indirect light, making it perfect for spaces with filtered sunlight. Avoid placing it in direct sunlight, as this can scorch the delicate fronds. Additionally, ensure adequate airflow around the plant to prevent the onset of pests and diseases.

How to Grow Areca Palm, Soil and Potting

Areca Palms prefer well-draining, slightly acidic soil that mimics their natural habitat. A mixture of peat moss, perlite, and sand creates the perfect growing medium, allowing excess water to drain freely while retaining essential moisture. When potting your Areca Palm, opt for a container with drainage holes to prevent waterlogging, which can lead to root rot.

11 – Areca Palm Tree of the Dougherty Garden – Transitions Over Time –  November 7, 2014 | Palms of the Dougherty Garden

Watering and Humidity

Maintaining proper moisture levels is crucial for the health and vitality of your Areca Palm. Water your plant thoroughly when the top inch of soil feels dry to the touch, ensuring that excess water drains out of the pot. However, avoid overwatering, as this can lead to root rot and other fungal diseases. To enhance humidity levels, consider misting the foliage regularly or placing a humidifier nearby, especially during the dry winter months.

Temperature and Climate

Areca Palms thrive in warm, humid environments reminiscent of their native habitat. Ideally, keep temperatures between 65°F to 75°F during the day and slightly cooler at night. Avoid exposing the plant to temperature extremes or drafts, as this can cause stress and leaf damage. If you live in a region with harsh winters, protect your Areca Palm from cold drafts and consider moving it indoors until the weather improves.

Fertilizing and Maintenance

Regular fertilization is essential for promoting healthy growth and vibrant foliage. During the growing season, from spring to early fall, apply a balanced liquid fertilizer every 4-6 weeks to replenish essential nutrients. However, reduce fertilization frequency during the winter months when growth slows down. Additionally, remove any yellowing or dead fronds regularly to maintain the plant’s appearance and prevent pest infestations.

CEPRA Landscape News | Palm Pests

Common Pests and Diseases

While Areca Palms are relatively resilient, they are susceptible to pests such as spider mites, mealybugs, and scale insects. Keep a close eye on your plant for any signs of infestation, such as webbing, sticky residue, or distorted growth, and treat them promptly with organic insecticidal soap or neem oil. Additionally, watch out for fungal diseases like root rot and leaf spot, which can occur due to overwatering or poor ventilation.

Propagation

Propagating Areca Palm is relatively straightforward and can be achieved through division or by planting fresh seeds. Divide mature plants during repotting, ensuring that each division has a healthy root system and several leafy stems. Alternatively, collect ripe seeds from the plant’s berries and sow them in a well-draining potting mix. Keep the soil consistently moist and provide warmth and indirect light for optimal germination.

Areca Palm Butterfly Palm Chrysalidocarpus lutescens 10 Seeds USA Comp –  R&B Floridaseeds

Conclusion

In conclusion, growing Areca Palm is a rewarding endeavor that brings a touch of tropical paradise into your home or office space. By following these expert tips and techniques, even beginners can successfully cultivate and care for this stunning plant. From selecting the right location to providing proper watering and maintenance, creating an ideal environment for your Areca Palm ensures years of lush greenery and natural beauty. Embrace the joy of gardening and watch as your Areca Palm flourishes into a majestic centerpiece of your indoor oasis.

With patience, dedication, and a bit of green-thumb magic, you’ll soon be rewarded with a thriving Areca Palm that not only enhances your surroundings but also uplifts your spirits with its timeless elegance. Happy gardening!

How to Grow Parijat Plant Successfully: Unlock the Secrets

how to grow parijat plant

Introduction

How to grow Parijat plant, Parijat, also known as Nyctanthes arbor-tristis or the Night-flowering Jasmine, is a fascinating and revered plant in many cultures. Renowned for its fragrant blossoms and ethereal beauty, cultivating Parijat plants can be a rewarding experience for any gardener. However, like any other plant, Parijat requires specific care and attention to thrive. In this comprehensive guide, we will delve into the intricacies of growing Parijat plants successfully, from understanding its origins to mastering its cultivation techniques.

Parijat Plant, Night Flowering Jasmine - Nestreeo.com

Understanding the Parijat Plant

Before diving into the intricacies of cultivating the Parijat plant, let’s grasp its traits and needs. Originating from South Asia, notably India and Bangladesh, Parijat is a petite tree or shrub in the Oleaceae family. Recognized for its fragrant, nocturnal, star-shaped white blossoms, it’s crucial to understand these characteristics when learning how to grow Parijat plant.

Choosing the Right Location

Selecting an appropriate location is crucial for the successful cultivation of Parijat plants. These plants thrive in warm, tropical climates and prefer well-drained soil with good moisture retention. Choose a spot in your garden that receives partial sunlight to full sunlight for at least a few hours each day.

How to grow Parijat plant, Preparing the Soil

Prepare the soil before planting your Parijat sapling. Ensure that the soil is well-drained and rich in organic matter. Incorporate compost or aged manure into the soil to improve its fertility and texture. Parijat plants prefer slightly acidic to neutral soil with a pH level between 6.0 and 7.5.

Planting Parijat Saplings

When planting Parijat saplings, dig a hole slightly larger than the root ball of the plant. Gently place the sapling in the hole, ensuring that the top of the root ball is level with the surrounding soil. Backfill the hole with soil and pat it gently to remove any air pockets. Water the newly planted sapling thoroughly to help it establish roots.

Let us Grow the Kalp Vriksha or Parij,harsingar,Night Jasmine in our homes | Blog.Nurserylive.com | gardening in india

Watering and Moisture

Proper watering is essential for the healthy growth of Parijat plants. While they prefer slightly moist soil, they are susceptible to root rot if overwatered. Allow the soil to dry slightly between watering sessions, and avoid waterlogging the soil. During dry spells or hot weather, increase the frequency of watering to keep the soil consistently moist.

Fertilization

Fertilize Parijat plants regularly to promote healthy growth and abundant flowering. Use a balanced fertilizer formulated for flowering plants, and apply it according to the manufacturer’s instructions. Avoid over-fertilizing, as excessive nutrients can lead to lush foliage at the expense of flowers.

Pruning and Maintenance

Regular pruning is essential to maintain the shape and health of Parijat plants. Remove dead or diseased branches, as well as any overcrowded or crossing branches. Pruning also encourages new growth and enhances flowering. Conduct pruning during the plant’s dormant season, typically in late winter or early spring.

Pest and Disease Management

Parijat plants are relatively resistant to pests and diseases, but occasional problems may arise. Keep an eye out for common pests such as aphids, scale insects, and whiteflies. If infestations occur, treat them promptly with insecticidal soap or neem oil. Additionally, ensure good air circulation around the plants to prevent fungal diseases such as powdery mildew.

Parijat Tree 101 : Steps To Grow Night-Flowering Jasmin

Harvesting Flowers

One of the most rewarding aspects of growing Parijat plants is harvesting their fragrant flowers. Parijat flowers bloom at night and begin to wither by morning, so it’s best to harvest them in the early morning hours. Gently pluck the flowers from the plant and use them fresh or dry them for future use in teas, potpourri, or floral arrangements.

Conclusion

Growing Parijat plants can be a deeply fulfilling endeavor for gardeners seeking to add beauty and fragrance to their outdoor spaces. By following the guidelines outlined in this comprehensive guide, you can cultivate healthy and thriving Parijat plants in your garden. Remember to provide the right growing conditions, including sunlight, well-drained soil, and appropriate care. With patience and dedication, you’ll be rewarded with the enchanting beauty and heavenly fragrance of Parijat flowers in your garden for years to come.

How to grow walnut: A Beginner’s Guide in 10 Simple Steps

how to grow walnut

How to grow walnut, Unlock the secrets of successful walnut cultivation with our comprehensive guide tailored for beginners. In this article, we’ll walk you through the process of growing walnuts in 10 easy-to-follow steps, ensuring a bountiful harvest for years to come.

Step 1: How to grow walnut, Selecting the Right Location

Choosing the perfect spot for your walnut tree is crucial for its overall health and productivity. Opt for a sunny location with well-drained soil and ample space for the tree to establish its roots and spread comfortably. Consider factors such as sunlight exposure, air circulation, and proximity to other plants.

How to Chandler Walnut Tree Pruning and Fertilizing? - YouTube

Step 2: Preparing the Soil

Prepare the soil meticulously to create an optimal growing environment for your walnut tree. Begin by loosening the soil to a depth of at least 18 inches using a shovel or garden fork. Incorporate organic matter such as compost or aged manure to improve soil fertility, structure, and drainage. This step is essential for providing the necessary nutrients and moisture retention for healthy root development.

Step 3: Choosing the Variety

how to grow walnut, Selecting the right walnut tree variety is crucial to ensure successful growth and productivity in your specific climate and growing conditions. Common walnut varieties include English, Black, and Persian walnuts, each with its unique characteristics and requirements. Consider factors such as climate, soil type, and available space when choosing the variety best suited to your garden or orchard.

Step 4: Planting the Tree

Plant your walnut tree during the dormant season, typically in late winter or early spring, to promote optimal root establishment and growth. Before planting, dig a hole slightly larger than the tree’s root ball and carefully position the tree at the same depth as it was in the nursery container. Ensure the tree is planted firmly and water thoroughly after planting to settle the soil around the roots.

How to plant walnut saplings & Mistakes Made | Misbell

Step 5: Providing Adequate Water

Water is essential for the healthy growth and development of walnut trees, especially during the establishment phase. Ensure your walnut tree receives sufficient water, particularly during hot and dry periods, to prevent stress and dehydration. Water deeply and regularly, allowing the soil to dry out slightly between waterings to avoid waterlogging and root rot.

Step 6: Fertilizing Regularly

Regular fertilization is essential to provide walnut trees with the necessary nutrients for vigorous growth and abundant fruit production. Feed your walnut tree with a balanced fertilizer formulated for fruit trees, following the manufacturer’s instructions for application rates and timing. Apply fertilizer in early spring before new growth begins to support healthy foliage and fruit development throughout the growing season.

Walnut Archives » iran dried fruit

Step 7: Pruning for Structure

Pruning is a vital aspect of walnut tree care, helping to promote strong branch structure, improve air circulation, and enhance overall tree health and productivity. Prune your walnut tree annually during the dormant season to remove dead, diseased, or damaged branches and thin out crowded areas to allow for better light penetration and air movement. Additionally, shaping the tree’s canopy can help encourage upward growth and facilitate easier harvesting and maintenance.

Step 8: Protecting Against Pests and Diseases

Monitoring your walnut tree regularly for signs of pests and diseases is essential for early detection and prevention of potential problems. Common pests that affect walnut trees include aphids, walnut husk flies, and various fungal infections, which can cause damage to foliage, flowers, and fruit if left untreated. Implementing integrated pest management strategies such as proper sanitation, biological controls, and cultural practices can help minimize pest and disease pressures while reducing the need for chemical interventions.

Step 9: Harvesting Your Walnuts

Patience is key when it comes to harvesting walnuts, as they require adequate time to mature and develop their characteristic flavor and texture. Wait until the husks surrounding the nuts split open and the nuts inside turn brown before harvesting. This usually occurs in late summer or early fall, depending on the variety and growing conditions. Once ready, collect the nuts from the ground and remove the husks promptly to prevent staining and spoilage. Allow the nuts to dry thoroughly before storing or cracking them open to enjoy their delicious kernels.

Step 10: Enjoying the Fruits of Your Labor

Congratulations on successfully growing your own walnuts! Now it’s time to reap the rewards of your hard work and patience. Whether you prefer to enjoy the nuts straight from the shell or incorporate them into your favorite recipes, homegrown walnuts offer a delicious and nutritious addition to your culinary endeavors. Share the bounty with friends and family or savor the satisfaction of enjoying your homegrown harvest all to yourself.

Walnut Tree Care - How To Grow A Walnut Tree | Gardening Know How

Embarking on the journey of “how to grow walnut” may seem daunting at first, but with the right knowledge, preparation, and care, anyone can successfully grow these delicious nuts at home. By following our comprehensive 10-step guide, you’ll be well-equipped to nurture healthy walnut trees and enjoy a bountiful harvest for years to come. Happy gardening!

Cultivating Green Goodness: A Complete Guide on How to Grow Fenugreek at Home

how to grow fenugreek at home

How to grow Fenugreek at home, Fenugreek, with its distinctive flavor and nutritional benefits, is a versatile herb that can easily be grown at home. In this comprehensive guide on how to grow fenugreek at home, we’ll delve into the step-by-step process of cultivating fenugreek in your own garden or indoor space.

Understanding Fenugreek:

Fenugreek (Trigonella foenum-graecum) is an annual herb native to the Mediterranean region and South Asia. It belongs to the Fabaceae family and is prized for its edible leaves, seeds, and sprouts, which are commonly used in culinary dishes and traditional medicine. Fenugreek has a slightly bitter taste with hints of sweetness, making it a popular ingredient in Indian, Middle Eastern, and Mediterranean cuisines.

Amazon.com : Fenugreek Herb Seeds - Non-GMO - 1 Gram, Approximately 60 Seeds : Herb Plants : Patio, Lawn & Garden

How to grow Fenugreek at home, Selecting Fenugreek Seeds:

When growing fenugreek at home, it’s essential to start with high-quality seeds to ensure successful germination and healthy plant growth. Look for fenugreek seeds from reputable suppliers or nurseries that specialize in organic and heirloom varieties. Opt for seeds that are fresh, plump, and free from signs of damage or decay, as these are more likely to produce vigorous and productive plants.

Preparing the Growing Environment:

Before we learn how to grow Fenugreek at home we should have knowledge about growing condition.  Fenugreek thrives in well-drained soil with a neutral to slightly acidic pH and requires ample sunlight to flourish. Before planting, prepare the growing environment by selecting a sunny location with fertile, loamy soil. If planting in containers or pots, choose a well-draining potting mix enriched with organic matter such as compost or aged manure. Ensure adequate drainage to prevent waterlogging, which can lead to root rot and other issues.

Planting Fenugreek Seeds:

Fenugreek seeds can be directly sown into the ground or started indoors in seed trays or pots. If sowing directly outdoors, plant the seeds about 1/4 inch deep and space them 2 to 3 inches apart in rows or clusters. Water the seeds gently after planting and keep the soil consistently moist until germination occurs, typically within 7 to 10 days. If starting seeds indoors, plant them in seed trays filled with moist potting mix and place them in a warm, sunny location.

How to Plant and Grow Fenugreek | Gardener's Path

Caring for Fenugreek Plants:

Once germinated, fenugreek plants require minimal care to thrive. Water the plants regularly to keep the soil evenly moist but not waterlogged, especially during hot and dry periods. Avoid overwatering, as this can lead to root rot and other problems. Mulching around the base of the plants can help conserve moisture, suppress weeds, and regulate soil temperature.

Fertilizing Fenugreek Plants:

Fenugreek is a relatively low-maintenance herb that doesn’t require heavy fertilization. However, you can apply a balanced, water-soluble fertilizer diluted to half strength every 4 to 6 weeks during the growing season to promote healthy growth and development. Avoid over-fertilizing, as this can lead to excessive leafy growth at the expense of seed production.

Harvesting Fenugreek Leaves:

Fenugreek leaves, also known as methi, can be harvested when the plants reach a height of 6 to 8 inches and have developed several sets of true leaves. Use sharp scissors or pruning shears to snip off individual leaves or cut the entire plant down to ground level, leaving about 1 inch of stem intact. Fenugreek leaves are best harvested in the morning when they are fresh and tender, before the sun’s heat causes them to wilt.

Welcome to My Random Garden: Growing and harvesting Fenugreek(methi) leaves

Using Fenugreek Leaves in Cooking:

Apart from just learning “how to grow fenugreek at home,” it’s essential to understand its versatile uses in cooking.Fresh fenugreek leaves add a distinctive flavor and aroma to a wide range of culinary dishes, including curries, stews, salads, and soups. They can be used as a flavorful herb or cooked as a leafy green vegetable. Fenugreek leaves are rich in vitamins, minerals, and antioxidants, making them a nutritious addition to any meal. To preserve their freshness and flavor, store fenugreek leaves in the refrigerator in a plastic bag or container for up to one week.

Harvesting Fenugreek Seeds:

When learning how to grow fenugreek at home, understanding the harvesting process is crucial. Fenugreek seeds can be harvested when the plants begin to turn yellow and the seed pods turn brown and dry. Allow the seed pods to mature fully on the plant before harvesting to ensure maximum seed viability. Use sharp scissors or pruning shears to cut the seed pods from the plant, then spread them out in a single layer on a clean, dry surface to finish drying. Once dry, thresh the seeds from the pods and store them in a cool, dry place in an airtight container for future use.

Fenugreek | Description, Plant, Seeds, Uses, & Facts | Britannica

Growing fenugreek at home is a rewarding and satisfying experience that allows you to enjoy the fresh flavors and nutritional benefits of this versatile herb. By selecting high-quality seeds, preparing the growing environment, planting with care, and providing proper care and maintenance, you can cultivate healthy fenugreek plants in your own garden or indoor space. Whether used in cooking, medicine, or as a culinary herb, fenugreek adds a unique flavor and aroma to a wide range of dishes and enhances the overall enjoyment of process of “How to grow Fenugreek at home”.

How to Grow Your Lemon Tree Faster: Proven Techniques for Quick Results

How to Grow Your Lemon Tree Faster

How to grow your lemon tree faster, Lemon trees are not only beautiful additions to any garden but also provide an abundance of bright, tangy fruit. However, waiting for your lemon tree to reach maturity and produce a bountiful harvest can test even the most patient gardener. Fortunately, there are several techniques you can employ to speed up the growth of your lemon tree and enjoy its fruits sooner. In this guide, we’ll delve into the essential steps and strategies to help your lemon tree thrive and grow faster.

File:Lemon Tree in Santa Clara California.jpg - Wikimedia Commons

How to Grow Your Lemon Tree Faster, Choosing the Right Variety:

Selecting the right lemon tree variety is the first step towards expediting its growth. Some lemon tree cultivars are known for their faster growth rates and earlier fruiting. Varieties such as Meyer lemon (Citrus × meyeri) and Eureka lemon (Citrus × limon ‘Eureka’) are popular choices for their relatively quick maturation and abundant yields.

Optimal Growing Conditions:

Providing your lemon tree with the ideal growing conditions is crucial for promoting rapid growth. Lemon trees thrive in full sunlight, so ensure they receive at least 6 to 8 hours of direct sunlight daily. Additionally, lemon trees prefer well-draining soil with a slightly acidic pH level of around 6.0 to 7.0. Amend the soil with organic matter like compost or aged manure to improve its texture and fertility.

Proper Planting and Spacing:

When planting your lemon tree, ensure proper spacing to prevent competition for resources and allow for adequate airflow. Planting lemon trees too close together can result in stunted growth and decreased productivity. Space standard lemon trees approximately 12 to 15 feet apart, while dwarf varieties can be planted 6 to 10 feet apart.

How to Plant, Grow & Care for Lemon Tree (Step-by-Step Guide)

Regular Watering and Fertilization:

How to grow your lemon tree faster, Consistent watering is essential for encouraging vigorous growth in lemon trees. Provide your lemon tree with deep, thorough watering, allowing the soil to dry out slightly between watering sessions. During the growing season, apply a balanced fertilizer formulated for citrus trees every 6 to 8 weeks to supply essential nutrients. Avoid over-fertilization, as it can lead to excessive vegetative growth at the expense of fruit production.

Pruning and Training:

Pruning plays a vital role in shaping the growth of your lemon tree and stimulating fruit production. Remove any dead, diseased, or crossing branches to promote airflow and reduce the risk of pests and diseases. Additionally, selectively prune to open up the canopy and allow sunlight to penetrate the inner branches. Training your lemon tree to a central leader or an open-center shape can help maximize sunlight exposure and encourage uniform growth.

Pest and Disease Management:

Pests and diseases can hinder the growth and development of lemon trees if left unchecked. Monitor your lemon tree regularly for signs of pests such as aphids, scale insects, or citrus leaf miners. Implement cultural control methods such as maintaining proper sanitation, removing affected plant parts, and encouraging beneficial insects. Consider using organic pest control products or horticultural oils to manage pest infestations effectively.

11 Citrus Tree Pests and Diseases That Can Destroy Your Grove

Protection from Extreme Conditions:

Lemon trees are sensitive to cold temperatures and frost, which can damage foliage and inhibit growth. If you live in a region with occasional frost, consider planting your lemon tree in a sheltered location or providing frost protection during cold spells. Covering your lemon tree with frost cloth or applying a layer of mulch around the base can help insulate the roots and protect against temperature fluctuations.

How to grow your lemon tree faster, Growing a lemon tree faster requires careful attention to its needs and providing optimal growing conditions. By selecting the right variety, ensuring proper planting and spacing, providing regular watering and fertilization, pruning and training the tree, managing pests and diseases, and protecting it from extreme conditions, you can encourage vigorous growth and earlier fruiting. With patience and dedication, you’ll soon be rewarded with a thriving lemon tree laden with juicy, flavorful fruits.

How To Grow Dragon Fruit in Pots

how to grow dragon fruit in pots

How to Grow Dragon Fruit in Pots: Tips and Tricks

Dragon fruit, also known as pitaya or pitahaya, is a unique and exotic fruit that has gained popularity for its striking appearance and delicious taste. If you’re a gardening enthusiast or someone with limited space, you’ll be delighted to know that you can grow dragon fruit in pots. In this comprehensive guide, we’ll walk you through the step-by-step process of cultivating these vibrant cacti fruits in containers.

pyroleppard User Profile | DeviantArt

Choosing the Right Pot:

how to grow dragon fruit in pots, The first step in grow dragon fruit in pots is selecting the right container. Opt for a large pot with drainage holes to ensure proper water drainage. Dragon fruit plants have shallow root systems, so a wide and shallow pot is ideal. A container with a diameter of at least 15-24 inches is recommended to provide ample space for the plant to spread its roots.

Selecting the Right Soil:

Dragon fruit thrives in well-draining soil with a slightly acidic to neutral pH. Consider using a cactus mix or create your own by combining potting soil with perlite or sand to enhance drainage. This prevents waterlogged soil, a condition that dragon fruit plants do not tolerate well.

Planting the Dragon Fruit Cutting:

Dragon fruit is typically grown from cuttings rather than seeds. Obtain a healthy cutting from a mature dragon fruit plant, ensuring it is at least 12-18 inches long. Allow the cutting to dry for a day or two before planting to reduce the risk of rot.

Plant the cutting in the prepared pot, burying it about 2-4 inches deep. Position the cutting at a slight angle to encourage root development. Water the plant lightly, and avoid overwatering during the initial weeks to prevent root rot.

Propagating Dragon Fruit From Cuttings - Gardenerd

Providing Optimal Growing Conditions:

Dragon fruit plants thrive in warm, sunny climates, so choose a location that receives full sunlight. If you’re growing dragon fruit indoors, place the pot near a south-facing window or use grow lights to provide sufficient light.

Maintain a consistent watering schedule, allowing the soil to dry out between watering sessions. Overwatering is a common mistake, so it’s crucial to strike a balance.

Supporting the Growing Plant:

how to grow dragon fruit in pots, As your dragon fruit plant matures, it will need support to prevent sprawling. Install a trellis or stakes in the pot to provide stability for the growing cactus. This not only aids in maintaining an upright structure but also enhances air circulation around the plant.

How to Grow Dragon Fruits in Pots [Simple] - Farming Method | How to grow dragon fruit, Dragon fruit tree, Dragon fruit plant

Fertilizing the Dragon Fruit:

how to grow dragon fruit in pots, During the growing season (spring and summer), feed your dragon fruit with a balanced, water-soluble fertilizer every 4-6 weeks. Reduce or eliminate fertilization during the dormant season (fall and winter) when the plant’s growth slows down.

Harvesting Your Dragon Fruit:

Patience is key when growing dragon fruit. The plant typically starts producing fruit within one to two years. Harvest the dragon fruit when the skin color changes and the fruit gives slightly to gentle pressure. Use pruning shears to cut the fruit from the plant.

How to Grow Dragon Fruit in Pots - Step by Step Process Explained

how to grow dragon fruit in pots, To Grow dragon fruit in pots is a rewarding experience that allows you to enjoy this exotic fruit even in limited space. By providing the right conditions, proper care, and a little patience, you can savor the vibrant colors and delicious flavors of home-grown dragon fruit right from your own potted garden. Happy growing!