How to Grow Amla Tree: Ultimate Guide for Healthy Harvest

how to grow amla tree

In the realm of fruit-bearing trees, understanding how to grow amla tree stands as paramount for enthusiasts. The Amla tree, also known as the Indian gooseberry, offers a plethora of health benefits and an exotic charm to any garden. Cultivating an Amla tree successfully requires a blend of knowledge, care, and dedication. In this comprehensive guide, we’ll delve into everything you need to know to master the art of how to grow amla tree in your own backyard.

Understanding the Amla Tree

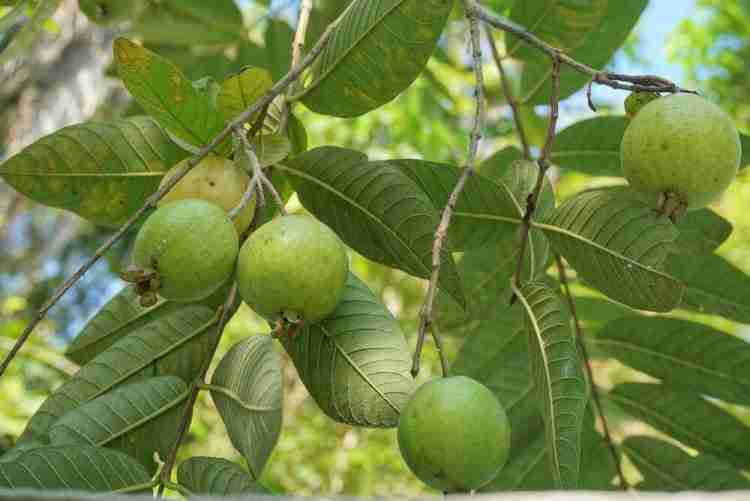
Before diving into the specifics of how to grow amla tree, it’s essential to understand its nature and requirements. Botanically known as Phyllanthus emblica, the Amla tree is native to the Indian subcontinent. It thrives in subtropical and tropical regions, reaching heights of 8 to 18 meters. The crooked trunk and spreading branches adorned with small, feathery leaves characterize its appearance. Its resilience and adaptability make it an attractive addition to any garden.

6 Emerging Benefits of Amla Juice

Selecting the Right Location

One of the critical factors in mastering how to grow amla tree is selecting the optimal location. Amla trees require ample sunlight to thrive, making a spot in your garden with full sun exposure essential. Additionally, ensuring well-draining soil is crucial to prevent waterlogging, which can harm the roots and overall health of the tree.

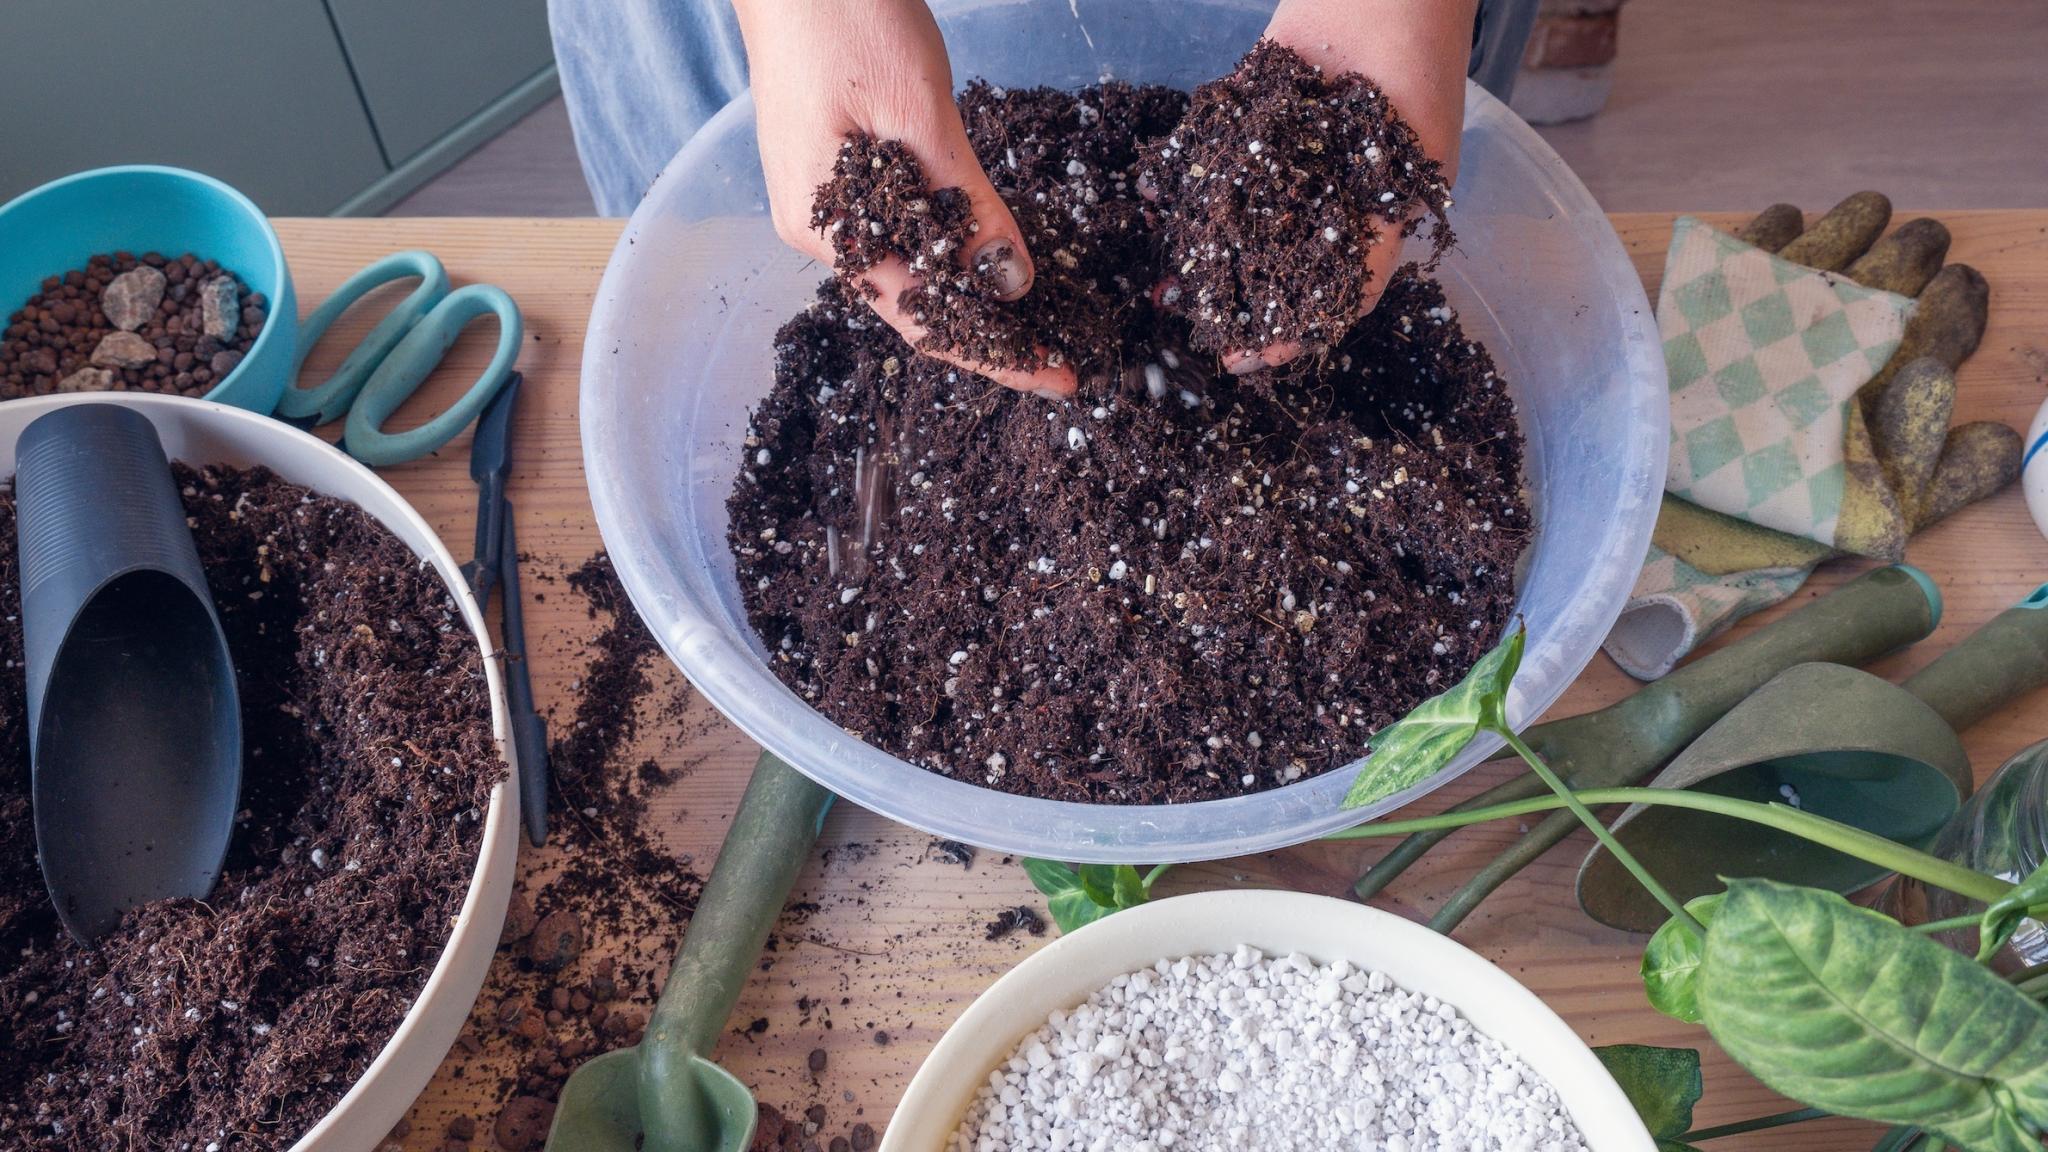
How to Grow Amla Tree, Preparing the Soil

Preparing the soil is a vital step in the journey of how to grow amla tree successfully. Amla trees prefer slightly acidic to neutral soil with a pH range of 5.5 to 7.5. Amending the soil with organic matter such as compost or well-rotted manure can improve its texture and fertility, creating an ideal environment for healthy root development.

Planting Your Amla Tree

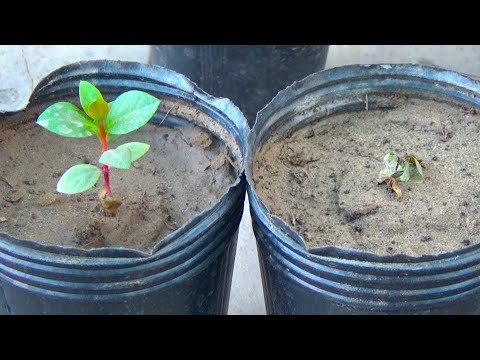
Now that you’ve prepared the soil, it’s time to plant your Amla tree. Whether you opt for bare-root or container-grown saplings, the planting process remains the same. Dig a hole twice the width of the tree’s root ball and of equal depth. Gently remove the sapling from its container or packaging, taking care not to disturb the roots, and place it in the center of the hole. Backfill the hole with soil, ensuring the tree is planted at the same depth as it was in the container, and water thoroughly to settle the soil.

Simple Guide on How to Grow Amla Seeds

Caring for Your Amla Tree

Proper care is essential for the health and productivity of your Amla tree. Regular watering, especially during dry periods, is crucial to keep the soil moist but not waterlogged. Mulching around the base of the tree can help retain moisture and suppress weeds. Fertilize your Amla tree with a balanced fertilizer in early spring to promote healthy growth and fruit production. Pruning is also necessary to maintain the tree’s shape and remove any dead or diseased branches.

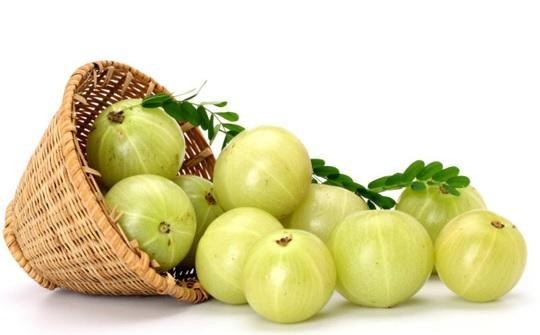
Harvesting Amla Fruits

With proper care and attention, your Amla tree will reward you with a bountiful harvest of nutritious fruits. Amla fruits typically ripen in late summer to early fall, turning from green to yellowish-green or light green when fully mature. Harvest the fruits by gently twisting them from the branch, taking care not to damage the surrounding foliage. Fresh Amla fruits can be enjoyed raw, juiced, or used in various culinary applications, including jams, chutneys, and preserves.

The Complete Guide to Amla Plant and Why You Should Add it to Your Die —  Kadiyam Nursery

Conclusion

Mastering how to grow amla tree requires patience, knowledge, and a love for gardening. By understanding the needs of the Amla tree and providing the proper care, you can enjoy a sustainable supply of vitamin-rich fruits straight from your garden. So roll up your sleeves, follow these guidelines, and embark on your journey to growing a healthy and fruitful Amla tree today!

Expert Tips: How to Grow Guava Plant Successfully

How to Grow Guava Plant

How to grow Guava plant, Guava, with its sweet tropical flavor and rich nutritional profile, is a delightful addition to any garden. Whether you’re a seasoned gardener or a novice enthusiast, cultivating your own guava plant can be a rewarding experience. In this comprehensive guide, we’ll walk you through everything you need to know about growing guava plants successfully.

Selecting the Right Variety:

Before diving into the cultivation process, it’s crucial to choose the right variety of guava for your climate and space. Common varieties include the strawberry guava, pineapple guava, and tropical guava. Research the specific requirements of each variety and select one that aligns with your gardening conditions, following the guidelines on “How to grow Guava plant“.

KRISH FARM Guava Plant Price in India - Buy KRISH FARM Guava Plant online at Flipkart.com

Ideal Growing Conditions:

Guava plants thrive in warm, tropical climates, but they can also adapt to subtropical regions, making them a versatile addition to various environments. Ensure your planting location receives ample sunlight, preferably at least six to eight hours a day, as sunlight is essential for robust growth and fruit production. Guava plants exhibit a remarkable ability to flourish in diverse soil types, yet they prefer well-draining soil with a pH range between 5.0 and 7.0 for optimal nutrient absorption and overall health. Additionally, they require consistent watering, particularly during the dry season, to establish and maintain healthy root systems, ensuring vigorous growth and abundant fruiting.

Planting Guava Seeds or Seedlings:

How to grow Guava plant, Guava plants can be grown from seeds or propagated from cuttings, providing multiple avenues for cultivation. If planting from seeds, it’s beneficial to soak them in water for 24 hours before planting to enhance germination rates and kickstart the growing process. Once prepared, sow the seeds in well-prepared soil, maintaining adequate moisture levels until germination occurs, fostering the emergence of strong, resilient seedlings. Alternatively, for those seeking a more accelerated start in the growing journey, guava seedlings are readily available at nurseries, offering a convenient and efficient option to initiate cultivation with established young plants.

703# How to Grow Guava Plants From Seeds | Result of 101 Days (Urdu/hindi) - YouTube

Caring for Guava Plants:

Once your guava plant is established, proper care is essential for optimal growth and fruit production. Keep the soil consistently moist but avoid overwatering, as guava plants are susceptible to root rot. Fertilize the plants regularly with a balanced fertilizer to promote healthy foliage and fruit development. Prune the branches periodically to maintain shape and improve air circulation within the canopy.

Pest and Disease Management:

Like any other plant, guava is prone to pests and diseases that can affect its health and productivity. Common pests include fruit flies, aphids, and scale insects, which can be controlled using organic insecticides or natural predators. Regularly inspect your plants for signs of disease, such as leaf spot or powdery mildew, and take appropriate measures to prevent spreading.

Forum: Pests On Guavas

Harvesting Guava Fruit:

How to grow Guava plant, Patience is key when it comes to harvesting guava fruit. Depending on the variety, it can take anywhere from 2 to 8 years for the plant to bear fruit. Guavas are typically ready for harvest when they emit a fragrant aroma and yield slightly to gentle pressure. Use pruning shears to harvest ripe fruit, taking care not to damage the branches or surrounding foliage.

Conclusion:

Growing guava plants requires dedication, patience, and a bit of know-how, but the rewards are well worth the effort. By following the guidelines outlined in this article on “How to grow Guava plant,” you can cultivate healthy guava plants and enjoy a bountiful harvest of delicious, nutritious fruit. Whether you’re a beginner or an experienced gardener, adding guava to your garden repertoire is sure to enhance your gardening experience and bring joy to your harvests.

Beginner’s Guide: How to Grow Kiwi Plants

How to Grow Kiwi Plants

How to grow Kiwi plants, Are you eager to add the exotic and delicious kiwi fruit to your garden’s bounty? Growing your own kiwi plants can be a rewarding endeavor, providing fresh, flavorful fruit right from your backyard. In this comprehensive guide, we’ll walk you through everything you need to know about how to grow kiwi plants successfully.

Understanding Kiwi Plants

Before you start planting kiwi vines in your garden, it’s essential to understand the basics of these fruit-bearing plants. Kiwi plants, also known as Actinidia deliciosa, are vigorous climbers native to China but now cultivated in many parts of the world. They are known for their woody vines and large, fuzzy fruits with tangy, sweet flesh.

File:Kiwi Fruit Orchard n.jpg - Wikimedia Commons

Choosing the Right Variety

One of the first steps in growing kiwi plants is selecting the right variety for your climate and space. Kiwi plants come in several different cultivars, each with its unique characteristics. Common varieties include Hayward, Bruno, and Issai. Consider factors such as cold hardiness, pollination requirements, and space availability when choosing the variety that suits your garden best.

Site Selection and Preparation

Kiwi plants thrive in well-drained soil and full sun, so choose a location in your garden that receives ample sunlight throughout the day. Before planting, prepare the soil by loosening it to a depth of at least 12 inches and incorporating organic matter such as compost or aged manure to improve fertility and drainage.

Planting Kiwi Vines

Plant kiwi vines in early spring once the threat of frost has passed. Space plants approximately 10 to 15 feet apart to allow for adequate air circulation and room to grow. Dig a hole slightly larger than the plant’s root ball and set it in the ground at the same depth it was growing in its container. Backfill the hole with soil, tamp it down gently, and water thoroughly to settle the soil around the roots.

Providing Support

Kiwi plants are vigorous climbers and require sturdy support structures to thrive. Install trellises, arbors, or pergolas to provide support for the vines as they grow. Secure the vines to the support structure using soft ties or twine, taking care not to damage the tender stems.

Watering and Fertilizing

Keep the soil consistently moist but not waterlogged, especially during the growing season and hot summer months. Mulching around the base of the plants can help retain moisture and suppress weeds. Fertilize kiwi plants annually in early spring with a balanced fertilizer to promote healthy growth and fruit production.

How to Grow Kiwis | BBC Gardeners World Magazine

How to Grow Kiwi Plants, Pollination

Most kiwi varieties are dioecious, meaning they have separate male and female plants. To ensure fruit production, you’ll need at least one male plant for every four female plants. Male plants produce pollen, which is essential for pollinating the flowers on female plants and setting fruit. Be sure to plant male and female vines in close proximity for successful pollination.

Pruning and Training

Regular pruning is essential for maintaining the health and productivity of kiwi plants. Prune in late winter or early spring while the plants are dormant to remove dead or diseased wood, shape the vines, and encourage fruiting spurs. Train the vines to grow along the support structure, removing any side shoots that develop below the main framework.

Pest and Disease Management

Keep an eye out for common pests and diseases that can affect kiwi plants, such as aphids, spider mites, powdery mildew, and bacterial canker. Regularly monitor your kiwi plants for signs of infestation or disease, and take prompt action to control and prevent further damage. Utilize organic insecticidal soaps and fungicides as part of your strategy on “How to Grow Kiwi Plants” to effectively manage pests and diseases and ensure the health of your crop.

Harvesting Kiwi Fruit

Kiwi fruit typically ripens in late summer to early fall, depending on the variety and growing conditions. Harvest fruits when they are firm but yield slightly to gentle pressure. Use pruning shears or scissors to cut the fruits from the vine, leaving a short stem attached. Kiwi fruits will continue to ripen after harvest if stored at room temperature.

Kiwi fruit tree: How to grow and take care?

Conclusion

Growing kiwi plants in your garden can be a rewarding experience, providing you with a bountiful harvest of delicious, nutritious fruits. By following the steps outlined in this guide and providing proper care and maintenance, you can enjoy the sweet taste of homegrown kiwis straight from your backyard. Get started today and embark on your journey to becoming a successful kiwi grower!

How to Grow Jackfruit at Home

how to grow jackfruit at home

how to grow jackfruit – From Seed to Harvest

Jackfruit, the giant tropical fruit known for its sweet and aromatic flesh, has become a sought-after addition to home gardens. If you’re ready to embark on a flavorful journey of jackfruit cultivation, this comprehensive guide will walk you through each step, providing insights into selecting the right variety, preparing the planting site, caring for your jackfruit tree, and eventually savoring the delicious harvest.

Choosing the Right Jackfruit Variety

Your journey into jackfruit cultivation begins with selecting the right variety. Each variety has unique characteristics, including taste, size, and adaptability to different climates. Consider factors such as your local climate, available space, and personal preference for fruit attributes. Popular varieties include ‘Black Gold,’ ‘J31,’ and ‘Ceylon.’

Preparing the Planting Site

how to grow jackfruit , Creating the optimal environment for your jackfruit tree is crucial for its success. Jackfruit trees thrive in warm, tropical climates but can also adapt to subtropical regions. Choose a well-draining site with abundant sunlight. Given the large size of mature jackfruit trees, plan for sufficient space to accommodate their expansive canopy.

Planting Jackfruit Seeds Right in the Ground - YouTube

Planting Jackfruit Seeds or Seedlings

Whether you opt for seeds or seedlings, preparing the soil is a key step. Ensure that the soil is rich in organic matter and well-draining. Plant seeds about 2 inches deep and water them consistently. If using seedlings, transplant them carefully, ensuring the root system remains intact.

1. Watering:

Jackfruit trees thrive in consistently moist soil. Adequate watering is vital, especially during dry periods, to maintain soil moisture levels. Deep watering, allowing the water to penetrate the root zone, is beneficial for the tree’s hydration. However, during the winter months or in periods of reduced growth, it’s advisable to scale back on watering, preventing waterlogged conditions that can harm the roots.

2. Fertilization:

For optimal growth and development, jackfruit trees benefit from a balanced fertilizer regimen. During the growing season, typically spring and summer, provide a slow-release fertilizer every 2-3 months. This ensures a steady supply of essential nutrients, promoting healthy foliage, robust root development, and ultimately, fruitful production. Selecting a fertilizer specifically formulated for fruit trees enhances the tree’s overall vigor.

3. Pruning:

Regular pruning is a key aspect of jackfruit tree care. It serves multiple purposes, including maintaining the tree’s desired shape, promoting air circulation through the canopy, and eliminating dead or diseased branches. Pruning also helps manage the tree’s size, preventing it from becoming overly dense. Additionally, it encourages the growth of new shoots and branches, contributing to a well-balanced and aesthetically pleasing tree. When pruning, use clean and sharp tools to minimize stress on the tree.

4. Protection from Pests:

Vigilance against pests is crucial for the well-being of your jackfruit tree. Common pests include aphids and scale insects, which can affect both the leaves and fruits. Regularly inspect the tree for signs of infestation, such as discoloration, wilting, or the presence of pests. To address pest issues, consider environmentally friendly approaches, such as using organic pesticides or insecticidal soaps. These alternatives effectively target pests while minimizing harm to beneficial insects and the overall ecosystem.

how to grow jackfruit , Implementing these care tips ensures that your jackfruit tree thrives in a healthy and nurturing environment. By maintaining proper soil moisture, providing essential nutrients through fertilization, practicing regular pruning, and protecting against pests, you contribute to the longevity and productivity of your jackfruit tree, ultimately yielding delicious and rewarding harvests.

Harvesting the Fruits

Patience is a virtue when growing jackfruit, as it may take several years for the tree to bear fruit. The signs of maturity include a sweet aroma emitted by the fruits. Once mature, use pruning shears to carefully cut the jackfruits, leaving a portion of the stem attached.

Where does our jackfruit come from? Right here 👆🏽 Grown + harvested by  farming families in India, our jackfruit … | Jackfruit facts, Jackfruit,  Whole food recipes

Delighting in the Fruits of Your Labor

Growing jackfruit is not only a horticultural endeavor but a rewarding experience that adds a tropical touch to your landscape. The fruits, once harvested, provide a sweet and versatile ingredient for a variety of culinary delights. Your effort in cultivating jackfruit at home will not only result in a bountiful harvest but also a visually stunning addition to your garden.

Jackfruit Golden Pillow - Just Berry Plants

how to grow jackfruit, learning how to grow jackfruit involves understanding the specific needs of this tropical tree. By following these comprehensive guidelines, you’re well-equipped to embark on a successful journey of cultivating your own jackfruit at home. Happy gardening and enjoy the flavorful fruits of your labor!

How To Grow Dragon Fruit in Pots

how to grow dragon fruit in pots

How to Grow Dragon Fruit in Pots: Tips and Tricks

Dragon fruit, also known as pitaya or pitahaya, is a unique and exotic fruit that has gained popularity for its striking appearance and delicious taste. If you’re a gardening enthusiast or someone with limited space, you’ll be delighted to know that you can grow dragon fruit in pots. In this comprehensive guide, we’ll walk you through the step-by-step process of cultivating these vibrant cacti fruits in containers.

pyroleppard User Profile | DeviantArt

Choosing the Right Pot:

how to grow dragon fruit in pots, The first step in grow dragon fruit in pots is selecting the right container. Opt for a large pot with drainage holes to ensure proper water drainage. Dragon fruit plants have shallow root systems, so a wide and shallow pot is ideal. A container with a diameter of at least 15-24 inches is recommended to provide ample space for the plant to spread its roots.

Selecting the Right Soil:

Dragon fruit thrives in well-draining soil with a slightly acidic to neutral pH. Consider using a cactus mix or create your own by combining potting soil with perlite or sand to enhance drainage. This prevents waterlogged soil, a condition that dragon fruit plants do not tolerate well.

Planting the Dragon Fruit Cutting:

Dragon fruit is typically grown from cuttings rather than seeds. Obtain a healthy cutting from a mature dragon fruit plant, ensuring it is at least 12-18 inches long. Allow the cutting to dry for a day or two before planting to reduce the risk of rot.

Plant the cutting in the prepared pot, burying it about 2-4 inches deep. Position the cutting at a slight angle to encourage root development. Water the plant lightly, and avoid overwatering during the initial weeks to prevent root rot.

Propagating Dragon Fruit From Cuttings - Gardenerd

Providing Optimal Growing Conditions:

Dragon fruit plants thrive in warm, sunny climates, so choose a location that receives full sunlight. If you’re growing dragon fruit indoors, place the pot near a south-facing window or use grow lights to provide sufficient light.

Maintain a consistent watering schedule, allowing the soil to dry out between watering sessions. Overwatering is a common mistake, so it’s crucial to strike a balance.

Supporting the Growing Plant:

how to grow dragon fruit in pots, As your dragon fruit plant matures, it will need support to prevent sprawling. Install a trellis or stakes in the pot to provide stability for the growing cactus. This not only aids in maintaining an upright structure but also enhances air circulation around the plant.

How to Grow Dragon Fruits in Pots [Simple] - Farming Method | How to grow dragon fruit, Dragon fruit tree, Dragon fruit plant

Fertilizing the Dragon Fruit:

how to grow dragon fruit in pots, During the growing season (spring and summer), feed your dragon fruit with a balanced, water-soluble fertilizer every 4-6 weeks. Reduce or eliminate fertilization during the dormant season (fall and winter) when the plant’s growth slows down.

Harvesting Your Dragon Fruit:

Patience is key when growing dragon fruit. The plant typically starts producing fruit within one to two years. Harvest the dragon fruit when the skin color changes and the fruit gives slightly to gentle pressure. Use pruning shears to cut the fruit from the plant.

How to Grow Dragon Fruit in Pots - Step by Step Process Explained

how to grow dragon fruit in pots, To Grow dragon fruit in pots is a rewarding experience that allows you to enjoy this exotic fruit even in limited space. By providing the right conditions, proper care, and a little patience, you can savor the vibrant colors and delicious flavors of home-grown dragon fruit right from your own potted garden. Happy growing!

How to Grow Sitaphal from Seeds, Nurturing Your Garden from Seedling to Harvest

How to Grow Sitaphal from Seeds

How to Grow Sitaphal from Seeds, Sweet and fragrant sitafari, also known as custard apple, is a tropical fruit with the essence of indulgence. Growing your own sitaphyll tree from seed is not only fun, but also an opportunity to enjoy the fruits of your labor. In this detailed guide, we’ll show you how to grow Citadel seeds into lush trees to ensure you get the best results.

Cudding apple or sitaphila is a tropical plant. It is known for its fruit texture and pleasant taste. Growing this delicious fruit from seed allows you to connect with nature and enjoy growing your own sitaphyll tree.

Custard apple (Annona squamosa) Flower, Leaf, Care, Uses - PictureThis

Choose Citadel Seeds:

Choose fresh seeds: Start by choosing fresh Citadel seeds for healthy and ripe fruits. New seeds contain more bacteria.

Seed Removal: Carefully remove the seeds from the fruits, making sure they are clean and free of debris. Rinse gently to remove remaining pulp.

Germination of Citadel seeds:

Pre-germination treatment: Soak Citadel seeds in water for 24 hours to soften the seed coat and promote rapid growth.

Sowing seeds: sow pre-soaked seeds in pots or pots with well-drained potting mix. Sow the seeds about 1 inch deep.

Keep warm and moist: Place the seeds in a warm and humid place. Cover with plastic wrap or a clear lid to retain moisture.

File:Sitaphal.JPG - Wikimedia Commons

Caring for Sita Par Seedlings:

Light and temperature: How to Grow Sitaphal from Seeds, Provide bright, indirect sunlight for good growth. Provide a warm environment where the temperature is 70-85°F (21-29°C).

Water: Keep the soil moist at all times but not waterlogged. Water the seedlings sparingly to prevent them from wilting.

Transplantation: When the seedlings have developed a few leaves and are strong enough, transfer them to a larger pot or directly into the soil.

Growing Sita Par Tree:

Choose the right location: Sita Par Tree thrives in well-drained soil and needs full sun. Choose a location with sufficient sunlight and good ventilation.

Soil Preparation: Make the soil rich in organic matter and well-drained. Treat the soil with compost for fertility.

Planting the fruit: How to Grow Sitaphal from Seeds, Dig a small hole larger than the sapling’s root ball. Place the seedling in the hole and fill it with soil.

Care of Sittaphile Tree:

Water: Water your Sittaphile tree regularly, especially during the dry season. Allow the soil to dry slightly between watering.

Fertilization: Give your trees equal amounts of fertilizer throughout the growing season. Reduce fertilization during the dormant period.

Pruning: Proper pruning of trees and removal of dead or diseased branches. Pruning encourages good growth and fruit production.

File:"Seeds of custard apple".JPG - Wikimedia Commons

How to Grow Sitaphal from Seeds, Harvesting Sitaphal:

Patience pays off: Sitaphal trees usually start bearing fruit 2-3 years after planting. Be patient as you wait for payment.

By fruit: Harvest Sitafari when the fruit emerges slightly in full light. The skin should be green and the fruit should have a sweet aroma.

How to Grow Sitaphal from Seeds, Growing Sitafil from seed is a journey that begins with the selection of new seeds and ends with the joy of harvesting the fruit. , self-produced apple pudding. Whether you are a gardener or a beginner, growing sitaphila can bring you happiness linked to good results. Follow the process, be patient, and you’ll soon be enjoying your own Citadel collection. Happy gardening!

Pumpkin Flower Power: A Deep Dive into Nature’s Floral Symphony

Pumpkin flowers

Pumpkin Flowers: Unveiling Nature’s Autumn Elegance

Pumpkin flowers, often overshadowed by their famous fruit, hold a unique and enchanting beauty that deserves a spotlight in your garden. In this journey, we’ll explore the intricate world of pumpkin blossoms, from their delicate appearance to the art of cultivation.

Kayabasa pumpkin flower early morning | Richard Parker | Flickr

The Anatomy of Pumpkin Flowers

1. Male and Female Blossoms:

Pumpkin plants produce distinct male and female flowers. The male blooms emerge first, featuring slender stems, while the females follow, distinguished by a miniature fruit at their base. Understanding this dynamic is key to successful pollination.

2. Petals and Colors:

Pumpkin flowers boast broad, vibrant petals in shades of yellow and orange, complementing the autumn palette. Their intricate design and rich colors make them a visual delight in any garden.

The Beauty of Pumpkin Flower Arrangements

1. Culinary Uses:

Pumpkin flowers are not only aesthetically pleasing but also edible. Harvest them in the morning when they’re most vibrant and add them to salads or use them as a unique garnish.

2. Decorative Displays:

Bring the essence of autumn indoors by incorporating pumpkin flowers into floral arrangements. Their distinctive appearance adds a touch of elegance to fall decor.

Unique Varieties and Cultivars

1. Atlantic Giant Pumpkin (Cucurbita maxima):

Known for colossal fruits, the Atlantic Giant also produces impressive, large flowers, making it a statement piece in any garden.

2. Baby Boo Pumpkin (Cucurbita pepo):

This miniature pumpkin variety not only features tiny fruits but also delicate, charming flowers, ideal for compact garden spaces.

Bloom of the Week: Pumpkin Flower – Darby Creek Trading

Growing and Caring for Pumpkin Flowers: A Gardener’s Guide

Pumpkin flowers, though overshadowed by their fruit, are gems in the garden. To cultivate these delicate blossoms successfully, consider the following steps:

Planting Conditions

1. Soil Requirements:

Choose well-drained soil with a neutral pH. Pumpkins prefer fertile soil enriched with organic matter. Ensure good drainage to prevent waterlogging.

2. Sunlight:

Pumpkin flowers thrive in full sunlight. Select a location that receives at least 6-8 hours of direct sunlight daily for optimal growth.

3. Spacing:

Plant pumpkin seeds or seedlings with adequate spacing to promote air circulation. This reduces the risk of diseases and ensures healthy growth.

Watering and Fertilization

1. Moisture Levels:

Maintain consistent soil moisture, especially during dry spells. Water at the base of the plant to prevent fungal issues. However, avoid overwatering to prevent root rot.

2. Fertilizer Application:

Use a balanced fertilizer during the growing season. Apply fertilizer when the plants begin to vine, and again when the first blossoms appear. Avoid excessive nitrogen, which can lead to excessive foliage at the expense of flowers.

Pollination Tips

1. Distinguishing Male and Female Flowers:

Identify male flowers by their slender stems and females by the small fruit at their base. Be aware that both types are crucial for successful pollination.

2. Hand Pollination:

Due to the separation of male and female blooms, manual pollination may be necessary. Transfer pollen from male to female flowers using a small brush or cotton swab to ensure fruit development.

Disease Prevention and Pest Management

1. Powdery Mildew Prevention:

Monitor for signs of powdery mildew, a common issue with pumpkin plants. Provide proper spacing, good air circulation, and consider applying a fungicide if needed.

2. Pest Control:

Keep an eye out for pests such as aphids or cucumber beetles. Natural predators like ladybugs can help, or use organic insecticides to deter pests without harming the blossoms.

A Brief Primer on Disease Management of Pumpkin | Purdue University  Vegetable Crops Hotline

Harvesting Pumpkin Flowers

1. Timing is Key:

Harvest male flowers freely for culinary use. For those wanting pumpkin fruit, leave some male flowers intact for pollination. Harvest in the morning when the blossoms are fully open.

2. Gentle Harvesting:

Handle pumpkin flowers with care to avoid damaging the delicate petals. Use scissors or pruners to snip the flowers from the stem, leaving a short stem attached.

Fall Pumpkin Planter Ideas | Garden Gate

Culinary Uses and Decorative Displays

1. Edible Delights:

Pumpkin flowers are not just ornamental; they are also edible. Harvest them in the morning and use them in salads, soups, or as a unique garnish.

2. Decorative Arrangements:

Bring the beauty of pumpkin flowers indoors by incorporating them into floral arrangements. Their vibrant colors and unique shape add a touch of elegance to fall decor.

Preserving Pumpkin Flowers

1. Drying Techniques:

Preserve the charm of pumpkin flowers by drying them. Hang them upside down in a dark, well-ventilated space to maintain their color and form.

2. Pressing for Keepsakes:

Create lasting memories by pressing pumpkin flowers between the pages of a book. Use these preserved blossoms for crafts or sentimental keepsakes.

Flower Becoming a Pumpkin | Learned something new at the pum… | Flickr

Pumpkin flowers, often overlooked, add a unique dimension to your garden. From their captivating beauty to culinary and decorative uses, these blossoms deserve a place in every gardener’s heart. Cultivate and cherish the enchanting journey of pumpkin flowers, enhancing your garden with the elegance of autumn.

what is the cantaloupe season?

what is the cantaloupe season?

Cantaloupe season, a refreshing and succulent melon, holds a special place in the hearts of fruit enthusiasts. Its vibrant orange flesh and sweet aroma make it a sought-after treat during specific times of the year. In this article, we will delve into the intriguing world of cantaloupe, exploring the nuances of its growing season, peak freshness, and the factors that contribute to its delectable taste.

File:Melon Sugar Baby Matisse-9953.jpg - Wikipedia

Understanding Cantaloupe:

Cantaloupe, also known as muskmelon or Cucumis melo var. reticulatus, belongs to the gourd family and is renowned for its juicy, orange flesh. This melon is characterized by its netted rind, sweet flavor, and high water content, making it a favorite during hot summer days.

Cantaloupe Seasonality:

The cantaloupe season is primarily influenced by its sensitivity to temperature and growing conditions. This melon thrives in warm climates, and its peak season aligns with the summer months. The ideal temperature range for cantaloupe cultivation is between 70°F and 90°F (21°C to 32°C).

Factors Affecting Cantaloupe Growth:

  1. Temperature: Cantaloupes require warm temperatures to germinate and grow. Cooler temperatures can slow down growth and affect the overall quality of the fruit.
  2. Sunlight: Adequate sunlight is crucial for the development of sugars in the melon, contributing to its sweetness. Cantaloupes thrive in full sun exposure.
  3. Soil Quality: Well-draining, nutrient-rich soil is essential for cantaloupe cultivation. Proper soil conditions support healthy root development and overall plant growth.

Ivory Gaya Melon Information and Facts

Peak Cantaloupe Season:

The peak cantaloupe season typically spans from late spring to early fall, with the highest availability and best quality occurring during the summer months. However, the specific timing can vary based on geographical location, local climate patterns, and agricultural practices.

Selecting Ripe Cantaloupes:

  1. Aroma: A ripe cantaloupe emits a sweet and fragrant aroma from the stem end. Avoid melons with little to no scent.
  2. Color and Texture: Look for a vibrant, golden-orange color with a slightly waxy feel on the rind. The netting should be well-defined and raised.
  3. Weight: A ripe cantaloupe feels heavy for its size, indicating a high water content and juiciness.

Storage and Preservation Tips:

To prolong the enjoyment of cantaloupes, store them in the refrigerator once they are ripe. Cut cantaloupe should be wrapped and refrigerated, preferably in an airtight container, to retain its freshness.

How to Grow Cantaloupe in Containers | Gardener's Path

The cantaloupe season is a delightful period marked by the abundance of this sweet and hydrating fruit. Understanding the factors that influence cantaloupe growth, its peak season, and the signs of ripeness enhances the overall experience of indulging in this summer delicacy. So, as the temperatures rise, savor the essence of cantaloupe season and relish the natural sweetness that it brings to your palate.