Mastering Onion Seed Harvesting: A Comprehensive Guide for Gardeners

Onion Seed Harvesting

Onions, with their distinctive flavor and culinary versatility, are a staple in many gardens. While most gardeners focus on growing onions for their bulbs, harvesting onion seeds opens up a world of possibilities for seed saving and experimentation with different varieties. In this comprehensive guide, we’ll delve deep into the process of onion seed harvesting, providing valuable insights and practical tips for gardeners of all levels.

Onion Seed Starting - How To Grow Onions From Seeds | Gardening Know How

Understanding Onion Seed Production:

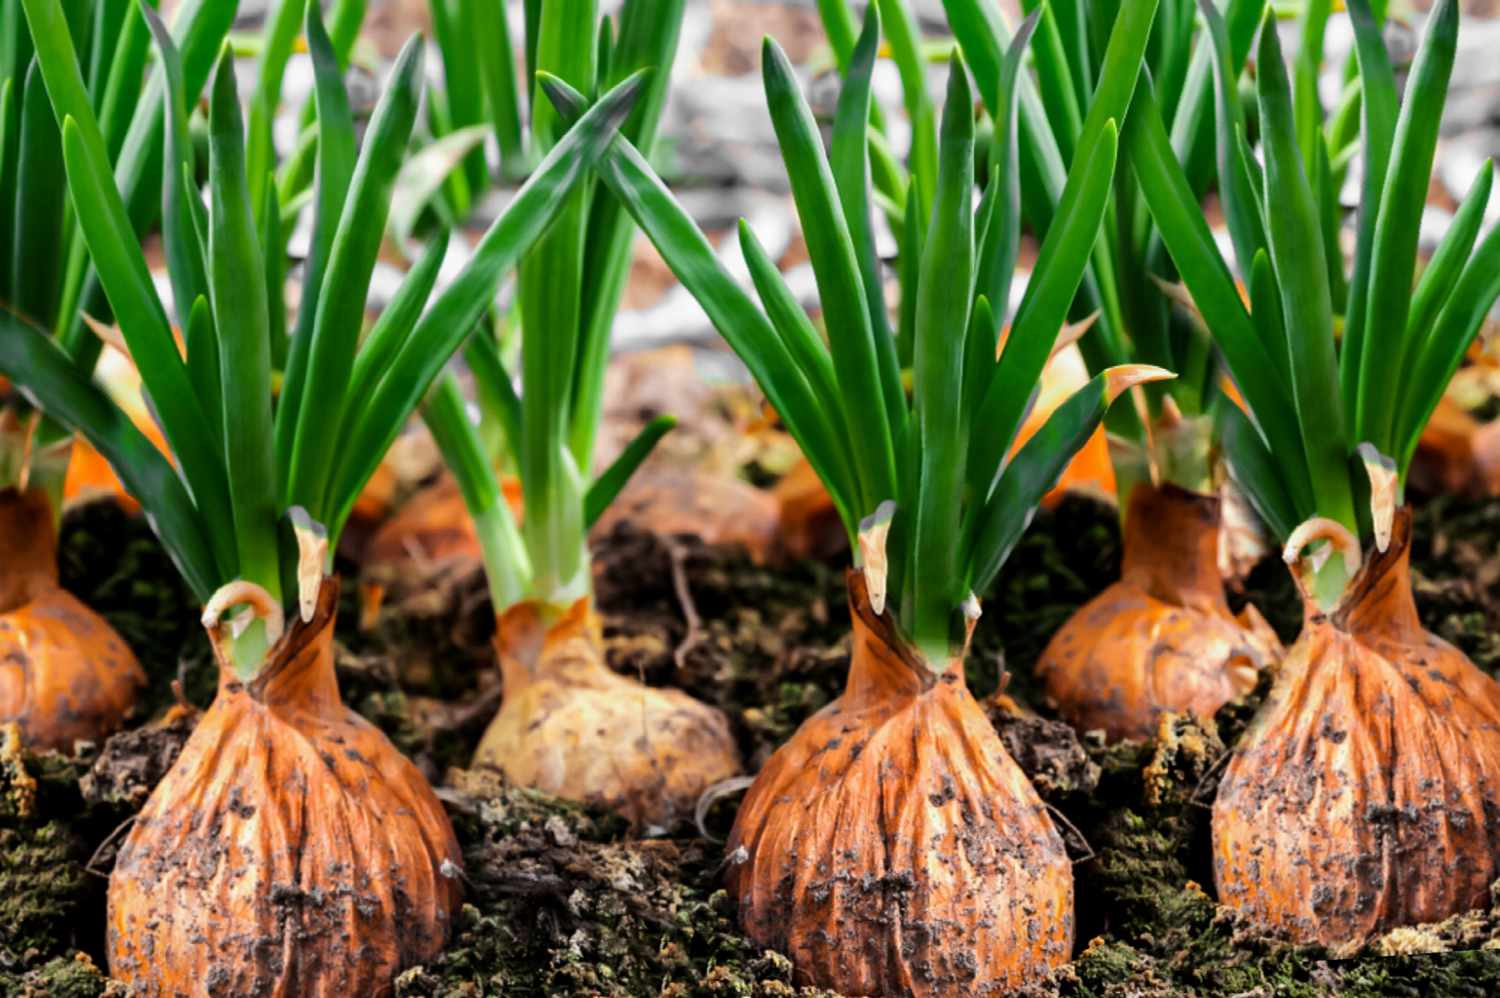
Before diving into the intricacies of onion seed harvesting, it’s essential to grasp the fundamentals of onion seed production. Onions are biennial plants, meaning they complete their life cycle over two years. During the first year, onions focus their energy on bulb development, storing essential nutrients for the plant’s future reproductive phase. In the second year, triggered by changing environmental conditions such as increasing daylight hours and warmer temperatures, onions transition from bulb development to seed production.

Timing is Key:

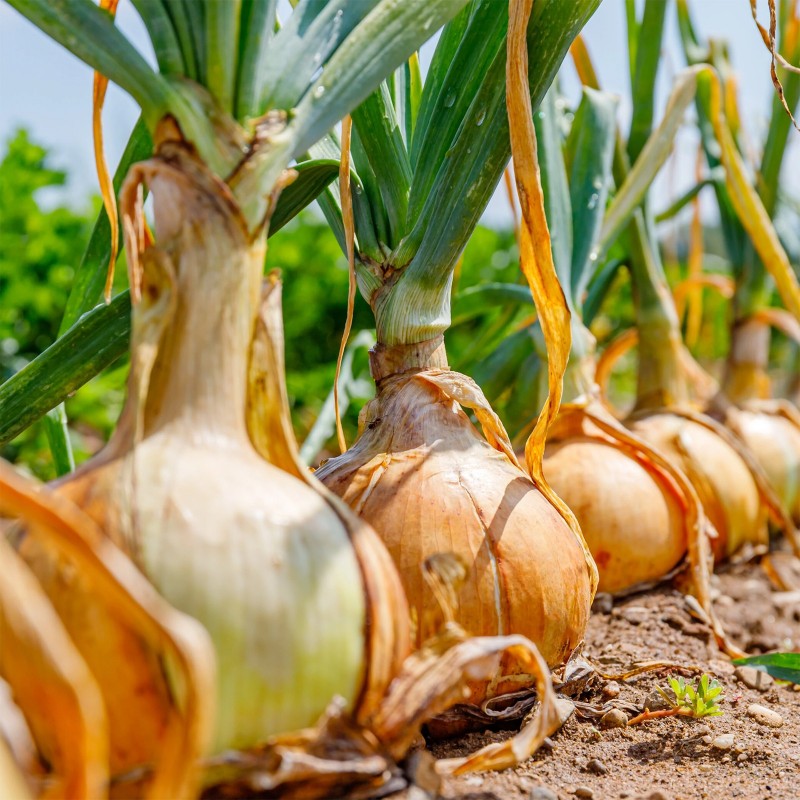
Timing plays a crucial role in successful onion seed harvesting. As the second year progresses and temperatures begin to rise, onions undergo a process known as bolting. Bolting is characterized by the rapid growth of a flower stalk from the center of the onion plant, eventually culminating in the formation of seed heads. It’s essential to monitor your onion plants closely during this stage, as harvesting onion seeds at the optimal time ensures seed viability and quality.

Harvesting Onion Seeds:

The key to harvesting onion seeds lies in patience and observation. As summer gives way to early fall, keep a watchful eye on your onion plants for signs of seed head development. Mature seed heads will gradually turn brown and begin to dry out, indicating that the seeds are ready for harvesting. Use sharp scissors or pruning shears to carefully cut the seed heads from the plant, taking care not to damage the seeds in the process.

Threshing and Cleaning:

Once you’ve harvested the seed heads, the next step is to extract the seeds and prepare them for storage. Threshing is the process of separating the seeds from the seed heads and any accompanying debris. You can accomplish this by gently rubbing the seed heads between your hands or by tapping them against a clean, hard surface. After threshing, winnow the seeds to remove any remaining chaff or impurities. A simple method involves pouring the seeds from one container to another in front of a gentle breeze, allowing the lighter chaff to be carried away while the heavier seeds remain behind.

Onion seeds for planting, High germination (50 Seeds)

Drying and Curing:

Proper drying and curing are essential for preserving the quality and viability of onion seeds. Spread the cleaned seeds out in a single layer on a paper towel or a fine mesh screen, ensuring good airflow around each seed. Place the seeds in a well-ventilated area away from direct sunlight and moisture, allowing them to dry thoroughly over the course of several days to a week. Once dry, transfer the seeds to airtight containers such as glass jars or paper envelopes, making sure to label each container with the onion variety and harvest date.

Storage:

Storing onion seeds properly is vital for maintaining their viability over time. Choose a cool, dry location for seed storage, away from temperature fluctuations and humidity. A basement or pantry shelf is ideal for this purpose. When stored correctly, onion seeds can remain viable for several years, allowing you to save money and preserve your favorite onion varieties for future growing seasons.

Tips for Success:

Start with high-quality onion plants from reputable sources to ensure healthy seed production.
Consider growing open-pollinated or heirloom onion varieties for greater seed diversity and adaptability.
To prevent cross-pollination, isolate different onion varieties from one another or stagger planting times.
Hand pollination can help ensure seed purity, especially when growing multiple onion varieties in close proximity.
Regularly inspect your onion plants for signs of pests or diseases that could affect seed production, and take appropriate measures to address any issues promptly.

Knight onion seeds - Price €1.95

Conclusion:

Harvesting onion seeds is a rewarding endeavor that allows gardeners to deepen their connection to the natural world and preserve the rich diversity of onion varieties for generations to come. By following the guidelines outlined in this comprehensive guide, you’ll be well-equipped to master the art of onion seed harvesting and enjoy a bountiful harvest of seeds for years to come.

Beginner’s Guide: How to Grow Beetroot at Home

how to grow beetroot at home

Are you ready to embark on a journey into the world of home gardening? Perhaps you’re eager to cultivate your own fresh produce but aren’t sure where to start. Growing beetroot at home is an excellent choice for beginners, offering a rewarding experience and a delicious harvest. In this comprehensive guide, we’ll walk you through everything you need to know to successfully grow beetroot in your own backyard or even on your balcony.

Royalty-Free photo: Red beet on brown wooden surface | PickPik

Why Grow Beetroot at Home?

Before we dive into the details of how to grow beetroot at home, let’s consider why it’s such a fantastic choice for home gardeners. Beetroot, also known simply as beets, is a versatile and nutritious root vegetable that thrives in various climates. Here are a few reasons why you should consider adding beetroot to your home garden:

Nutritional Benefits: Beetroot is packed with essential nutrients, including vitamins, minerals, and antioxidants. Incorporating fresh beetroot into your diet can support overall health and well-being.
Easy to Grow: Beetroot is relatively low-maintenance and easy to grow, making it perfect for beginners and experienced gardeners alike.

Versatility: From salads and soups to pickles and juices, beetroot can be used in a wide range of culinary applications, making it a versatile addition to any kitchen.
Quick Harvest: Unlike some other vegetables that require months of growth, beetroot matures relatively quickly, allowing you to enjoy a bountiful harvest in a relatively short amount of time.

How to Grow Beetroot at Home, Getting Started

How to grow beetroot at home, Before you start planting your beetroot seeds, it’s essential to gather the necessary supplies and prepare your garden bed or containers. Here’s what you’ll need:

Beetroot Seeds: Choose high-quality beetroot seeds from a reputable supplier. You can find a variety of beetroot cultivars to suit your taste preferences and growing conditions.

Soil: Beetroot prefers well-draining, loose soil rich in organic matter. Ensure your soil is free from rocks and debris and has a pH level of around 6.0 to 7.5.

Containers or Garden Beds: Decide whether you’ll be growing your beetroot in containers or directly in the ground. Beetroot can thrive in both settings, as long as they have enough space to grow and receive adequate sunlight.

Watering Can or Hose: Keep your beetroot plants consistently moist throughout the growing season by watering them regularly. Avoid overwatering, as this can lead to rot and other issues.

Growing beetroot: how to sow and plant beetroot - Plantura

Planting Beetroot Seeds

Once you’ve gathered your supplies and prepared your garden bed or containers, it’s time to plant your beetroot seeds. Follow these steps for successful planting:

Choose the Right Time: Beetroot is a cool-season crop that thrives in temperatures between 50°F and 75°F (10°C to 24°C). Plant your beetroot seeds in early spring or late summer for the best results.

Prepare the Soil: If you’re planting in the ground, loosen the soil to a depth of at least 6 inches and amend it with compost or aged manure to improve fertility and drainage.

Sow the Seeds: Plant beetroot seeds directly into the soil or containers, spacing them 2 to 4 inches apart in rows spaced 12 to 18 inches apart. Sow the seeds to a depth of around 1/2 inch and cover them lightly with soil.

Water Thoroughly: After planting, water the soil thoroughly to ensure good seed-to-soil contact and promote germination. Keep the soil consistently moist but not waterlogged throughout the growing season.

Caring for Beetroot Plants

How to grow Beetroot at home, Once your beetroot seeds have germinated and begun to grow, it’s essential to provide them with proper care to ensure a healthy and bountiful harvest. Here are some essential care tips for how to grow beetroot at home:

Thin Seedlings: Once the seedlings have emerged, thin them to ensure they have enough space to grow. Leave the strongest seedlings, spacing them 4 to 6 inches apart in rows.

Mulch: Apply a layer of organic mulch, such as straw or compost, around your beetroot plants to help retain moisture, suppress weeds, and regulate soil temperature.

Fertilize: Beetroot plants benefit from a balanced fertilizer application about four weeks after planting. Use a fertilizer with a higher potassium content to promote root development and overall plant health.

Watering: Keep the soil consistently moist by watering your beetroot plants regularly, especially during dry periods. Avoid overhead watering to prevent foliar diseases and fungal issues.

Pest and Disease Control: Monitor your beetroot plants for signs of pests and diseases, such as aphids, leaf miners, and fungal infections. Remove any affected plants promptly and use organic pest control methods as needed.

How To Grow Beetroot | BBC Gardeners World Magazine

Harvesting and Storing Beetroot

As your beetroot plants mature, you’ll soon be ready to harvest your delicious homegrown produce. Here’s how to know when your beetroot is ready to harvest and how to store it for long-lasting freshness:

Harvesting: Beetroot is typically ready for harvest 8 to 10 weeks after planting, depending on the variety and growing conditions. When the roots reach the desired size (usually around 2 to 3 inches in diameter), carefully loosen the soil around the base of the plant and gently lift the roots from the ground.

Storing: After harvesting, remove the tops (leaves) from the beetroot roots, leaving about an inch of stem attached. Store the beetroot in a cool, dark place, such as a root cellar or refrigerator, where they will keep for several weeks.

Conclusion

Growing beetroot at home is a rewarding experience that allows you to enjoy the freshest, most flavorful produce right from your own garden. By following the steps outlined in this guide and providing your beetroot plants with the care and attention they need, you’ll soon be harvesting a bountiful crop of delicious, nutritious roots. Whether you’re a seasoned gardener or a complete beginner, growing beetroot at home is a fun and satisfying way to connect with nature and enjoy the fruits of your labor.

Start your beetroot-growing adventure today and reap the rewards of homegrown goodness!

Cultivating Green Goodness: A Complete Guide on How to Grow Fenugreek at Home

how to grow fenugreek at home

How to grow Fenugreek at home, Fenugreek, with its distinctive flavor and nutritional benefits, is a versatile herb that can easily be grown at home. In this comprehensive guide on how to grow fenugreek at home, we’ll delve into the step-by-step process of cultivating fenugreek in your own garden or indoor space.

Understanding Fenugreek:

Fenugreek (Trigonella foenum-graecum) is an annual herb native to the Mediterranean region and South Asia. It belongs to the Fabaceae family and is prized for its edible leaves, seeds, and sprouts, which are commonly used in culinary dishes and traditional medicine. Fenugreek has a slightly bitter taste with hints of sweetness, making it a popular ingredient in Indian, Middle Eastern, and Mediterranean cuisines.

Amazon.com : Fenugreek Herb Seeds - Non-GMO - 1 Gram, Approximately 60 Seeds : Herb Plants : Patio, Lawn & Garden

How to grow Fenugreek at home, Selecting Fenugreek Seeds:

When growing fenugreek at home, it’s essential to start with high-quality seeds to ensure successful germination and healthy plant growth. Look for fenugreek seeds from reputable suppliers or nurseries that specialize in organic and heirloom varieties. Opt for seeds that are fresh, plump, and free from signs of damage or decay, as these are more likely to produce vigorous and productive plants.

Preparing the Growing Environment:

Before we learn how to grow Fenugreek at home we should have knowledge about growing condition.  Fenugreek thrives in well-drained soil with a neutral to slightly acidic pH and requires ample sunlight to flourish. Before planting, prepare the growing environment by selecting a sunny location with fertile, loamy soil. If planting in containers or pots, choose a well-draining potting mix enriched with organic matter such as compost or aged manure. Ensure adequate drainage to prevent waterlogging, which can lead to root rot and other issues.

Planting Fenugreek Seeds:

Fenugreek seeds can be directly sown into the ground or started indoors in seed trays or pots. If sowing directly outdoors, plant the seeds about 1/4 inch deep and space them 2 to 3 inches apart in rows or clusters. Water the seeds gently after planting and keep the soil consistently moist until germination occurs, typically within 7 to 10 days. If starting seeds indoors, plant them in seed trays filled with moist potting mix and place them in a warm, sunny location.

How to Plant and Grow Fenugreek | Gardener's Path

Caring for Fenugreek Plants:

Once germinated, fenugreek plants require minimal care to thrive. Water the plants regularly to keep the soil evenly moist but not waterlogged, especially during hot and dry periods. Avoid overwatering, as this can lead to root rot and other problems. Mulching around the base of the plants can help conserve moisture, suppress weeds, and regulate soil temperature.

Fertilizing Fenugreek Plants:

Fenugreek is a relatively low-maintenance herb that doesn’t require heavy fertilization. However, you can apply a balanced, water-soluble fertilizer diluted to half strength every 4 to 6 weeks during the growing season to promote healthy growth and development. Avoid over-fertilizing, as this can lead to excessive leafy growth at the expense of seed production.

Harvesting Fenugreek Leaves:

Fenugreek leaves, also known as methi, can be harvested when the plants reach a height of 6 to 8 inches and have developed several sets of true leaves. Use sharp scissors or pruning shears to snip off individual leaves or cut the entire plant down to ground level, leaving about 1 inch of stem intact. Fenugreek leaves are best harvested in the morning when they are fresh and tender, before the sun’s heat causes them to wilt.

Welcome to My Random Garden: Growing and harvesting Fenugreek(methi) leaves

Using Fenugreek Leaves in Cooking:

Apart from just learning “how to grow fenugreek at home,” it’s essential to understand its versatile uses in cooking.Fresh fenugreek leaves add a distinctive flavor and aroma to a wide range of culinary dishes, including curries, stews, salads, and soups. They can be used as a flavorful herb or cooked as a leafy green vegetable. Fenugreek leaves are rich in vitamins, minerals, and antioxidants, making them a nutritious addition to any meal. To preserve their freshness and flavor, store fenugreek leaves in the refrigerator in a plastic bag or container for up to one week.

Harvesting Fenugreek Seeds:

When learning how to grow fenugreek at home, understanding the harvesting process is crucial. Fenugreek seeds can be harvested when the plants begin to turn yellow and the seed pods turn brown and dry. Allow the seed pods to mature fully on the plant before harvesting to ensure maximum seed viability. Use sharp scissors or pruning shears to cut the seed pods from the plant, then spread them out in a single layer on a clean, dry surface to finish drying. Once dry, thresh the seeds from the pods and store them in a cool, dry place in an airtight container for future use.

Fenugreek | Description, Plant, Seeds, Uses, & Facts | Britannica

Growing fenugreek at home is a rewarding and satisfying experience that allows you to enjoy the fresh flavors and nutritional benefits of this versatile herb. By selecting high-quality seeds, preparing the growing environment, planting with care, and providing proper care and maintenance, you can cultivate healthy fenugreek plants in your own garden or indoor space. Whether used in cooking, medicine, or as a culinary herb, fenugreek adds a unique flavor and aroma to a wide range of dishes and enhances the overall enjoyment of process of “How to grow Fenugreek at home”.

How to grow button mushrooms at home

How to grow button mushrooms at home

How to grow button mushrooms at home, In the realm of home gardening, cultivating button mushrooms offers a rewarding and flavorful experience. These versatile fungi, known for their mild taste and tender texture, can be easily grown in the comfort of your own home. In this comprehensive guide, we will walk you through the step-by-step process of growing button mushrooms, from selecting the right substrate to harvesting your bountiful crop.

Royalty-Free photo: Sliced button mushrooms vegetables close-up photography | PickPik

How to grow button mushrooms at home,Getting Started

Choosing the Right Mushroom Strain
Selecting a high-quality mushroom strain is the first crucial step in your button mushroom cultivation journey. We’ll explore popular strains and provide insights into their unique characteristics, helping you make an informed choice based on your preferences and growing conditions.

Essential Equipment and Supplies
How to grow button mushrooms at home, To ensure a successful harvest, you’ll need to gather the necessary equipment and supplies. From mushroom spawn and substrate to containers and humidity control tools, we’ll guide you through creating an optimal environment for your button mushrooms to thrive.

Creating the Ideal Growing Environment

Selecting a Growing Substrate
Button mushrooms thrive on a variety of substrates, including compost, straw, and other organic materials. Learn about the different options available and how to prepare the perfect substrate to support healthy mushroom growth.

Agaricus - Wikipedia

Setting Up a Mushroom Growing Container
Whether you choose to grow your button mushrooms in bags, trays, or containers, setting up the right growing environment is crucial. We’ll provide step-by-step instructions on creating a conducive space for your mushrooms, ensuring proper aeration and moisture levels.

The Cultivation Process

Inoculation and Spawn Distribution
Once your substrate and container are ready, it’s time to inoculate the medium with mushroom spawn. We’ll guide you through the inoculation process, explaining the importance of proper distribution for even mushroom growth which will help to know how to grow button mushrooms at home.

Incubation Period
During the incubation period in button mushroom cultivation, patience becomes a crucial virtue. This phase is dedicated to the colonization of the substrate by mycelium, the mushroom’s vegetative part. Mycelium works behind the scenes, breaking down organic matter in the substrate. To ensure successful growth, maintaining optimal conditions is paramount. This includes regulating factors such as temperature, humidity, and fresh air exchange. Monitoring the progress involves observing the development of mycelium throughout the substrate. As the mycelium spreads and establishes its network, it sets the stage for the eventual formation of button mushrooms

White Button Mushroom Spawn — Welcome

Providing Ideal Growing Conditions

Temperature and Humidity Control
Discover the ideal temperature and humidity ranges for button mushroom cultivation. We’ll share tips on how to maintain a consistent environment throughout the growing stages, fostering healthy and robust mushroom development.

Light Requirements
While button mushrooms don’t require direct sunlight, they do benefit from indirect light. Understand the role of light in the cultivation process and learn how to provide the right amount for optimal results.

Troubleshooting and Maintenance

Common Challenges and Solutions
Even the most experienced growers encounter challenges. We’ll address common issues such as contamination, pests, and diseases, offering effective solutions to keep your button mushrooms healthy.

Harvesting and Storage
How to grow button mushrooms at home, As your button mushrooms reach maturity, it’s time to harvest. Learn the signs of readiness, proper harvesting techniques, and tips for storing your freshly picked mushrooms to maintain their quality.

Growing Button Mushrooms: A Complete Guide on How to Plant, Grow, & Harvest Button Mushrooms

Embark on the exciting journey of growing button mushrooms at home by following this comprehensive guide. With the right knowledge and a bit of dedication, you’ll soon be enjoying the delicious fruits of your labor in the form of homegrown button mushrooms that elevate your culinary endeavors. Happy cultivating!

From Seed to Plate: Exploring ‘How to Grow Peas at Home’ Successfully

From Seed to Plate: Exploring 'How to Grow Peas at Home' Successfully

1. Choose the right variety:

How to Grow Peas at Home, The first step in growing peas at home is to choose the right variety. This decision depends on many factors, so let’s break it down this way:

Understand your climate and growing area: Peas thrive in cold climates and are suitable for planting in early spring or late summer. Consider your climate and choose the variety that suits your city.

Consider available space: Peas can be grown in the garden, in containers or even baskets. Measure the space you have and choose the variety accordingly. Compact shrub varieties perform well in small spaces, while vine varieties may need more space to spread.

Choose from soybeans, peas or snow peas: each has a unique taste and use. Podded peas are ripe peas that have been removed from their pods, peas are immature edible pods, and snow peas have smooth, soft pods. Choose the type that suits your cooking preferences.

Scientific Analysis: Different peanuts have different growth requirements. Some may be resistant to certain pests or diseases. Researching and understanding these concepts will increase your chances of reaping the benefits.

Farming Soybean Planting Images | Free Photos, PNG Stickers, Wallpapers & Backgrounds - rawpixel

2. Prepare the Soil:

How to Grow Peas at Home, The quality of the soil is important for growing peas. Follow these steps to create the best growing environment:

Choose a good location with sunlight: Peas love well-drained soil to protect against waterlogging, but they also need a lot of sunlight for good growth. Choose a location that gets at least six hours of sunlight each day.

Test Soil pH: Peas thrive in slightly acidic to neutral soil. Measure the pH of the soil and adjust if necessary to ensure it is within the desired range.

Fertile Soil: Peas benefit from rich soil. Improve the soil by adding organic matter such as compost or well-rotted manure. This increases fertility and provides essential nutrients for vigorous fruiting.

3. Planting Peas:

How to Grow Peas at Home, Now that your soil is ready, it is time to plant pea seeds. Follow these tips for good planting:

Follow package instructions: Each type of pea will have specific rules for planting depth and spacing. Refer to the information on the seed packet to ensure correct planting.

Grow peas in rows or groups: Depending on the variety, you can grow peas in neat rows or groups. Consider the recommended amount of space for plants to grow.

Provide support for the vine variety: If you choose a variety of vines, install a trellis or stake for support. This prevents the plant from spreading on the soil and makes harvest easier.

File:Peas plant grown from Seed (2).jpg - Wikimedia Commons

4. How to Grow Peas at Home, Watering and Care:

Proper watering and care is essential for healthy plants. Follow these practices:

Water regularly: Peas need consistent moisture, especially during flowering and pod development. Water deeply when the top layer of soil is dry.

Mulch around plants: Apply a layer of organic mulch around bean plants to retain moisture, control soil temperature and reduce weeds.

Check for pests and diseases: Check plants regularly for pests such as aphids and diseases such as powdery mildew. Early detection ensures timely intervention and prevention of damage.

5. Harvesting:

Harvest is an interesting stage of growing. Here’s how to do it correctly:

Pea pod removal: Harvest when the pods are full and the peas are fully formed. Peas should be soft and sweet.

Peas: Collect peas before they are fully ripe. The pods should be crisp and the peas visible but small.

Snow Peas: Harvest when the pods are flat and the peas inside are still small. Snow peas are prized for their soft, edible pods.

harvesting peas | harvesting peas from the spring garden - p… | Flickr

6. Enjoy the fruits of your labor:

Your efforts will be rewarded with the enjoyment of fresh home-grown fruits. Here’s how to get the most out of your bean crop:

Eat Fresh: Peanuts can be enjoyed fresh, which gives a sweet and crunchy taste. Eat it alone or add it to a salad to make it nice and healthy.

Effective in many recipes: Try mixing peas into recipes. They bring bright colors and flavors to a variety of dishes, from stir-fries to pasta.

Royalty-Free photo: Vegetable basket on table near potted plant | PickPik

In short, growing peas at home is a whole that includes correct planning, soil preparation, planting, proper care and the time required for planting and harvesting. Each step plays an important role in the overall success of your crop, ensuring you get the freshest, tastiest peas from your garden. Beyond practicality, this gardening journey connects you to the circle of nature, providing a sense of satisfaction and satisfaction. So roll up your sleeves and start the fun of growing peas at home!

Ripe for the Picking: Your Ultimate Guide to Growing and Enjoying Succulent Red Tomatoes

red tomatoes

Indulge in the brilliance of red tomatoes – vibrant, succulent, and versatile. From refreshing salads to luscious sauces, they transform every dish. Bursting with vitamins, minerals, and antioxidants, red tomatoes not only tantalize your taste buds but also boost your well-being. Experience the culinary elegance of each juicy bite, a symphony of flavors embodying freshness and nutritional richness.

Royalty-Free photo: Tilt shift lens photo of round red fruits during daytime | PickPik

A Comprehensive Guide to Growing Red Tomatoes

1. Choose the Right Red Tomato Variety:

Immerse yourself in the wide world of red tomatoes, each with their own unique characteristics, texture and culinary uses. From classic steak to Roman variety to delicious tomato meringue, choose a variety to suit your cooking preferences and gardening goals.

2. Know your local climate:

Consider your location and local climate when you start your red tomato growing business. Tomatoes grow in warm climates, but temperature changes, rainfall patterns and slight differences in sunlight can affect their growth. Learn the microclimate in your area to adjust your growing practices accordingly.

3. Soil Preparation and pH:

Careful soil preparation guarantees success. Red tomatoes thrive in well-drained soil rich in organic matter. Conduct a soil test to determine pH, aiming for the slightly acidic to neutral range (6.0-7.0). This promotes the growth of healthy plants, ensuring efficient use and absorption.

4. Planting Time and Frost Considerations:

Time your planting carefully to match your frost pattern. Start growing tomatoes by sowing seeds indoors 6-8 weeks before the last expected frost. To prevent frost damage and allow your tomatoes to grow well, plant outdoors only when the soil temperature consistently exceeds 10°C (50°F).

5. Spacing and support:

Consider the placement of your tomatoes carefully. Proper spacing ensures adequate ventilation and reduces the risk of disease. For the indeterminate variety that continues to grow throughout the season, provide a stable support structure, such as a stake or trellis, to provide ample weight for the fruit.

6. Irrigation Practices:

Irrigation master to keep the soil moist, especially during drought. Avoid overhead watering to reduce leaf diseases. Applying a layer of mulch around plants helps retain moisture, regulate soil temperature and reduce plant growth.

7. Fertilize:

Keep the environment healthy by adding balanced fertilizer to your daily maintenance. Customize the fertilization method based on soil testing and the specific needs of your tomatoes at different growth stages, from seedling to fruiting.

8. Pest Control Strategies:

Proactively protect your tomatoes from pests such as aphids and aphids. Implement integrated management strategies such as planting companions, attracting natural enemies, or using organic pesticides. This ensures a harmonious, beautiful garden ecosystem.

9. Pruning Techniques:

Improve your pruning skills to control plant size and optimize airflow in the canopy. Regularly remove the suction cups and lower leaves to transfer the plant’s energy to the fruit. Pruning helps plants become healthier and more productive.

10. Tips for Harvesting:

Harvesting is an art in itself. Red tomatoes are ready to be picked when they are a plump color, firm when gently pressed, and yield a small amount. To increase the freshness of your tomatoes at home and preserve all their flavor, use scissors to cut the stems.

11. Cooking Adventure:

Grow your red tomatoes from the garden to the kitchen. Discover countless delicious recipes with products grown at home. From refreshing salads to rich and delicious sauces, try many recipes that showcase the vibrant and subtle flavor of red tomatoes.

Free image of red tomatoes | Free Photo - rawpixel

Growing red tomatoes is a challenging job, but it also brings some challenges 

1. Disease Prevention and Control:

Problems: Fungal diseases such as early blight and powdery mildew can affect red tomatoes.
Solutions: Use tomato resistant varieties, rotate crops and provide adequate air space

2. Pests:

Problems: Aphids, tomato hornworms and whiteflies are pests that can cause red tomatoes.
Solution: Introduce beneficial insects like ladybugs, use neem oil or insect repellent, and eliminate pests by hand. Regular check-ups and early intervention are important.

3. Blossom End Rot:

Problem: Dark, tough spots at the base of tomatoes indicate blossom end rot, usually caused by calcium deficiency, if water is constant.
Solution: Keep water consistent, maintain good calcium levels by amending soil and mulches to retain soil moisture.

4. Sunburn:

Problems: Excessive sun exposure can cause sunburn and cause pale, hard spots on your sun-exposed tomatoes.
Solution: Provide shade when the sun shines, especially for seedlings. Mulching can also help control soil temperature.

5. Poor fruit quality:

Problem: Poor pollination, high temperature or malnutrition can cause fruit loss. not good.
Solutions: Encourage pollinators, maintain appropriate temperature and ensure soil fertility through balanced fertilization.

6. Flowering:

Problem: Rapid changes in water availability, especially during heavy rains, can cause tomato flowers to bloom.
Solution: Save water, especially during the dry season, to avoid sudden changes in humidity. Mulch can help retain moisture.

Tomato Leaves Turning Yellow? Here's How to Fix It | HGTV

7. Yellow leaves:

Problem: Yellow leaves may indicate a deficiency of nutrients such as nitrogen or magnesium.
Solution: Treat the soil with appropriate fertilizers to have balanced content. Monitor plant health regularly and adjust fertilization as needed.

8. Wilt and root problems:

Problems: Wilt can be caused by many things, including root diseases or inadequate watering.
Solutions: Ensure good soil drainage, prevent overwatering and respond quickly to root diseases. Mulching helps retain soil moisture.

9. Wrinkled tomato leaves:

Problem: Curling or wrinkling of tomato leaves can be caused by physical factors such as heat and cold.
Solution: Provide even growing conditions, including temperature control, to prevent leaf breakage.

By following these thorough guidelines, you’re on a complete journey to become a red tomato growing expert. Enjoy the fulfillment of a rich harvest and the delight of nurturing not just tomatoes but a thriving garden. Happy gardening!

Growing Juicy Tomatoes: Unraveling the Secrets of the Best Soil for Tomatoes

Best soil for tomatoes

Best Soil for Tomatoes: sun-kissed tomatoes, plump and bursting with flavor, owe their glory to the earth beneath them. Crafting the perfect soil bed is more than gardening wisdom; it’s an art for tomato enthusiasts. This guide unravels the secrets of best soil for tomatoes, exploring the nuanced world of soil components, amendments, and cultivation practices that transform a garden into a tomato haven.

Tomato Plant Leaf Curling: Tips & Tricks for Healthy Growth

Understanding the Needs of Tomato Plants

Before we dive into soil science, let’s get into the mindset of tomatoes. They’re not just plants; they’re discerning consumers with unique nutritional cravings. Let’s cater to their tastes:

Well-Drained Soil:

Tomatoes are drama queens about soggy feet. Optimal soil must play the role of a diligent bouncer, keeping excess water away and potential diseases at bay.

Nutrient-Rich Composition:

These tomatoes are VIPs. They demand a nutrient-rich banquet—nitrogen, phosphorus, and potassium are their favorite courses. A fertile soil mix ensures a lavish spread throughout the growing season.

Balanced pH Levels:

Tomatoes have a pH preference, leaning towards a slightly acidic to neutral stage (around 6.0 to 7.0). Think of it as curating the perfect ambiance for a tomato gala.

Ample Organic Matter:

Imagine organic matter as the grand buffet. It enhances structure, locks in moisture, and ensures essential nutrients are served on a silver platter to the tomato roots.

Components of the Best Soil for Tomatoes

Loamy Soil:

It’s like crafting the perfect canvas for a masterpiece. Loamy soil, a blend of sand, silt, and clay, provides a smooth texture, allowing tomato roots to groove through easily. Think of it as a dance floor with excellent drainage moves.

Compost:

Best Soil for Tomatoes, Compost is the life of the party, rich in organic matter, elevating soil fertility and structure. Incorporate it generously, creating a continuous feast for your tomato plants.

Peat Moss:

Peat moss is the cool breeze in a summer soirée. It aids in soil aeration and keeps the mood (pH levels) just right for the tomatoes.

Perlite or Vermiculite:

Think of these as the supportive friends in your gardening circle. They enhance soil aeration, prevent compaction, and make sure the soil is light and fluffy—a perfect setting for root development.

Well-Aged Manure:

Aged manure is the secret sauce. Whether it’s from cows, chickens, or other critters, make sure it’s well-composted to avoid any ammonia-induced dramas with your tomato stars.

How To Replenish Soil After Tomatoes [Inc. Amending Soil Or What To Plant]

Preparing Your Soil for Tomato Planting

Soil Testing:

Before you roll out the red carpet, let’s do a soil test. It’s like sending out invitations, ensuring that the pH and nutrient levels match the expectations of your tomato VIPs.

Clearing and Tilling:

Time for some garden feng shui. Clear out the clutter, till the soil, and create a welcoming stage for your tomato stars. It’s all about ambiance.

Incorporating Amendments:

Based on the soil test results, it’s time for targeted enhancements. Think of it as giving your soil a makeover. Adjust pH with lime, address nutrient gaps with specific fertilizers—it’s all part of the glam routine.

Adding Organic Matter:

Now, let’s infuse the soil with life. Mix in generous amounts of compost, creating an atmosphere where fertility, drainage, and structure harmonize like a well-orchestrated symphony.

Best Practices for Planting Tomatoes in Optimal Soil

Choosing the Right Tomato Varieties:

Tomatoes have their personalities. Some are compact, some are wild. Pick determinate varieties for a neat garden, and go for the indeterminate ones if you’re up for a lively tomato dance.

Planting Depth:

It’s like giving your tomatoes a VIP table. Plant them deep, burying a chunk of the stem. This encourages extra roots, providing stability and enhancing nutrient absorption—like a backstage pass to tomato success.

Spacing:

Social distancing in the garden? Absolutely. Give your tomatoes room to breathe. Proper spacing ensures good airflow, preventing any drama with diseases. Follow the recommended guidelines for a harmonious tomato community.

Mulching:

Mulch is the red carpet for your tomatoes. Lay it around the base, and it’s like giving them the royal treatment. Mulch retains moisture, suppresses unwanted guests (weeds), and keeps the soil temperature just right.

When to Plant Tomatoes in Perth | Ultimate Backyard

Caring for Tomatoes in Optimal Soil

Watering:

It’s a delicate balance—consistent moisture without drowning. Tomatoes don’t like surprises, especially when it comes to watering. Ensure the soil stays evenly moist but not waterlogged to avoid any backstage tantrums like blossom end rot.

Supporting Tomato Plants:

Think of stakes, cages, or trellises as the bodyguards of your tomato stars. Indeterminate varieties, especially, need sturdy support as they rise to fame. Proper support prevents sprawling—no one wants tomatoes on the ground.

Pruning:

Pruning is like giving your tomatoes a spa day. Regular trims manage their size, improve airflow, and direct energy towards fruitful endeavors. Remove suckers and lower foliage as needed, keeping it sleek and focused.

Fertilizing:

Tomato plants are like gourmet diners. Monitor their nutrient cravings throughout the growing season. Side-dress with additional fertilizer, especially during growth spurts—it’s like serving them a gourmet dessert.

Common Soil-Related Issues and Solutions

Blossom End Rot:

A tomato tragedy caused by calcium deficiency. Avoid it by ensuring consistent moisture, maintaining proper calcium levels, and not overloading with nitrogen. Your tomatoes deserve a smooth journey from start to finish.

Soil-Borne Diseases:

Think of crop rotation as changing the venue every season. It prevents soil-borne diseases from taking root. Keep it fresh, remove debris, and address any issues promptly—tomatoes don’t like drama in their green room.

Yellowing Leaves:

Yellow leaves are like warning signals. It might be nutrient deficiencies stealing the show. Adjust fertilization based on soil tests, observe plant reactions, and ensure your tomatoes are always in the spotlight.

Tomatoes · Free Stock Photo

In the grand finale, cultivating the best soil for tomatoes isn’t just about gardening; it’s a prelude to a harvest symphony. Understanding your tomatoes, curating the perfect soil blend, and following the garden dance steps ensure a stage where vibrant, healthy tomato plants steal the show. May your gardening adventure be ripe with success, and may your tomatoes revel in the embrace of their ideal soil. Here’s to a season of happy gardening and

A Guide to Growing and Enjoying Nutrient-Rich Cole Crops in Your Garden

cole crops

Cultivating Abundance: A Comprehensive Guide on How to Grow Cole Crops

Growing cole crops, a diverse group of vegetables in the Brassicaceae family, can be a rewarding experience for both novice and seasoned gardeners. These cruciferous wonders, including broccoli, cauliflower, Brussels sprouts, kale, and cabbage, are not only delicious additions to your table but also packed with essential nutrients. In this comprehensive guide, we’ll delve into the nuances of growing cole crops, covering everything from soil preparation to pest management, ensuring a bountiful harvest and a thriving garden.

Cole Crop Quick Facts – Cold-Season Vegetables

Understanding Cole Crops

Before we embark on the journey of cultivation, let’s understand the basics of cole crops. These vegetables share a common ancestry and are known for their adaptability to various climates and growing conditions. Each variety, from the vibrant green florets of broccoli to the tightly packed leaves of cabbage, has unique characteristics that require specific care during cultivation.

Selecting the Right Varieties

Broccoli (Brassica oleracea var. italica):

Choose varieties that suit your climate, as some are better suited for cooler temperatures. Popular choices include ‘Green Goliath’ and ‘Calabrese.’

Cauliflower (Brassica oleracea var. botrytis):

Varieties like ‘Snowball’ and ‘Purple Cape’ offer different flavors and colors. Consider your climate and preferences when selecting a variety.

Brussels Sprouts (Brassica oleracea var. gemmifera):

Opt for varieties like ‘Long Island Improved’ or ‘Churchill’ for well-formed sprouts. Brussels sprouts thrive in cooler conditions.

Kale (Brassica oleracea var. acephala):

Kale varieties, such as ‘Lacinato’ and ‘Winterbor,’ offer different textures and flavors. Choose based on your culinary preferences.

Cabbage (Brassica oleracea var. capitata):

Select cabbage varieties like ‘Early Jersey Wakefield’ for early harvest or ‘Savoy’ for a crinkled leaf texture. Consider the size of the head and the maturity period.

Preparing the Soil

Well-Drained Soil:

Cole crops thrive in well-drained soil. Ensure good drainage to prevent waterlogged roots, which can lead to diseases.

Soil pH:

Maintain a slightly acidic to neutral pH level, ideally between 6.0 and 7.5. This range supports nutrient absorption and microbial activity in the soil.

Amending with Organic Matter:

Enhance soil fertility by adding organic matter, such as compost or well-rotted manure. This improves soil structure and provides essential nutrients.

Soil Testing:

Conduct a soil test to determine nutrient levels. Based on the results, adjust nutrient levels using organic or synthetic fertilizers as needed.

Planting Cole Crops

Seed Starting:

Start seeds indoors for certain cole crops, like broccoli and cauliflower, about 6-8 weeks before the last expected frost. Use seed trays with a well-draining seed-starting mix.

Transplanting:

Once seedlings have developed several true leaves, transplant them into the garden. Space them according to the recommendations for each variety to allow for proper airflow and sunlight exposure.

Direct Sowing:

Some cole crops, like kale and cabbage, can be directly sown into the garden. Sow seeds at the recommended depth, and thin seedlings as they grow.

Cultivation of Cole Crop | Agrarian Blog

Watering and Feeding

Consistent Watering:

Provide consistent moisture, especially during dry spells. Uneven watering can lead to issues such as uneven head development in cabbage or buttoning in broccoli.

Mulching:

Mulch around the plants to retain soil moisture and suppress weeds. Mulching also helps regulate soil temperature, particularly during temperature fluctuations.

Balanced Fertilization:

Use a balanced fertilizer or amend the soil with organic fertilizers before planting. Side-dress with additional fertilizer during the growing season, following package instructions.

Pest Management

Companion Planting:

Utilize companion planting to deter pests. For example, planting aromatic herbs like basil or thyme near cole crops can help repel insects.

Natural Predators:

Encourage natural predators like ladybugs and predatory wasps that feed on common cole crop pests such as aphids and cabbage worms.

Crop Rotation:

Practice crop rotation to disrupt the life cycle of pests and reduce the risk of soil-borne diseases. Avoid planting cole crops in the same location every year.

Seasonal Considerations

Optimal Planting Times:

Understand the optimal planting times for each cole crop. Some, like kale and cabbage, can withstand colder temperatures and are suitable for early spring or late summer planting. Others, like broccoli and cauliflower, thrive in cooler weather.

Frost Protection:

Provide frost protection for cole crops susceptible to cold temperatures. Use row covers or cloths to shield young plants from late spring or early fall frosts.

Harvesting

Timing:

Harvest cole crops when they reach maturity. The ideal harvesting time varies for each variety, so refer to the specific guidelines for the chosen crop.

Cut-and-Come-Again Harvesting:

For crops like kale, adopt a cut-and-come-again approach. Harvest the outer leaves, allowing the inner leaves to continue growing for an extended harvest period.

Nutritional Benefits of Cole Crops

Vitamins and Minerals:

Cole crops are rich in essential vitamins and minerals, including vitamins C, K, and A, as well as potassium, calcium, and folate.

Antioxidants:

The presence of antioxidants, such as glucosinolates, makes cole crops powerful defenders against oxidative stress, contributing to a reduced risk of chronic diseases.

Fiber Content:

High dietary fiber content in cole crops promotes digestive health, supports weight management, and regulates blood sugar levels.

Cancer-Fighting Properties:

The unique phytochemicals found in cole crops, particularly glucosinolates, have been linked to a lower risk of certain cancers, including breast, prostate, and colorectal cancers.

Planting and Caring for Cole Crops | Kellogg Garden Organics™

Cooking Tips and Culinary Inspirations

Roasting:

Roasting brings out the natural sweetness in cole crops like Brussels sprouts and cauliflower. Drizzle with olive oil, sprinkle with herbs, and roast until golden brown for a delicious side dish.

Stir-Frying:

Quick and flavorful, stir-frying is ideal for broccoli and kale. Add garlic, ginger, and soy sauce for an Asian-inspired twist.

Steaming:

Retaining maximum nutritional value, steaming is perfect for delicate cole crops like broccoli. Serve with a squeeze of lemon for a simple and nutritious side.

Raw Preparations:

Embrace the freshness of cole crops by incorporating them into salads or as crunchy additions to wraps. Massaged with a vinaigrette, kale becomes tender and flavorful.

Cultivating cole crops is a fulfilling journey that promises a bountiful harvest and a plethora of health benefits. From selecting the right varieties and preparing nutrient-rich soil to managing pests and harvesting at optimal times, each step contributes to a successful garden. Embrace the nutritional richness of cole crops, incorporating them into culinary delights for a wholesome dining experience. Whether you’re a gardening enthusiast or a culinary adventurer, growing cole crops offers a tapestry of flavors and textures, enriching both your garden and your table with the vibrant essence of these cruciferous wonders. Happy gardening and bon appétit!

Asparagus Mastery: Learn How to Cut Asparagus Like a Chef

Asparagus

How to cut Asparagus, with its delicate spears and earthy undertones, stands as a versatile vegetable that effortlessly brings a touch of sophistication to a variety of dishes. If you’ve ever been curious about the art of cutting asparagus to not only enhance its flavor but also elevate its presentation, this all-encompassing guide is here to unravel the secrets. From handpicking the freshest asparagus to perfecting distinct cutting techniques, let’s embark on a culinary journey that will elevate your asparagus game to a whole new level.

22 - Spargel trocknen lassen / Drip asparagus | [Rezept / Re… | JaBB |  Flickr

Understanding Asparagus Anatomy:

How to cut Asparagus, Before we dive into the intricate world of cutting techniques, it’s imperative to acquaint ourselves with the anatomy of asparagus. Each spear comprises three main parts: the delicate tip, the spear or stalk, and the fibrous woody end. Precise attention to each part is crucial during the cutting process.

Here’s a detailed and elaborative step-by-step process on how to cut asparagus:

Step 1: Selecting the Right Asparagus

How to cut Asparagus, Begin by choosing fresh, high-quality asparagus. Look for spears that are vibrant green with tightly closed, compact tips. Avoid any signs of wilting or yellowing, as these may indicate older or less fresh asparagus.

Step 2: Understanding Asparagus Anatomy

How to cut Asparagus, Familiarize yourself with the anatomy of asparagus. Each spear comprises three main parts: the delicate tip, the spear or stalk, and the woody end. Recognizing these components is crucial for precise cutting.

Step 3: Essential Tools

How to cut Asparagus, Ensure you have the right tools for the job. A sharp knife or kitchen shears are essential for clean and accurate cuts. Choose a cutting board with enough space to accommodate the length of the asparagus spears.

Step 4: Trimming the Woody Ends

How to cut Asparagus, To eliminate the tough and fibrous ends, hold each asparagus spear and gently bend it until it naturally snaps. Alternatively, you can trim the ends by cutting about 1-2 inches from the bottom. This step is crucial to enhance the tenderness of the asparagus.

How to Cut Asparagus {Easy Tutorial} - FeelGoodFoodie

Step 5: Determining Cutting Styles

Asparagus can be cut into various styles based on your recipe and preference:

a. Whole Asparagus:
Ideal for grilling or roasting, leaving asparagus whole preserves its natural elegance. Trim the woody ends, and it’s ready for your chosen cooking method.

b. Diagonal Cuts:
Diagonal cuts not only add visual appeal but also provide more surface area for flavors to infuse. Angle the knife and cut the spears into elegant diagonal slices.

c. Bite-Sized Pieces:
Perfect for stir-fries, salads, or pasta dishes, cutting asparagus into bite-sized pieces ensures even distribution. Cut the spears into 1 to 2-inch segments.

Step 6: Blanching Asparagus

Blanching involves boiling asparagus briefly, followed by immediate submersion in ice water. This method retains the vibrant green color and enhances the crispness of the asparagus, making it an excellent preparation step for various dishes.

Step 7: Cooking Asparagus

Choose a cooking method based on your preference:

a. Steaming:
Steam asparagus for a few minutes until tender but still crisp. Season with olive oil, salt, and pepper for a simple and healthy side dish.

b. Roasting:
Toss asparagus with olive oil, garlic, and your favorite herbs before roasting for a rich and savory flavor.

c. Grilling:
Grill asparagus spears for a smoky flavor and appealing grill marks. Brush with olive oil and season with salt and pepper for a delightful side dish.

d. Sautéing:
Quickly sauté asparagus in a hot pan with butter or oil for a speedy and delicious preparation. Add garlic or lemon juice for extra flavor.

How to Cook Asparagus on the Stove | Saveur

Step 8: Storing Asparagus

For optimal freshness:

a. Refrigeration:
Store asparagus in the refrigerator, wrapped in a damp paper towel and placed in a plastic bag. It can last for about a week.

b. Freezing:
While fresh is best, you can freeze blanched asparagus for longer storage. Use airtight containers or freezer bags.

Oven-Roasted Asparagus Recipe (with Video)

How to cut Asparagus, Cutting asparagus is an art that enhances the flavor and presentation of your dishes. With these comprehensive steps, you now have the skills to choose, cut, and cook asparagus like a pro. Whether you’re grilling, roasting, or sautéing, perfectly cut asparagus will elevate your culinary creations to new heights of perfection. Embrace the simplicity and elegance of well-cut asparagus in your kitchen, and let your culinary skills shine.

Elevate Your Meals with Spaghetti Squash Season’s Best

In the realm of nutritious and versatile vegetables, spaghetti squash stands out as a culinary gem, especially during the harvest season. This low-calorie, gluten-free alternative to traditional pasta not only satisfies the taste buds but also adds a vibrant, nutritious twist to your meals. In this article, we will explore the wonders of spaghetti squash season, offering tips, recipes, and insights to elevate your culinary experiences during its peak season.

spaghetti squash season

Unlocking the Nutritional Goldmine

Before delving into the culinary delights of spaghetti squash, it’s essential to appreciate its nutritional value. Packed with vitamins, minerals, and fiber, this vegetable is a low-calorie, high-nutrient addition to your diet. A single cup of cooked spaghetti squash contains only about 40 calories, making it an excellent choice for those looking to maintain a healthy weight without sacrificing flavor,spaghetti squash season.

Choosing and Preparing Spaghetti Squash

Selecting the right spaghetti squash is the first step to a successful culinary experience. Look for firm, evenly colored squash with a matte surface. The brighter the color, the riper and sweeter the squash will be. Once you’ve chosen your squash, preparing it is a breeze.

Start by preheating your oven to 375°F (190°C). Cut the spaghetti squash in half lengthwise, scoop out the seeds, and place the halves face down on a baking sheet. Roast for about 40-45 minutes or until the flesh is tender. Alternatively, you can microwave or use an instant pot for a quicker cooking process.

Spaghetti Squash as a Pasta Alternative

The real magic of spaghetti squash lies in its ability to transform into a pasta-like consistency when cooked. After roasting, use a fork to scrape the flesh, and voila! You’ll have strands resembling spaghetti. This makes it an ideal substitute for traditional pasta in various dishes.

spaghetti squash season

Spaghetti Squash Primavera: Combine the cooked squash with sautéed colorful vegetables like bell peppers, cherry tomatoes, and zucchini. Toss with olive oil, garlic, and your favorite herbs for a refreshing and wholesome meal.

Pesto Parmesan Spaghetti Squash: Mix the squash strands with homemade pesto sauce and top with a generous sprinkle of Parmesan cheese. Bake until bubbly for a deliciously cheesy and aromatic dish.

Spaghetti Squash in Savory Dishes

Beyond its role as a pasta substitute, spaghetti squash can be the star of savory dishes that delight the taste buds.

Stuffed Spaghetti Squash Boats: Fill the hollowed-out halves with a flavorful mixture of ground turkey, black beans, corn, and spices. Bake until the squash is tender and the filling is golden brown for a satisfying and protein-packed meal.

Spaghetti Squash Stir-Fry: Stir-fry the squash strands with a colorful array of vegetables, protein of your choice, and a savory sauce. This quick and easy stir-fry brings together vibrant flavors and textures.

Sweet Endings with Spaghetti Squash

Surprisingly, spaghetti squash can also be a star in sweet dishes.

Spaghetti Squash | Leave the tomato sauce for another dish. … | Flickr

Spaghetti Squash Custard: Mix the squash with eggs, milk, vanilla, and a touch of cinnamon. Bake until set for a unique and healthier twist on a classic custard dessert.

Spaghetti Squash Muffins: Incorporate the squash into muffin batter with ingredients like nuts, raisins, and a hint of honey. Bake until golden for a delightful and nutritious snack.

Embracing the Season’s Best

As you embark on your culinary journey with spaghetti squash, remember to experiment with flavors, textures, and pairings. Whether you’re a seasoned chef or an adventurous home cook, the versatility of spaghetti squash offers a canvas for endless creativity in the kitchen.

Spaghetti Squash Season

In conclusion, embrace the season’s best with spaghetti squash as your culinary companion. Elevate your meals with this nutritious and delectable vegetable, exploring its potential in both savory and sweet dishes. From pasta alternatives to savory stuffed boats and sweet custards, spaghetti squash adds a touch of culinary magic to your kitchen, making every meal a celebration of the harvest season’s finest offerings,spaghetti squash season.