Pink Arrowhead Plant: A Radiant Touch to Your Indoor Haven

Pink Arrowhead Plant: A Radiant Touch to Your Indoor Haven

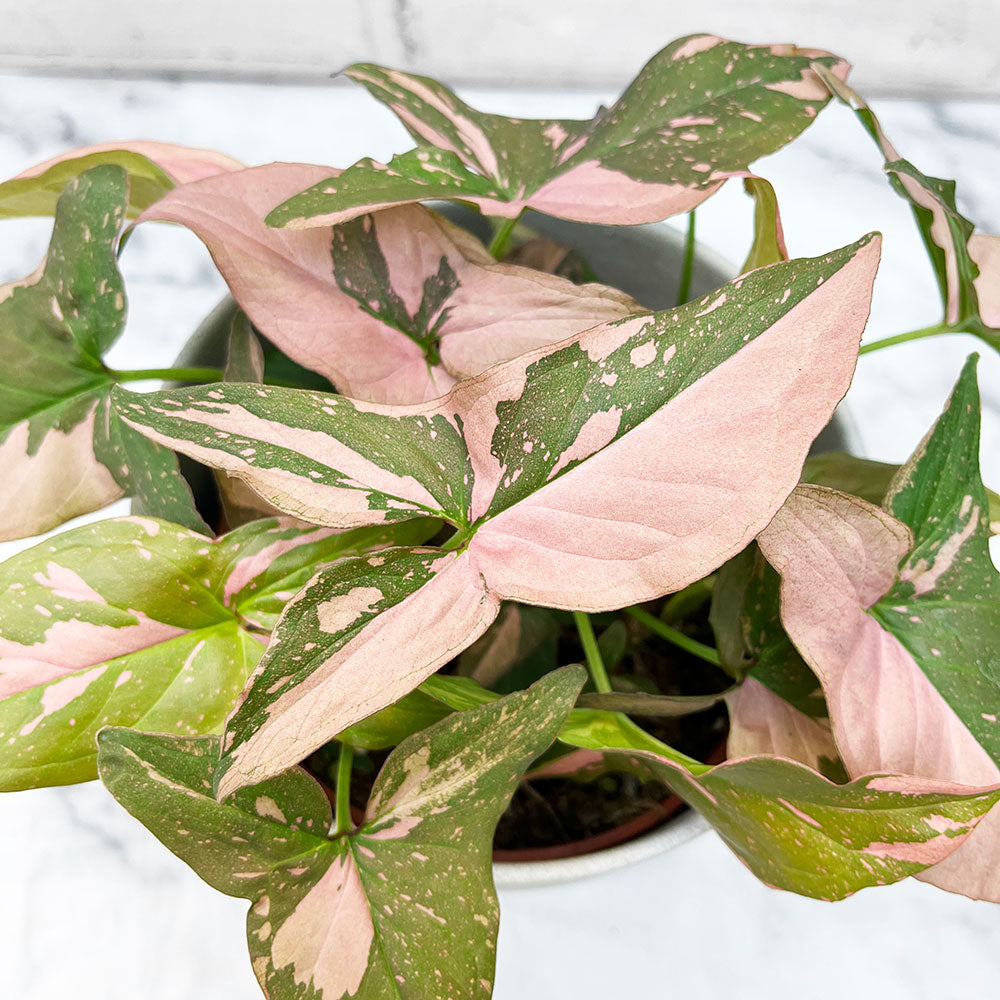
The Pink Arrowhead Plant stands is a charming and vibrant choice. With its distinctive pink hues and arrowhead-shaped leaves, this plant not only adds a touch of elegance to your space but also thrives with minimal care.

Turtle vine (Callisia repens) Flower, Leaf, Care, Uses - PictureThis

Unveiling the Allure of the Pink Arrowhead Plant:

The Pink Arrowhead plant, scientifically known as Syngonium podophyllum, is a delightful member of the arrowhead family. Its leaves start with a captivating blend of green and pink, evolving into deeper shades as the plant matures. This ornamental beauty is a perfect companion for both novice and experienced plant enthusiasts.

Cultivating Pink Beauty:

Light Requirements: Pink Arrowhead plants thrive in bright, indirect light. They can tolerate lower light conditions, but to enhance the vibrancy of their pink tones, providing ample light is recommended.

Watering Wisdom: These plants appreciate consistently moist soil. Water when the top inch of the soil feels dry, but avoid overwatering to prevent root rot. Maintaining a well-balanced watering routine is key to their health.

Soil and Potting: Plant your Pink Arrowhead in a well-draining potting mix to ensure proper aeration for the roots. A mix tailored for tropical plants is ideal.

Temperature Preferences: Pink Arrowhead plants prefer a warm and humid environment. Keep them in a room with temperatures ranging from 60 to 75°F (15-24°C) for optimal growth.

Enhancing Your Growing Experience:

Humidity Boost: Pink Arrowhead plants thrive in humid conditions. Increase humidity by misting the plant regularly or placing a tray of water near its pot.

Fertilization Routine: Feed your Pink Arrowhead with a balanced liquid fertilizer during the growing season (spring and summer) to promote healthy growth. Follow the package instructions for application.

Pruning for Shape: To maintain a bushy and well-shaped appearance, consider pruning your Pink Arrowhead plant. Pinch back the tips regularly to encourage lateral growth.

Propagation Tips: Expand your collection by propagating your Pink Arrowhead through stem cuttings. Place the cuttings in water or directly in soil for root development.

20 - 35cm Syngonium Pink Splash Arrowhead Plant 14cm Pot House Plant –  Plants For All Seasons

Quick Reference Growing Guide: Pink Arrowhead Plant

Aspect of Care Guidelines
Light Requirements Bright, indirect light; adaptable to lower light conditions
Watering Keep soil consistently moist; water when the top inch feels dry
Soil Type Well-draining tropical mix
Temperature 60-75°F (15-24°C)
Humidity Moderate to high; misting or using a water tray is beneficial
Fertilization Balanced liquid fertilizer during the growing season; follow package instructions
Pruning Regularly pinch back tips for a bushy appearance
Propagation Easily propagated through stem cuttings; root in water or soil


The Pink Arrowhead Plant is not just a botanical addition to your indoor haven; it’s a statement of elegance and simplicity. With its striking pink foliage and minimal care requirements, it’s an ideal choice for anyone looking to enhance their living space with a touch of natural beauty. Let the Pink Arrowhead grace your home, bringing joy and tranquility to your indoor oasis.

Epic Epazote: A Taste of Luxury in Every Dish

Epic Epazote: A Taste of Luxury in Every Dish

In the vibrant tapestry of herbs that adorn kitchens worldwide, the Epazote plant stands out as a unique and flavorful addition. Originating from Central America, specifically Mexico and Guatemala, this herb, scientifically known as Dysphania ambrosioides, has earned its place as a culinary treasure with a myriad of health benefits. Join us on a journey to explore the Epazote plant, from its roots to the plate, and discover why it deserves a prime spot in your garden and kitchen.

Epazote Plant: A Culinary Marvel

Cultivation and Characteristics

Epazote is celebrated not just for its aromatic leaves but also for its simplicity in cultivation. Thriving in warm climates and well-drained soil, this herb can be grown both outdoors and indoors, making it accessible to gardening enthusiasts regardless of space constraints. Its serrated, elongated leaves give off a pungent aroma, described as a blend of citrus, mint, and earthiness, setting it apart from other herbs.

Versatility in the Kitchen

The Epazote plant has long been a culinary secret in Mexican and Central American cuisines, where its distinct flavor elevates a variety of dishes. One of its primary culinary roles is in bean dishes, where its addition not only imparts a unique taste but also aids in digestion, minimizing the notorious gassiness associated with beans.

Beyond beans, Epazote adds depth to seafood dishes, soups, stews, and even beverages. The herb’s versatility shines as it effortlessly complements diverse ingredients, contributing to an unparalleled culinary experience.

Unlocking Health Benefits

Digestive Aid and Antimicrobial Properties

Epazote isn’t just a flavor enhancer; it also offers a range of health benefits. Traditionally used in folk medicine, this herb is believed to possess digestive properties, aiding in the breakdown of complex carbohydrates and reducing bloating. Its antimicrobial properties further contribute to its reputation as a natural digestive remedy.

Anti-Parasitic Potential

In certain cultures, Epazote has been embraced for its potential anti-parasitic effects. Some believe that incorporating this herb into the diet may help combat certain intestinal parasites, showcasing its value not only in culinary creations but also in holistic well-being.

Incorporating Epazote into Your Culinary Repertoire

Simple Recipes for Everyday Delights

Whether you’re a seasoned chef or an aspiring home cook, integrating Epazote into your culinary repertoire is a straightforward and rewarding experience. For a quick introduction, consider infusing Epazote leaves into your favorite bean dishes, imparting a unique and delightful flavor.

For a refreshing twist, experiment with Epazote-infused beverages. A simple tea, combining fresh Epazote leaves with hot water, can offer a soothing and aromatic experience. For a more adventurous palate, try incorporating Epazote into your cocktail creations for a subtle herbal infusion.

Growing Epazote at Home

Step-by-Step Guide

Growing Epazote at home is an enjoyable and rewarding endeavor. Begin by selecting a sunny spot for your garden or using pots if space is limited. Plant Epazote seeds or seedlings, ensuring well-drained soil and regular watering. As the plant matures, you’ll be able to harvest fresh leaves for your culinary exploits.

Grow Your Own Chocolate Mint plant Oasis with Our Expert Tips

Grow Your Own Chocolate Mint plant Oasis with Our Expert Tips

Are you a herb enthusiast looking to add a touch of sweetness to your garden? Look no further than the delightful chocolate mint plant. Known for its rich aroma and delectable flavor, this herb is a must-have for both culinary and ornamental purposes. In this comprehensive guide, we’ll explore everything you need to know about growing and caring for chocolate mint plants.

 Getting to Know the Chocolate Mint Plant

Chocolate mint (Mentha x piperita ‘Chocolate’) is a delightful cultivar of the peppermint family, renowned for its distinct chocolatey undertones. This aromatic herb boasts dark green, serrated leaves with a hint of purple, making it not only a flavorful addition to your kitchen but also an eye-catching ornamental plant in your garden.

Planting Your Chocolate Mint plant: A Step-by-Step Guide

1. Location Matters: Choosing the right location is crucial for the success of your chocolate mint plant. These herbs thrive in partial shade, making them ideal for planting beneath taller plants or near structures that provide dappled sunlight.

2. Soil Requirements: Chocolate mint plants prefer well-draining soil with a slightly acidic to neutral pH. Incorporate organic matter into the soil to enhance its fertility and water retention capabilities.

3. Planting Depth and Spacing: When planting chocolate mint, ensure you place the seeds or seedlings at a depth of about 1/4 inch in the soil. Space the plants approximately 18 to 24 inches apart to allow for optimal growth and air circulation.

Caring for Your Chocolate Mint Plant: Tips and Tricks

1. Watering: Chocolate mint plants thrive in consistently moist soil. Water them regularly, especially during dry spells, but be cautious not to oversaturate the soil, as mint plants are susceptible to root rot.

2. Pruning: Regular pruning is essential to encourage bushier growth and prevent the plant from becoming too leggy. Pinch off the tips of the stems to promote lateral branching and a fuller, more robust plant.

3. Harvesting: The best part of growing chocolate mint is the joy of harvesting. You can start harvesting the leaves once the plant reaches a height of 6 to 8 inches. Use scissors or your fingers to snip the leaves, and don’t be afraid to indulge in the aromatic experience as you do.

Chocolate Mint in the Kitchen: Culinary Delights Await

The culinary uses of chocolate mint are as diverse as its aromatic profile. From desserts and beverages to savory dishes, this herb can elevate your culinary creations. Try adding freshly chopped chocolate mint leaves to your favorite chocolate-based desserts, or infuse them into hot and cold beverages for a refreshing twist.

Swedish Ivy : A Guide to Growing and Caring for this Charming Houseplant

Swedish Ivy : A Guide to Growing and Caring for this Charming Houseplant

Swedish Ivy, scientifically known as Plectranthus australis, is a delightful and easy-to-care-for houseplant that can bring a touch of greenery to any indoor space. Perfect for beginners, this trailing plant is characterized by its lush, glossy leaves and low-maintenance nature. In this guide, we’ll explore the essentials of growing and caring for Swedish Ivy, making it an ideal companion for those venturing into the world of indoor gardening.

File:Plectranthus coleoïdes.JPG - Wikimedia Commons

Getting Started with Swedish Ivy:

Choosing the Right Location:

Swedish Ivy thrives in bright, indirect light but can tolerate lower light conditions. Avoid exposing it to direct sunlight for extended periods, as this can scorch the leaves.

Optimal Temperature and Humidity:

Maintain a comfortable indoor temperature between 60-75°F (15-24°C) and provide moderate humidity. Regular misting or placing a tray of water nearby can help create a favorable environment.

Selecting the Right Soil:

Use a well-draining potting mix to ensure proper water drainage and prevent waterlogged roots. A standard indoor potting mix works well for Swedish Ivy.

Planting and Watering:

Choosing the Right Pot:

Select a pot with drainage holes to prevent water accumulation. Repotting may be necessary if the plant outgrows its current container.

Watering Routine:

Allow the top inch of the soil to dry out before watering. Water thoroughly, ensuring excess water drains away. Adjust the frequency based on the plant’s specific needs and environmental conditions.

Caring for Swedish Ivy:

Pruning and Pinching:

Encourage bushiness by regularly pinching back the tips. Pruning can also help maintain a desirable shape and size for your Swedish Ivy.

Fertilizing Routine:

Feed the plant with a balanced liquid fertilizer during the growing season (spring and summer). Follow package instructions for dilution and frequency.

Dealing with Pests:

Swedish Ivy is generally resistant to pests, but occasionally, spider mites or aphids may appear. Keep an eye out for any signs of infestation and treat promptly with insecticidal soap if needed.

Propagation:

Swedish Ivy is easily propagated through stem cuttings. Snip a healthy stem with a few leaves and root it in water or directly in soil. This is a fun way to create new plants and share the joy of Swedish Ivy with friends.

Variegated Swedish Ivy - Plectranthus coleoides 'Variegata' – ServeScape

Effortless Growing Quick Guide

Aspect of Care Guidelines
Light Requirements Bright, indirect light; can tolerate lower light conditions
Temperature 60-75°F (15-24°C) indoors
Humidity Moderate humidity; misting or using a water tray can be beneficial
Soil Type Well-draining potting mix
Watering Allow top inch of soil to dry before watering; water thoroughly
Pot Type Use pots with drainage holes to prevent waterlogging
Pruning/Pinching Regularly pinch back tips to encourage bushiness
Fertilizing Balanced liquid fertilizer during the growing season (spring/summer)
Pest Control Generally pest-resistant; monitor for spider mites or aphids
Propagation Easily propagated through stem cuttings; root in water or soil


Majestic Alliums

Alliums

Alliums, commonly known as ornamental onions, stand out as a fascinating and diverse family of flowering bulbs that can elevate any garden. Renowned for their distinctive spherical blooms, these hardy perennials add a touch of architectural elegance and whimsy to outdoor spaces. Allium varieties come in an array of sizes, from delicate 12-inch wonders to towering giants reaching over 3 feet in height. The blossoms, ranging in colors from majestic purples and blues to bright whites, create a captivating visual spectacle.

Buy Allium Gladiator Bulbs | J Parker Dutch Bulbs

Whether you’re a seasoned gardener or just starting out, These are your floral friends. They bring that extra touch of elegance and magic to your outdoor space. So, if you want a garden that feels like a fairytale, let alliums work their enchanting wonders!

Planting alliums can be a rewarding experience, adding unique and striking blooms to your garden. Here’s a step-by-step guide:

Hooker's Onion – Sparrowhawk Native Plants

  1. Select the Right Bulbs: Choose high-quality allium bulbs from a reputable supplier. This come in various sizes and colors, so consider the specific variety that suits your garden design.
  2. Choose the Right Location: Alliums prefer well-draining soil and thrive in full sun. Select a location with good sunlight exposure to encourage healthy growth and vibrant blooms.
  3. Planting Time: Plant allium bulbs in the fall, usually from September to November. This allows them to establish roots before winter and bloom in the spring or early summer.
  4. Soil Preparation: Ensure the soil is well-draining by adding organic matter, like compost, to improve fertility. Alliums prefer slightly alkaline to neutral soil.
  5. Planting Depth: Plant the bulbs at a depth of three times their diameter. For larger allium varieties, this may be around 6 to 8 inches deep.
  6. Spacing: Space the bulbs according to the specific variety’s recommendations. Generally, plant them 6 to 8 inches apart to allow proper air circulation.
  7. Watering: Water the bulbs thoroughly after planting to help settle the soil and initiate root growth. Water sparingly throughout the winter, as alliums prefer drier conditions during their dormancy.
  8. Mulching: Apply a layer of mulch over the planting area to regulate soil temperature and suppress weeds. This is especially important in colder climates.
  9. Fertilizing: It typically don’t require much fertilizer. However, you can add a balanced fertilizer in the spring as new growth emerges.
  10. Maintenance: Remove spent flowers to encourage the plant’s energy to focus on bulb development. Alliums are generally low-maintenance and can naturalize over time.

By following these steps, you can enjoy the beauty of alliums in your garden, bringing a burst of color and architectural interest to your landscape.