Elevate Your Space with Green and White Leaf Plant: A Fusion of Beauty and Serenity

green and white leaf plant

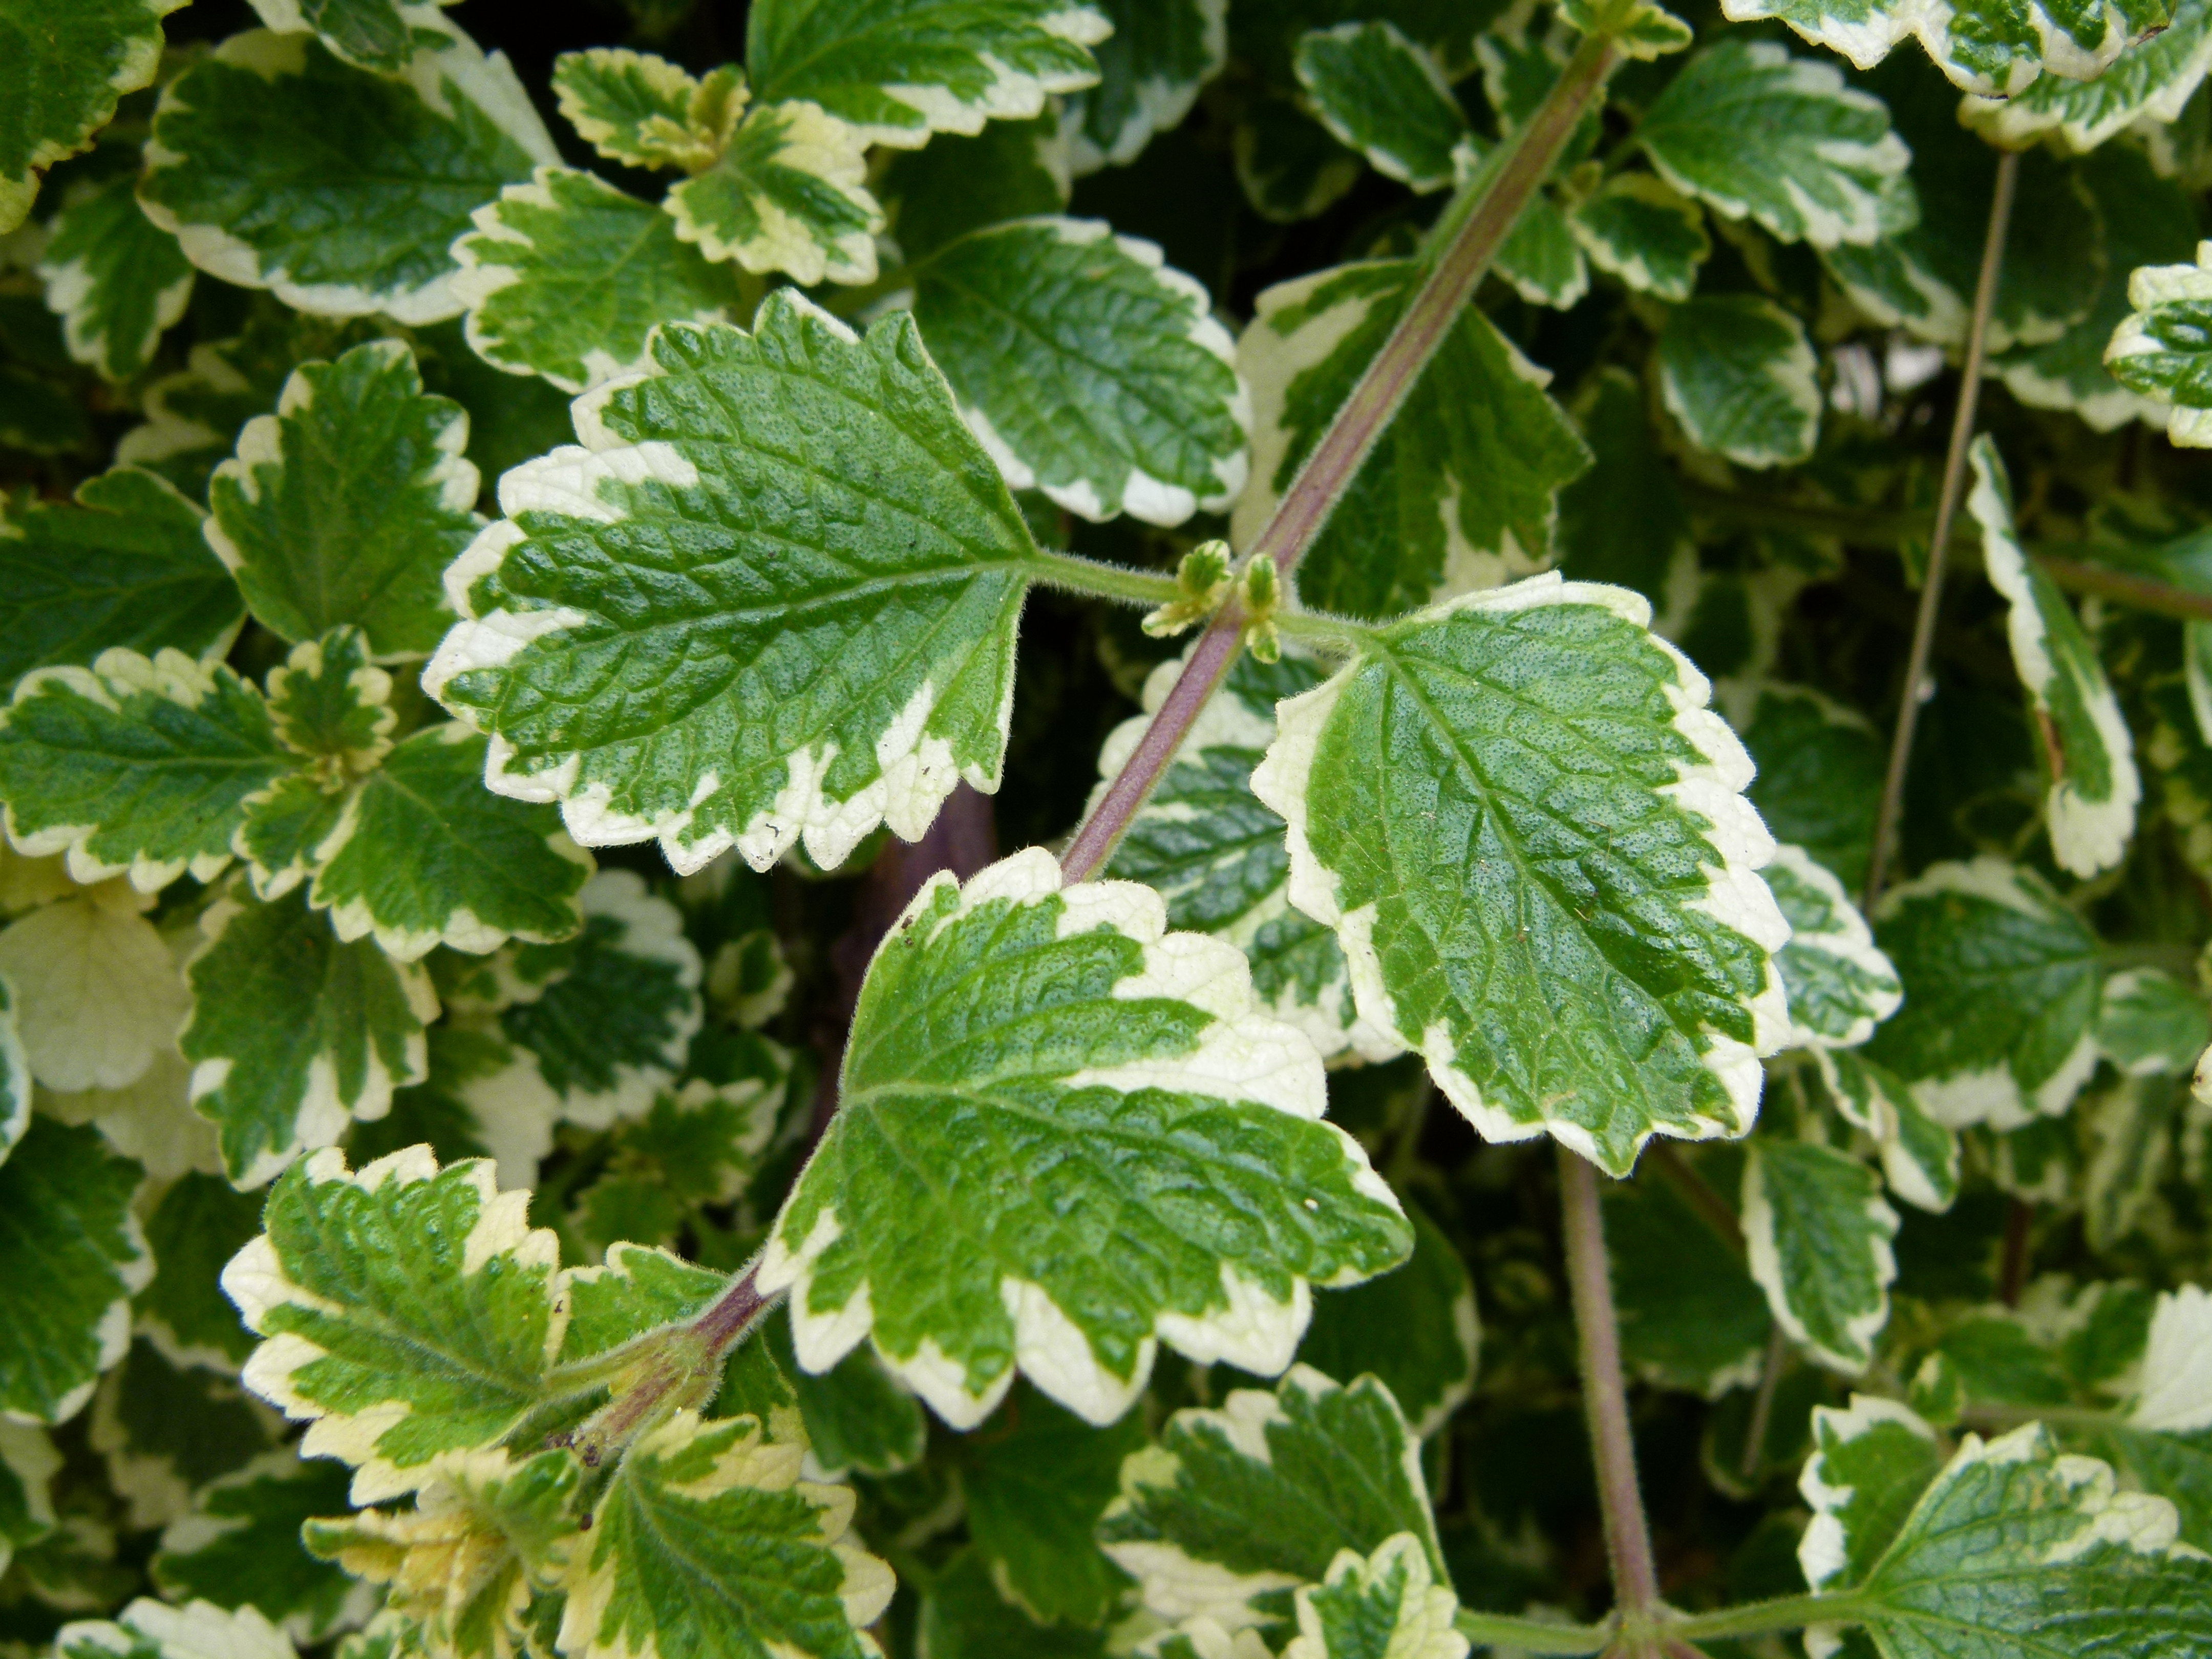
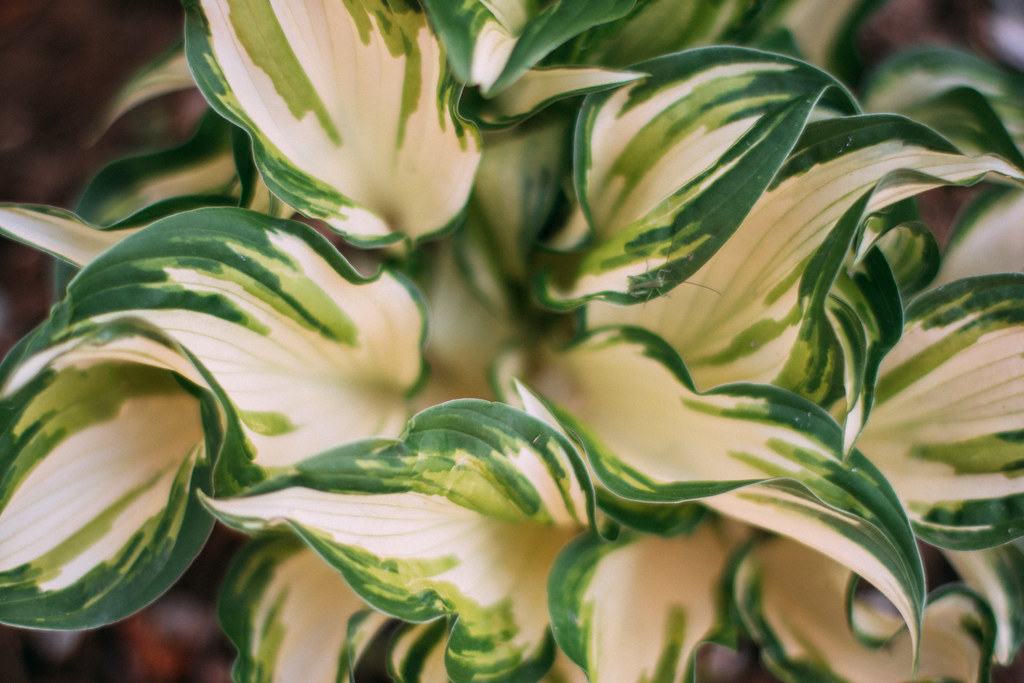
Green and White Leaf Plant, stands out as a favored choice among plant enthusiasts, introducing a refreshing visual appeal to indoor spaces. Characterized by lush green leaves adorned with contrasting white patterns, these plants are diverse, coming in various species, each with its distinct leaf shapes and sizes.

What makes these plants especially appealing is their adaptability to indoor conditions, thriving with moderate light and forgiving watering requirements. Beyond their decorative role, these green and white leaf plant, including popular varieties like Pothos and Spider Plants, are recognized for their ability to purify indoor air, enhancing overall air quality.

Suitable for both beginners and experienced gardeners, these indoor plants are valued for their low-maintenance nature and resilience. Whether placed in hanging baskets, stylish pots, or on shelves, they infuse spaces with a natural charm, contributing to a serene and aesthetically pleasing atmosphere. The enduring popularity of green and white foliage underscores its timeless allure, making these plants integral to indoor gardening and interior design, fostering both beauty and well-being in indoor environments.

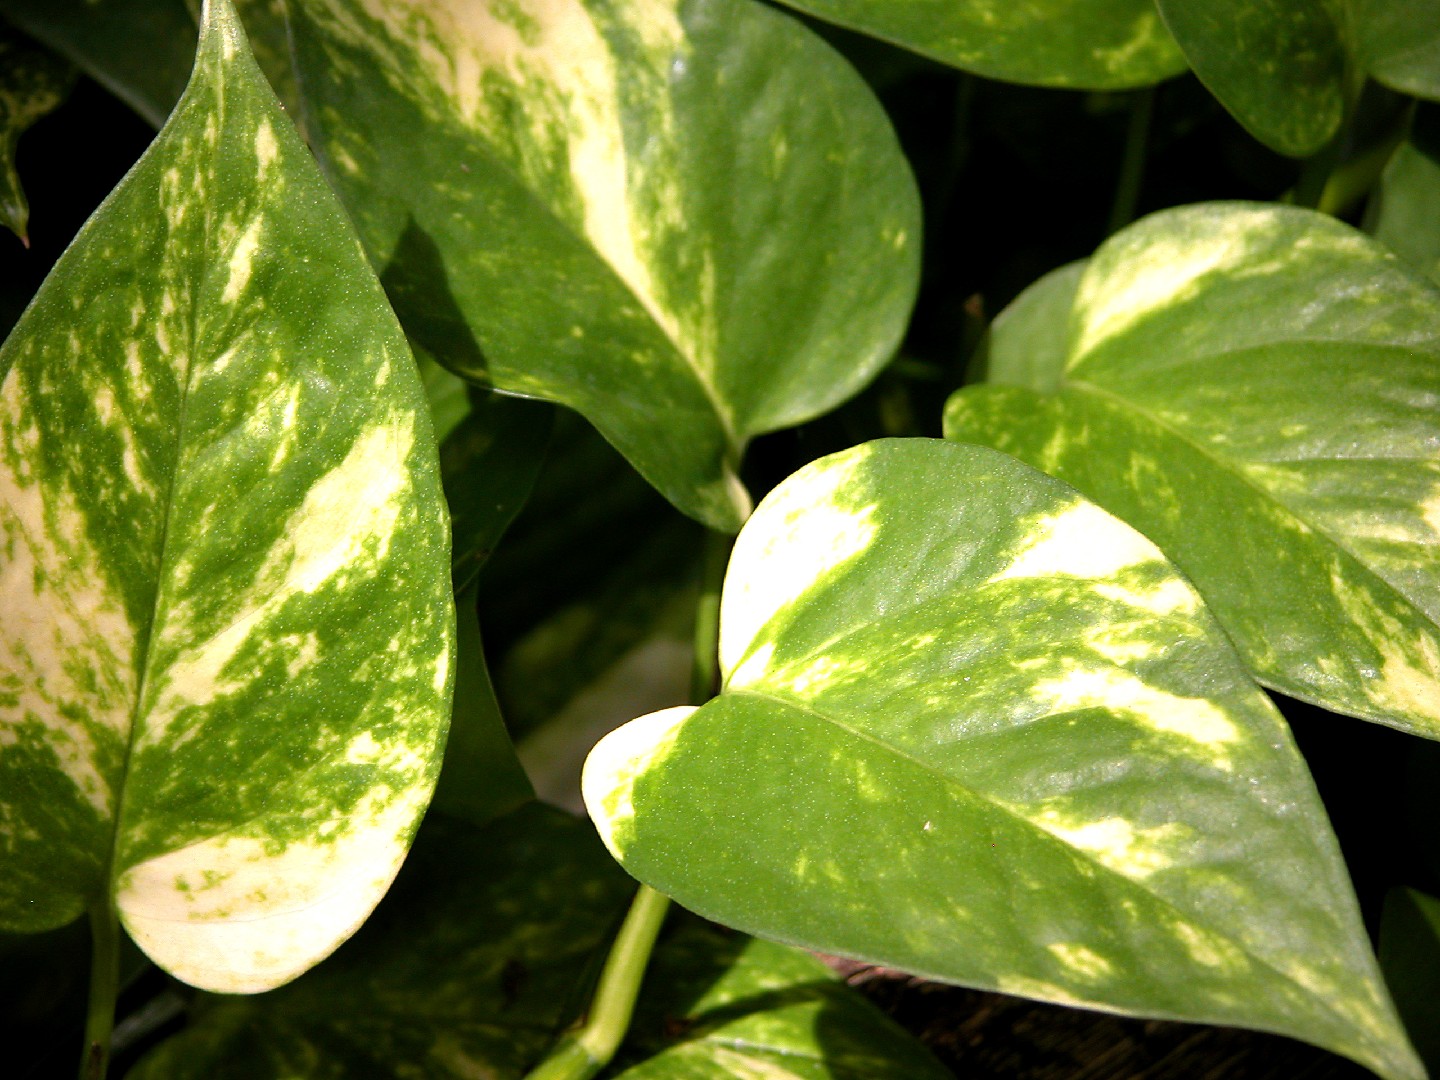
Pothos (Epipremnum aureum):

Green and White Leaf Plant, Commonly known as devil’s ivy, Pothos is the best choice for green and white foliage indoors. Its heart-shaped leaves have distinctive green, white or yellow hues and add elegance to any space. Pothos is incredibly adaptable and can thrive in a variety of lighting conditions, making it an excellent choice for beginners and gardeners alike. This perennial plant is known for its air-purifying properties, making it a beautiful and healthy addition to homes and offices.

Golden pothos (Epipremnum aureum) Flower, Leaf, Care, Uses - PictureThis

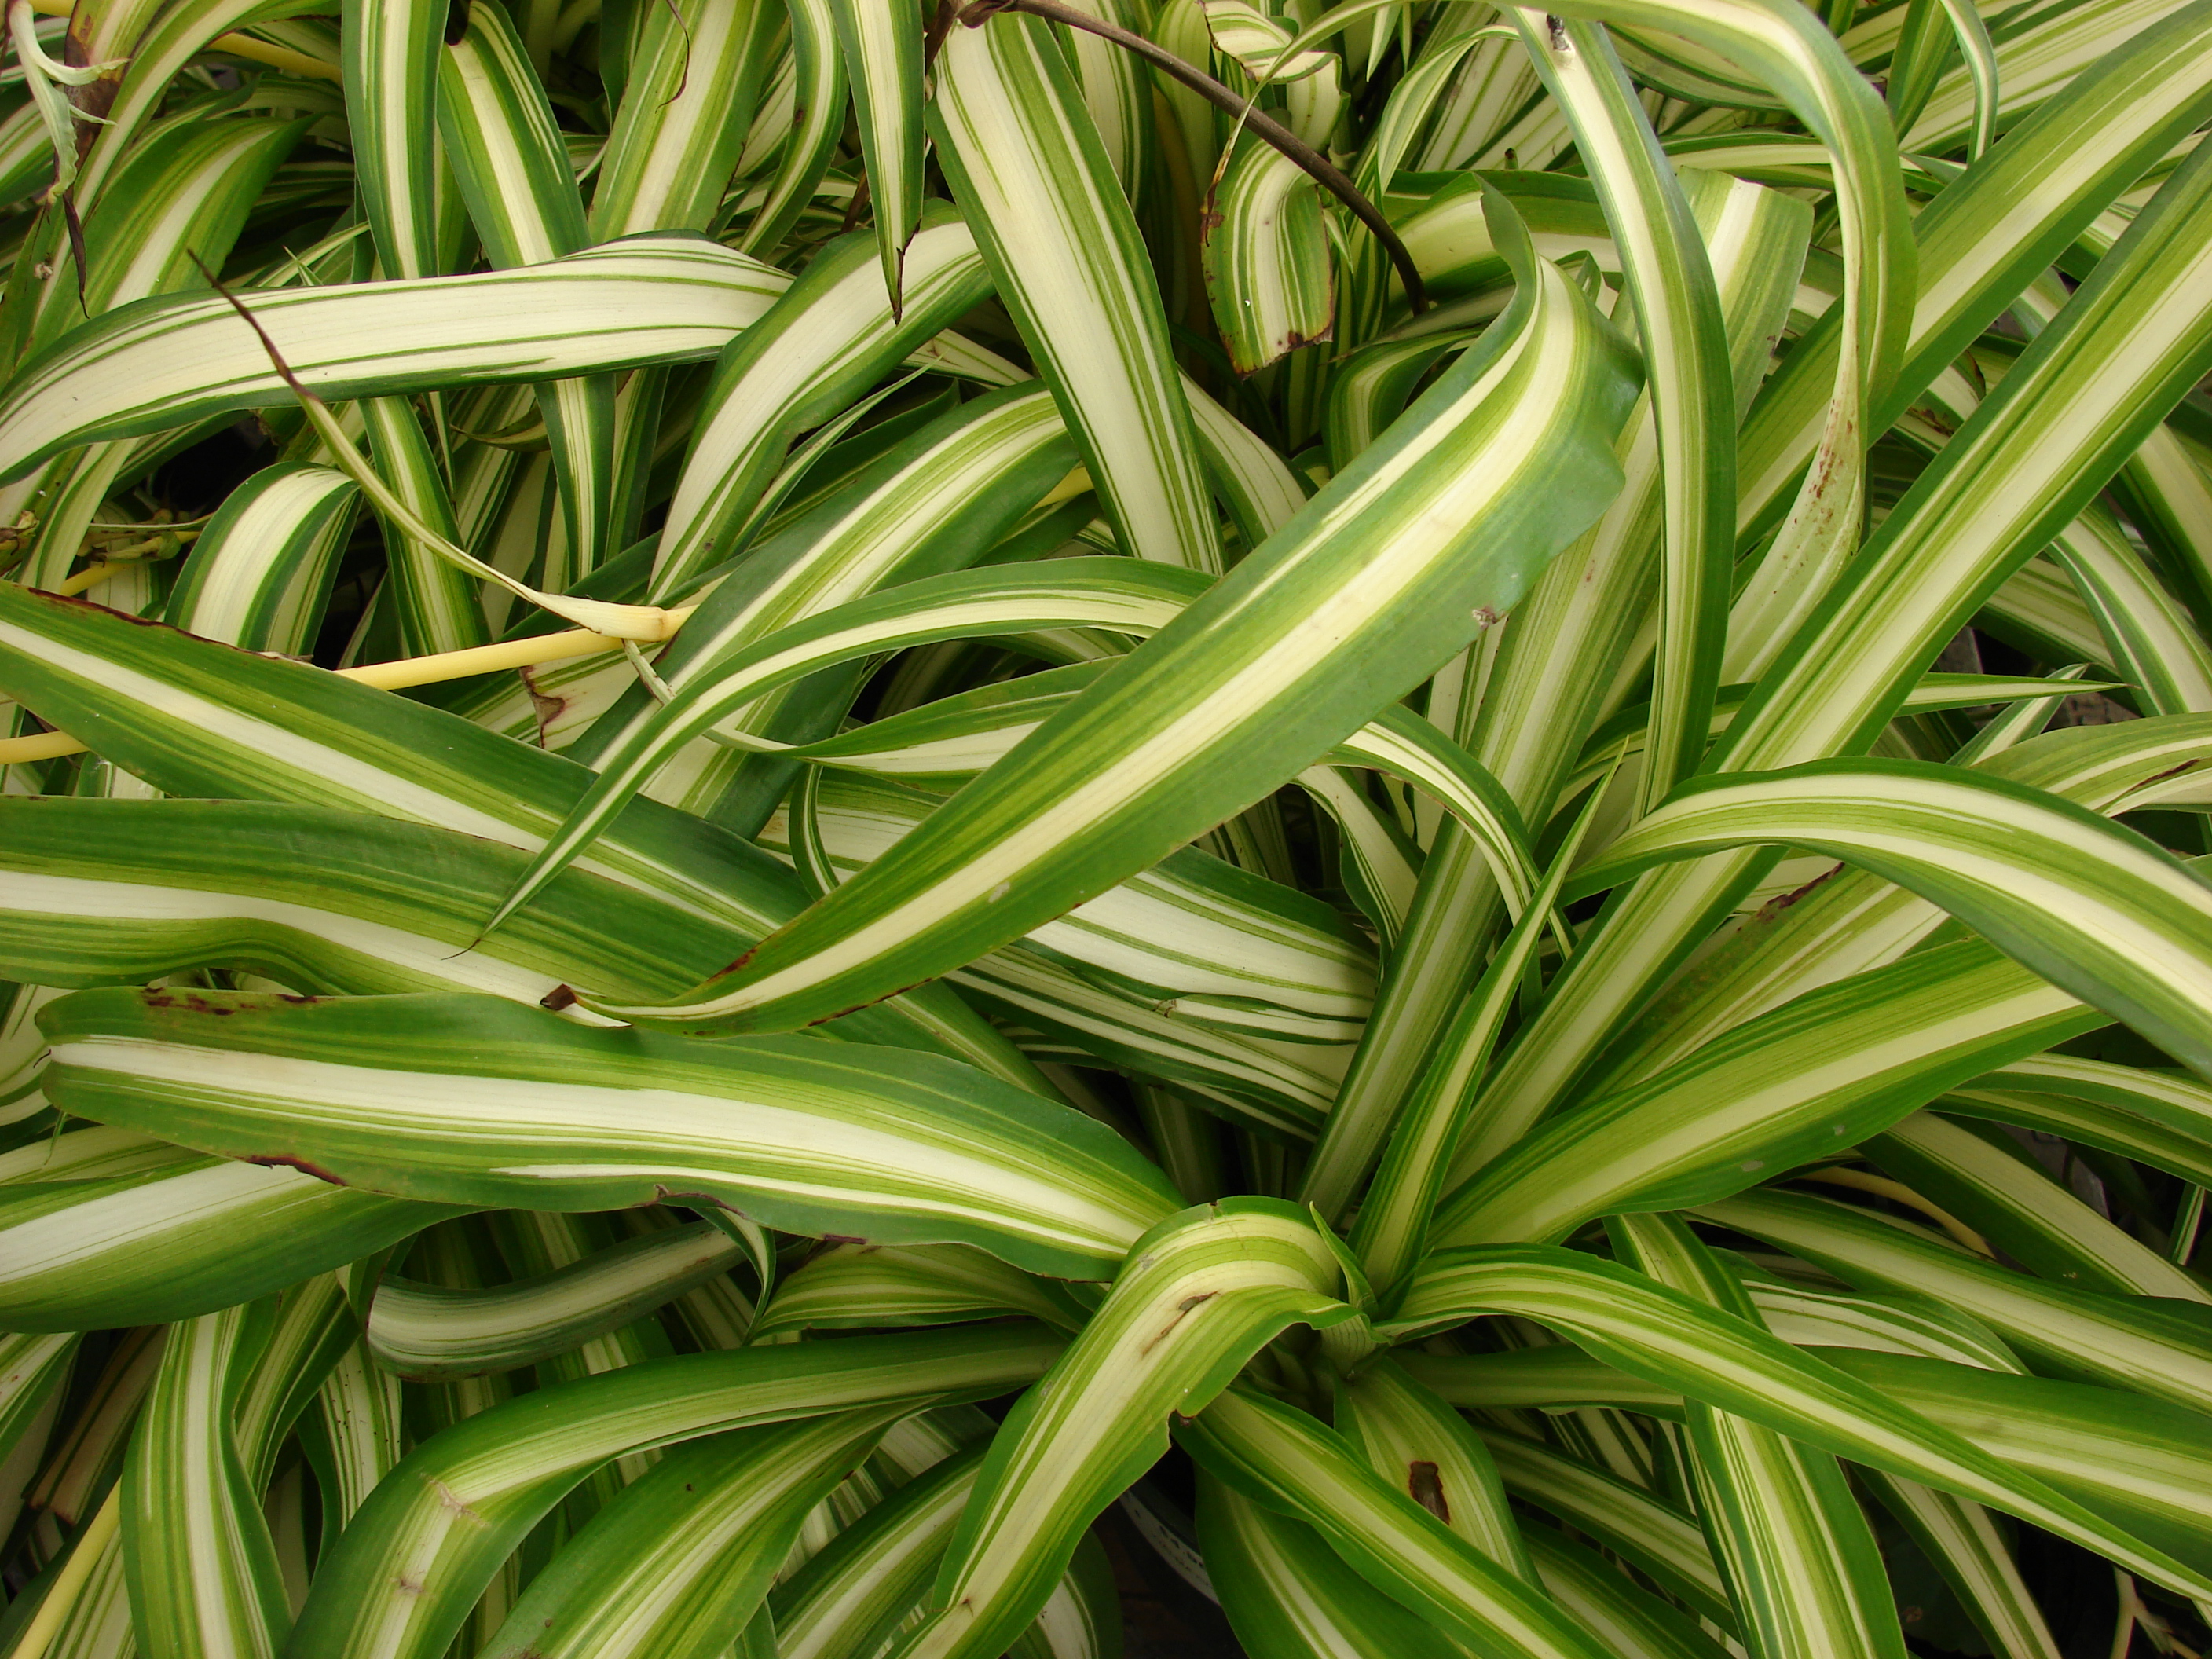
Chlorophytum comosum:

Green and White Leaf Plant Chlorophytum comosum, known for its curved leaves and air purifying properties, is a classic indoor plant with green and white leaves. This variegated variety displays green and white striped leaves, creating a visually stunning appearance. Spider plants are known for their hardiness and adaptability to different light conditions. They are especially suitable for hanging baskets and adding a new touch to vertical spaces. Requiring minimal maintenance and capable of producing spiders, this plant is perfect for those looking to enhance their indoor space with a beautiful growing option.

File:Starr 080117-1516 Chlorophytum comosum.jpg - Wikimedia Commons

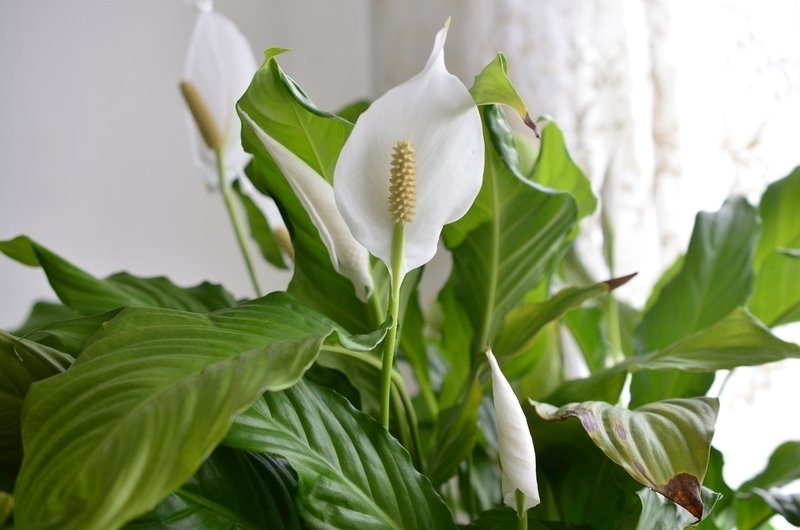
Peace Lily (Spathiphyllum spp.):

Green and White Leaf Plant, Peace lilies are known for their beautiful white flowers and are also available in variegated options with green and white petals. A variety such as ‘Domino’ is characterized by bright green leaves decorated with white patterns. Peace lilies are known for their air-purifying properties and thrive in low to medium light, making them a good choice for indoor environments. With their beautiful appearance and tolerance for occasional neglect, peace lilies add tranquility to the living space while helping to improve air quality.
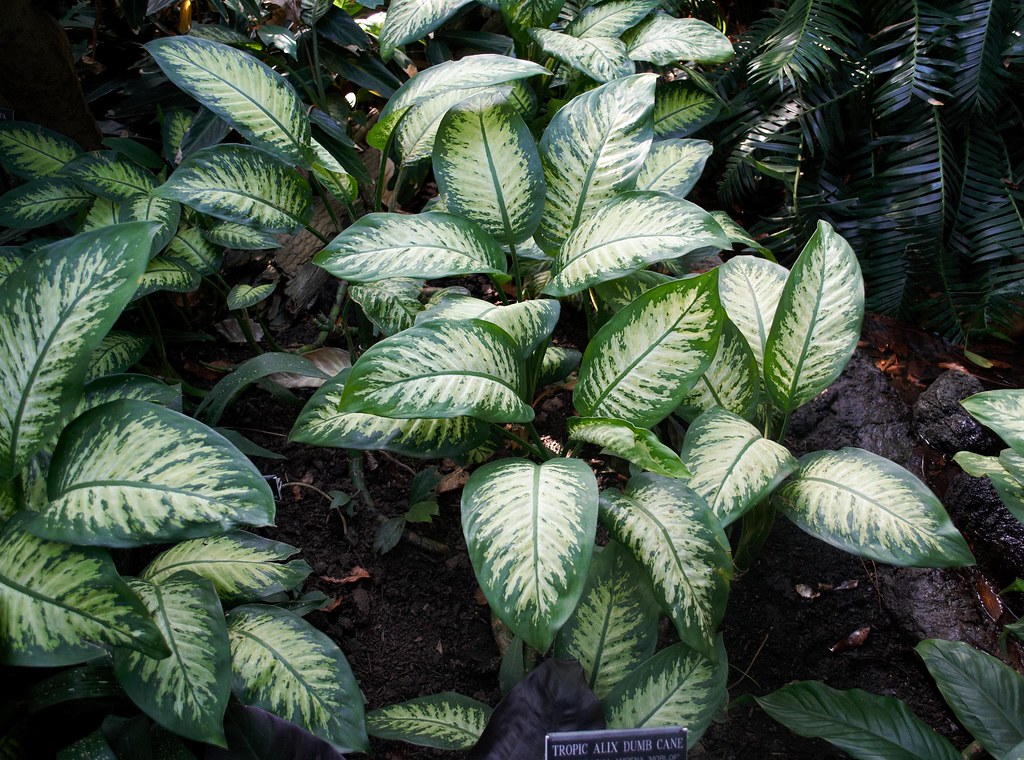
Houseplant of the month: Peace Lily - Frosts

Dieffenbachia spp.:

Dieffenbachia, or fool’s vine, is an excellent houseplant with large, tropical leaves in mixed shades of green and white. Its beautiful foliage makes it a popular choice for adding a touch of warmth to your interior. Dieffenbachia is a low-maintenance plant and can tolerate low light, but likes bright, indirect light. Although care with its water is necessary, proper drainage and regular watering make this plant a beautiful and easy-care addition to the home and garden.

Tropic Alix Dumb Cane ( Dieffenbachia sp.) | Brooklyn Botani… | Flickr

Calathea varieties:

Green and White Leaf Plant, Calathea species such as Calathea lancifolia (rattlesnake plant) and Calathea orbifolia are prized for their green leaves and green and white colors. Thanks to its unique response to light, the leaves open and close every day. Calathes love indirect light, moisture and regular soil, making them suitable for good care in a good indoor setting. The beautiful beauty of Calathea plants makes them attractive to those looking for beauty and visual beauty in the greenhouse.

Angel wings (Caladium lindenii) Flower, Leaf, Care, Uses - PictureThis

टमाटर कैसे उगाएं: 6 अद्भुत और शक्तिशाली कदम

टमाटर कैसे उगाएं

टमाटर कैसे उगाएं, टमाटर को अपने बगीचे से उगाना एक सुरक्षित और स्वास्थ्यपूर्ण विकल्प है जो आपको स्वदेशी और ताजगी से भरपूर टमाटर प्रदान कर सकता है। यह विवरण आपको बगीचे में टमाटर कैसे उगाएं, इस प्रक्रिया के लिए एक विस्तृत मार्गदर्शन प्रदान करता है। इसमें आपको उचित बीज़ का चयन, मिट्टी की तैयारी, सिंचाई, पोषण, सही समय पर पौधों की देखभाल, उर्वरक का उपयोग, और पौधों को समर्थन प्रदान करने जैसी महत्वपूर्ण जानकारी मिलेगी। इसका पालन करते हुए आप अपने बगीचे में स्वस्थ और स्वादिष्ट टमाटर उगा सकते हैं और आपकी सेहत को भी लाभ हो सकता है।

Tomato Growing Basics - Prairie Gardens & Jeffrey Alans

1. टमाटर कैसे उगाएं, उचित बीज़ का चयन:

टमाटर के बागवानी के लिए सही बीज़ों का चयन करना महत्वपूर्ण है। आप इन्हें अपने स्थानीय बाजार से प्राप्त कर सकते हैं या स्वतंत्र बाजारों से खरीद सकते हैं। यह आपकी ज़रा जिम्मेदारी होती है कि आप विशेषज्ञों की सलाह भी लें, जो आपको उचित और सुरक्षित बीज़ों का चयन करने में मदद कर सकते हैं।

2. बोना हुआ बुआई:

टमाटर कैसे उगाएं, बीजों को मिट्टी में धारित करने के लिए, सही गहराई में छिद्र बनाएं। इसके बाद, उन्हें धूप में अच्छे से सुखाएं और सावधानीपूर्वक इसे बोने गए क्षेत्र में फेंकें, सुनिश्चित करने के लिए कि बोने गए बीज पूरी तरह से उपयुक्तता और प्रबंध मिला है।

Growing Tomatoes in Pots | Bonnie Plants

3. मिट्टी का चयन:

टमाटर कैसे उगाएं, उर्वरक से भरपूर और फलों के लिए उपयुक्त मिट्टी का चयन करने में महत्वपूर्ण भूमिका है। यह मिट्टी पौधों को उर्जा प्रदान करने के लिए आवश्यक तत्वों से युक्त होती है, जिससे पौधों का समृद्धि सहज होता है। उर्वरक से भरपूर मिट्टी में खाद्यान्न और पोषक तत्वों की अच्छी मात्रा होती है, जिससे पौधों को सही पोषण मिलता है।

इसके साथ ही, यह मिट्टी फलों के उत्पन्न में भी मदद करती है, क्योंकि उसमें अच्छी सुस्ती और सुरक्षित प्रकार से फल पलन होता है। मिट्टी की यह गुणवत्ता पौधों को समृद्धि देने के साथ-साथ उन्हें सुरक्षित रूप से बनाए रखने में भी मदद करती है, क्योंकि सही मात्रा में उर्वरक प्रदान करना पौधों के स्वस्थ और सुरक्षित विकास के लिए आवश्यक है।

इसलिए, जब आप मिट्टी का चयन करते हैं, तो उर्वरक से समृद्ध मिट्टी का चयन करना पौधों के सही विकास और सुरक्षित प्रकार से उत्पन्न होने में महत्वपूर्ण है।

How to grow Tomatoes | RHS Vegetables

4. सही सिंचाई:

टमाटर कैसे उगाएं, टमाटर पौधों के उगाने में नियमित सिंचाई एक महत्वपूर्ण पहलू है। सिंचाई के माध्यम से पौधों को आवश्यक ऊर्जा, पोषण, और जल संचारित किया जाता है, जिससे वे स्वस्थ और प्रफुल्लित रहते हैं। हालांकि, यह ध्यान रखना महत्वपूर्ण है कि सिंचाई को अधिक मात्रा में न करें, क्योंकि यह पौधों को पानी की अधिक मात्रा में डाल सकता है जिससे पौधों को प्रतिरोधी हो सकता है।

इसलिए, जब आप नियमित सिंचाई करते हैं, सुनिश्चित करें कि पानी की भारी मात्रा से बचते हैं। पौधों को ठंडक प्रदान करने के लिए, सिंचाई को सुबह के समय या शाम को करना उत्तम होता है, जब तापमान में शीतलता होती है। इससे पौधों को सही रूप से जल पहुंचता है और वे पूरी तरह से हैल्दी रहते हैं।

5. सूचना और सुरक्षा:

टमाटर कैसे उगाएं, टमाटर पौधों को सही रूप से नकली सूचना और सुरक्षा प्रदान करना अत्यंत महत्वपूर्ण है। यह सुनिश्चित करने में मदद करता है कि पौधे सही रूप से विकसित हो रहे हैं और उन्हें किसी भी प्रकार की समस्याएं नहीं हैं। सूचना का सही तरीके से प्रदान करना पौधों के सही विकास को सुनिश्चित करने में मदद करता है, जिससे विकसित होनेवाले पत्तियों और फूलों की सही संख्या और आकार को बनाए रखा जा सकता है।

सुरक्षा की दृष्टि से, टमाटर के पौधों को पत्तियों के बीच सही दूरी पर रखना भी अत्यंत महत्वपूर्ण है। यह नहीं सिर्फ पौधों को ठीक से फैलने और उच्चता की दिशा में मदद करता है, बल्कि यह भी सुनिश्चित करता है कि पौधों के बीच कोई अवांछित संपर्क नहीं है, जो संक्रमण और रोगों के फैलने का जोखिम कम करता है।

टमाटर कैसे उगाएं, इसके लिए, पौधों को सही समर्थन प्रदान करने के लिए स्टेक्स, ट्रेलिस, या मॉस पोल का उपयोग किया जा सकता है, जिससे पौधों को सहारा मिलता है और वे सही दिशा में बढ़ते हैं। यह भी यह सुनिश्चित करने में मदद करता है कि पौधे ठीक से खड़े रहें और उच्चता के साथ बढ़ें, जिससे उन्हें अधिक सूर्य प्राप्त हो सके और विकास की गति बनी रहे।

How to Grow the Best Tomatoes - Dennis' 7 Dees | Landscaping Services & Garden Centers

6. उर्वरक और पोषण:

टमाटर कैसे उगाएं, अगर आप अपने टमाटर के पौधों को स्वस्थ और सजीव रखना चाहते हैं, तो उन्हें नियमित अंतराल पर उर्वरकों से पोषित करना आवश्यक है, लेकिन इसमें अधिकता से बचना भी महत्वपूर्ण है। यदि आप अधिक मात्रा में उर्वरक प्रदान करते हैं, तो यह पौधों के लिए हानिकारक हो सकता है। इसके बजाय, सावधानी से और निर्धारित मात्रा में उर्वरक प्रदान करें।

पौधों की सतह पर दिखाई देने वाले नपुंसक फूलों को हटाना भी महत्वपूर्ण है। यह कार्य करने से पौधों को और अधिक ऊर्जा प्राप्त होती है, जिससे वे स्वस्थ और जीवंत रहते हैं। नपुंसक फूलों को हटाकर पौधों की सबसे अच्छी स्थिति में रखने के लिए नियमित मार्गदर्शन का अनुसरण करना सुनिश्चित करेगा।

इस पूर्ण मार्गदर्शन के परिणामस्वरूप, आप अपने घर के बगीचे में स्वस्थ और स्वादिष्ट टमाटर उगा सकते हैं, जिससे आपकी सेहत को भी लाभ होगा।


Discover Elegance: Burgundy Rubber Plant for Trendy Home Décor

Unlock the Beauty of Indoor Gardening with a Burgundy Rubber Plant

In the realm of indoor gardening, the Burgundy Rubber Plant stands out as a captivating choice that not only adds a touch of elegance to your living space but also brings nature indoors. This versatile and aesthetically pleasing plant has gained popularity for its striking burgundy-colored leaves and low-maintenance nature. In this article, we will delve into the world of Burgundy Rubber Plants, exploring their unique characteristics, care tips, and the incredible beauty they can unlock in your home.

Peperomia obtusifolia (baby rubber plant) 3 | Peperomia obtu… | Flickr-Burgundy-Rubber-Plant

The Allure of Burgundy Rubber Plants: A Visual Delight

The Burgundy  Plant, scientifically known as Ficus elastica, is renowned for its glossy, burgundy-hued leaves that instantly command attention. The deep, rich color adds warmth and sophistication to any room, making it a popular choice among indoor plant enthusiasts. Its large, broad leaves create a lush and tropical atmosphere, transforming your living space into a green oasis Burgundy Rubber Plant.

Understanding Burgundy Rubber Plant Care: Simplicity at Its Best

One of the key reasons behind the Burgundy Rubber Plant’s rising popularity is its ease of care. Even for those without a green thumb, maintaining the beauty of this plant is a straightforward process. Here are some essential care tips to ensure your Plant thrives:

1. Light: Burgundy Rubber Plants prefer bright, indirect light. Place them near a window with filtered sunlight to maintain their vibrant color. While they can tolerate lower light conditions, exposing them to too much direct sunlight can scorch their leaves.

2. Watering: These plants appreciate consistently moist soil but don’t like to sit in waterlogged conditions. Allow the top inch of soil to dry out before watering, and ensure proper drainage in the pot.

3. Temperature and Humidity: Burgundy Rubber Plants thrive in typical room temperatures and average humidity levels. Avoid exposing them to sudden temperature fluctuations and drafty areas.

4. Fertilization: During the growing season (spring and summer), feed your Burgundy Rubber Plant with a balanced liquid fertilizer every 2-4 weeks. Reduce feeding in the fall and winter when the plant is not actively growing.

5. Pruning: Prune your plant to maintain its desired shape and size. Remove any yellow or damaged leaves to encourage new growth.

Room Images | Free HD Background Photos, PNGs, Vectors & Illustrations - rawpixel-Burgundy Rubber Plant

Incorporating Burgundy Rubber Plants into Your Home Decor

The versatility of Burgundy Rubber Plants extends beyond their ease of care. These plants can be integrated seamlessly into various home decor styles, adding a touch of natural beauty. Here are some creative ways to incorporate Burgundy Rubber Plants into your living space:

1. Statement Plant:

Position a large Burgundy Rubber Plant as a focal point in your living room or bedroom. Its vibrant foliage will draw the eye and become a captivating centerpiece.

2. Corner Elegance:

Place a Burgundy Rubber Plant in an empty corner to breathe life into overlooked spaces. Its lush leaves will fill the area with a sense of vitality.

3. Stylish Planters:

Choose decorative planters that complement your interior design. Whether it’s a minimalist ceramic pot or a boho-chic basket, the Burgundy Rubber Plant adapts effortlessly to different aesthetics.

4. Vertical Gardens:

Create a stunning vertical garden by arranging multiple Burgundy Rubber Plants on wall-mounted shelves. This not only maximizes space but also adds a dynamic visual element to your decor.

Benefits Beyond Beauty: The Positive Impact of Indoor Plants

Beyond their aesthetic appeal, Burgundy  Plants offer several benefits that contribute to a healthier and more pleasant indoor environment. Here are some advantages of incorporating indoor plants like the Burgundy Rubber Plant into your home:

1. Air Purification:

Like many houseplants, Burgundy Plants contribute to air purification by absorbing toxins and releasing oxygen. This can enhance air quality and create a fresher living space.

2. Stress Reduction:

The presence of indoor plants has been linked to reduced stress and improved mental well-being. Their calming effect and connection to nature can create a more serene atmosphere in your home.

3. Productivity Boost:

Burgundy Rubber Plant, Studies have shown that the introduction of plants in indoor spaces can enhance productivity and concentration. Placing a Burgundy  Plant in your home office or study area can contribute to a more focused and productive work environment.

Burgundy Rubber Plant

Conclusion

In conclusion, the Plant is more than just a visually stunning houseplant; it’s a versatile and resilient addition to your indoor garden. With its captivating burgundy leaves, low-maintenance care, and positive impact on indoor environments, this plant unlocks the beauty of indoor gardening in a way that resonates with both novice and experienced plant enthusiasts .


Sweet Joe Pye Weed: Pink Blooms and Garden Elegance

Sweet Joe Pye Weed

Dive into the world of garden allure with the Sweet Joe Pye Weed, a native North American perennial that weaves a stunning tapestry of pink blooms. This ornamental gem not only brings an air of elegance to your outdoor haven but also becomes a bustling hub for butterflies and bees.

Spotted Joe Pye Weed | Photographed in Parc National D'Oka, … | Flickr

Exploring the Charm of Sweet Joe Pye Weed:

Botanical Charm: Eutrochium purpureum, affectionately known as Sweet Joe Pye Weed, boasts clusters of delicate pink flowers that gracefully dance atop sturdy stems. It’s a visual spectacle that unfolds in various shades of pink, casting a mesmerizing spell on onlookers and pollinators alike.

Cultivating Nature’s Poise:

Planting Panache:

Sweet Joe Pye Weed flourishes in well-drained, moist soil and revels in the spotlight of full to partial sunlight. Its adaptability makes it a versatile choice for gardens, meadows, or even the tranquility of rain gardens.

Hydration Harmony:

While this perennial can adapt to different moisture levels, consistent watering during dry spells nurtures its growth, ensuring a vibrant display of blooms throughout the season.

Stature and Flourish:

With an impressive height potential exceeding six feet, Sweet Joe Pye Weed offers a generous spread, making it a splendid backdrop in perennial borders or naturalized landscapes.

Garden Symphony:

Pairing Sweet Joe Pye Weed with fellow pollinator-friendly companions like coneflowers and black-eyed Susans creates a harmonious environment, attracting a diverse array of beneficial insects.

Enhancing Your Growing Experience:

Pruning Poise:

Embrace the art of deadheading to extend the floral display and maintain a neat appearance. Alternatively, leaving spent blooms in the fall provides a seasonal feast for winter birds.

Soil Serenade:

Enrich the soil with organic amendments before planting, and a protective layer of mulch aids in moisture retention and weed control.

Winter Sonata:

While resilient, Sweet Joe Pye Weed appreciates a cozy layer of mulch in late fall, offering an extra layer of protection during the winter chill.

Growing and Using a Sweet Joe Pye Weed - World of Flowering Plants

A Guide for Growing Sweet Joe Pye Weed:

Care Aspect Guidelines
Light Preferences Full to partial sunlight
Soil Symphony Well-drained, moist soil with organic enhancements
Watering Wisdom Regular watering during dry spells
Stature & Spread May exceed six feet in height with a generous spread
Companion Ensemble Perfect with pollinator-friendly companions like coneflowers and black-eyed Susans
Pruning Prowess Master the art of deadheading for prolonged blooms; consider leaving spent blooms for winter birds
Soil Serenade Enrich soil with organic matter; mulch for moisture retention
Winter Sonata Provide a protective mulch layer in late fall for added winter care

Conclusion:

Sweet Joe Pye Weed isn’t just a garden addition; it’s a living symphony of pink elegance. By inviting this perennial maestro into your outdoor space, you transform it into a flourishing sanctuary where nature’s charm takes center stage. Let Sweet Joe Pye Weed be the enchanting conductor of your garden’s graceful and vibrant performance.


Swedish Ivy : A Guide to Growing and Caring for this Charming Houseplant

Swedish Ivy : A Guide to Growing and Caring for this Charming Houseplant

Swedish Ivy, scientifically known as Plectranthus australis, is a delightful and easy-to-care-for houseplant that can bring a touch of greenery to any indoor space. Perfect for beginners, this trailing plant is characterized by its lush, glossy leaves and low-maintenance nature. In this guide, we’ll explore the essentials of growing and caring for Swedish Ivy, making it an ideal companion for those venturing into the world of indoor gardening.

File:Plectranthus coleoïdes.JPG - Wikimedia Commons

Getting Started with Swedish Ivy:

Choosing the Right Location:

Swedish Ivy thrives in bright, indirect light but can tolerate lower light conditions. Avoid exposing it to direct sunlight for extended periods, as this can scorch the leaves.

Optimal Temperature and Humidity:

Maintain a comfortable indoor temperature between 60-75°F (15-24°C) and provide moderate humidity. Regular misting or placing a tray of water nearby can help create a favorable environment.

Selecting the Right Soil:

Use a well-draining potting mix to ensure proper water drainage and prevent waterlogged roots. A standard indoor potting mix works well for Swedish Ivy.

Planting and Watering:

Choosing the Right Pot:

Select a pot with drainage holes to prevent water accumulation. Repotting may be necessary if the plant outgrows its current container.

Watering Routine:

Allow the top inch of the soil to dry out before watering. Water thoroughly, ensuring excess water drains away. Adjust the frequency based on the plant’s specific needs and environmental conditions.

Caring for Swedish Ivy:

Pruning and Pinching:

Encourage bushiness by regularly pinching back the tips. Pruning can also help maintain a desirable shape and size for your Swedish Ivy.

Fertilizing Routine:

Feed the plant with a balanced liquid fertilizer during the growing season (spring and summer). Follow package instructions for dilution and frequency.

Dealing with Pests:

Swedish Ivy is generally resistant to pests, but occasionally, spider mites or aphids may appear. Keep an eye out for any signs of infestation and treat promptly with insecticidal soap if needed.

Propagation:

Swedish Ivy is easily propagated through stem cuttings. Snip a healthy stem with a few leaves and root it in water or directly in soil. This is a fun way to create new plants and share the joy of Swedish Ivy with friends.

Variegated Swedish Ivy - Plectranthus coleoides 'Variegata' – ServeScape

Effortless Growing Quick Guide

Aspect of Care Guidelines
Light Requirements Bright, indirect light; can tolerate lower light conditions
Temperature 60-75°F (15-24°C) indoors
Humidity Moderate humidity; misting or using a water tray can be beneficial
Soil Type Well-draining potting mix
Watering Allow top inch of soil to dry before watering; water thoroughly
Pot Type Use pots with drainage holes to prevent waterlogging
Pruning/Pinching Regularly pinch back tips to encourage bushiness
Fertilizing Balanced liquid fertilizer during the growing season (spring/summer)
Pest Control Generally pest-resistant; monitor for spider mites or aphids
Propagation Easily propagated through stem cuttings; root in water or soil


Majestic Alliums

Alliums

Alliums, commonly known as ornamental onions, stand out as a fascinating and diverse family of flowering bulbs that can elevate any garden. Renowned for their distinctive spherical blooms, these hardy perennials add a touch of architectural elegance and whimsy to outdoor spaces. Allium varieties come in an array of sizes, from delicate 12-inch wonders to towering giants reaching over 3 feet in height. The blossoms, ranging in colors from majestic purples and blues to bright whites, create a captivating visual spectacle.

Buy Allium Gladiator Bulbs | J Parker Dutch Bulbs

Whether you’re a seasoned gardener or just starting out, These are your floral friends. They bring that extra touch of elegance and magic to your outdoor space. So, if you want a garden that feels like a fairytale, let alliums work their enchanting wonders!

Planting alliums can be a rewarding experience, adding unique and striking blooms to your garden. Here’s a step-by-step guide:

Hooker's Onion – Sparrowhawk Native Plants

  1. Select the Right Bulbs: Choose high-quality allium bulbs from a reputable supplier. This come in various sizes and colors, so consider the specific variety that suits your garden design.
  2. Choose the Right Location: Alliums prefer well-draining soil and thrive in full sun. Select a location with good sunlight exposure to encourage healthy growth and vibrant blooms.
  3. Planting Time: Plant allium bulbs in the fall, usually from September to November. This allows them to establish roots before winter and bloom in the spring or early summer.
  4. Soil Preparation: Ensure the soil is well-draining by adding organic matter, like compost, to improve fertility. Alliums prefer slightly alkaline to neutral soil.
  5. Planting Depth: Plant the bulbs at a depth of three times their diameter. For larger allium varieties, this may be around 6 to 8 inches deep.
  6. Spacing: Space the bulbs according to the specific variety’s recommendations. Generally, plant them 6 to 8 inches apart to allow proper air circulation.
  7. Watering: Water the bulbs thoroughly after planting to help settle the soil and initiate root growth. Water sparingly throughout the winter, as alliums prefer drier conditions during their dormancy.
  8. Mulching: Apply a layer of mulch over the planting area to regulate soil temperature and suppress weeds. This is especially important in colder climates.
  9. Fertilizing: It typically don’t require much fertilizer. However, you can add a balanced fertilizer in the spring as new growth emerges.
  10. Maintenance: Remove spent flowers to encourage the plant’s energy to focus on bulb development. Alliums are generally low-maintenance and can naturalize over time.

By following these steps, you can enjoy the beauty of alliums in your garden, bringing a burst of color and architectural interest to your landscape.