Cultivating Aromatic Bliss: A Step-by-Step Guide on how to grow curry leaves plant from stem

how to grow curry leaves plant from stem

How to Grow Curry Leaves Plant from Stem, Curry leaves, revered for their aromatic essence and culinary significance, hail from the Murraya koenigii plant. Native to South Asia, these glossy, dark green leaves add a distinct flavor to dishes, enhancing the taste with a hint of citrus and spice. Rich in antioxidants and essential nutrients, curry leaves not only contribute to flavorful cuisines but also boast potential health benefits. Beyond the kitchen, their versatility extends to traditional medicine, where they are celebrated for their medicinal properties. Whether in a curry or infused oil, curry leaves impart a unique and indispensable touch to various culinary delights.

20090603-APHIS-HG-0002 | Typical view of Asian citrus psylli… | Flickr

Curry leaves, with their distinctive aroma and culinary significance, are a prized addition to any kitchen garden. While purchasing a curry leaves plant is a common option, propagating one from stem cuttings provides a rewarding journey into the heart of horticulture. In this comprehensive guide, we’ll explore the step-by-step process of growing a flourishing curry leaves plant from stem cuttings, from selecting the right cuttings to nurturing a bountiful harvest.

Selecting Healthy Stem Cuttings:

The foundation of successful propagation lies in choosing the right stem cuttings. Opt for mature, disease-free stems with at least three sets of healthy leaves. Ensure each cutting is around 6 to 8 inches in length, allowing for optimal rooting and subsequent growth.

Preparing the Planting Medium:

Curry leaves thrive in well-draining soil. Create a potting mix by combining equal parts of potting soil and perlite or sand to enhance drainage. Consider adding organic matter like compost to enrich the soil with essential nutrients.

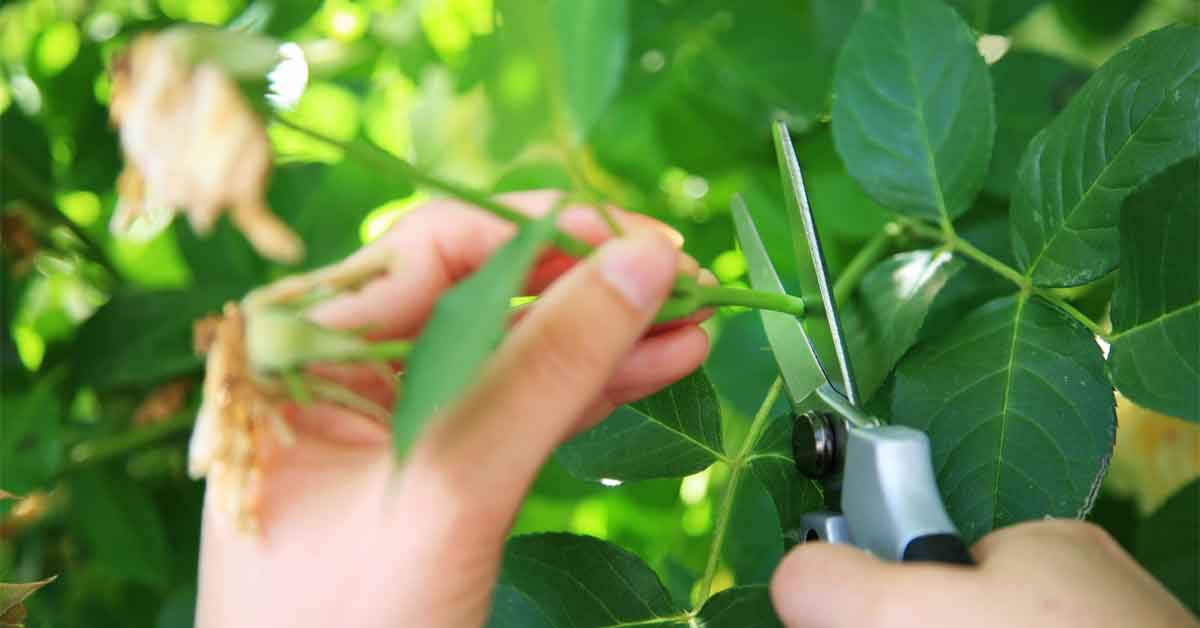
How to Grow Curry Leaves Plant from Stem, Taking the Cuttings:

How to Grow Curry Leaves Plant from Stem, Carefully cut a healthy stem from the parent curry leaves plant using sharp, clean scissors or pruning shears. Remove any excess leaves, leaving only a few at the top. This minimizes moisture loss and encourages energy focus on root development.

How to Duplicate Plants From Stem Cuttings

Rooting Hormone Application:

To boost the chances of successful rooting, consider using a rooting hormone. Dip the cut end of each stem in the hormone powder before planting. This encourages quicker root development and enhances overall plant resilience.

Planting the Stem Cuttings:

How to Grow Curry Leaves Plant from Stem, Create small holes in the prepared planting medium using a stick or your finger. Insert the dipped end of each cutting into the hole, ensuring it is secure and upright. Space the cuttings adequately to allow for proper air circulation.

Providing Optimal Conditions:

Place the pot in a location with bright, indirect sunlight. Ensure consistent moisture levels in the soil, avoiding waterlogging. Maintain a warm environment, as curry leaves prefer temperatures between 65°F to 75°F (18°C to 24°C) for optimal growth.

Curry Leaf Tree (Murraya koenigii) — UIC Heritage Garden

Nurturing the Rooting Process:

How to Grow Curry Leaves Plant from Stem, Patience is key during the initial rooting phase. Regularly check the moisture level in the soil and mist the cuttings with water to maintain humidity. After a few weeks, gentle tugs on the cuttings can indicate if roots have developed.

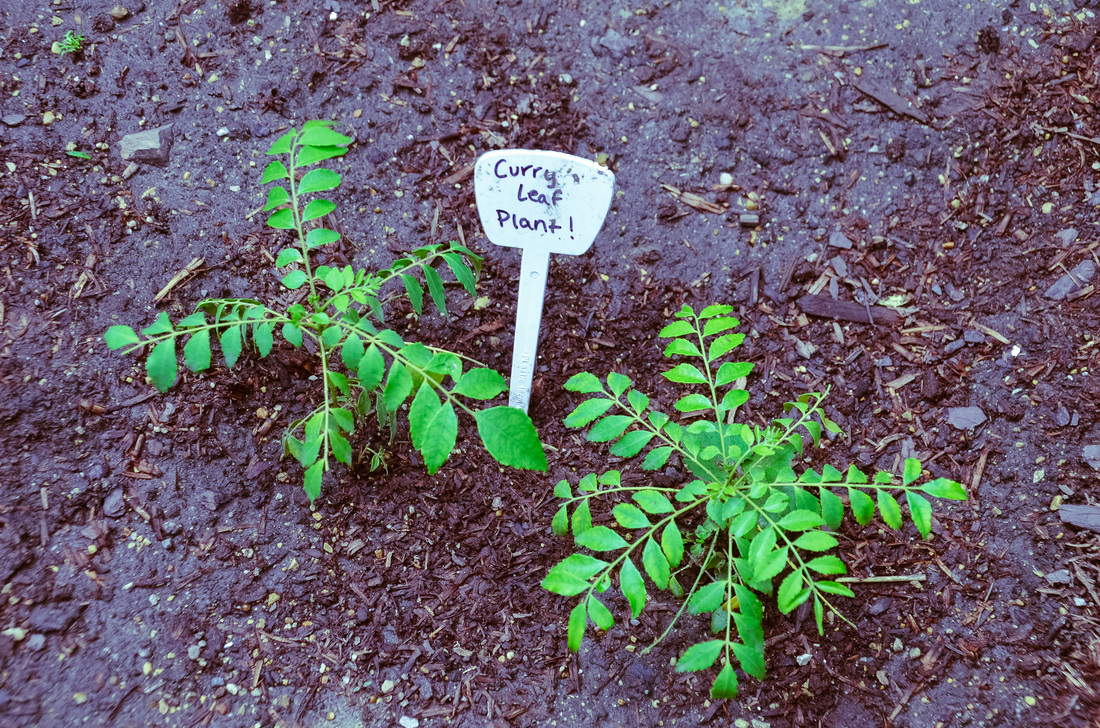
Transferring to Larger Containers:

Once the cuttings have established strong roots (usually after 6-8 weeks), carefully transplant them into larger containers or directly into the garden. Ensure the soil remains well-draining, and provide support for the young plants if needed.

How to Grow and Care for Curry Trees

Caring for Mature Curry Leaves Plants:

As your curry leaves plant matures, maintain a consistent watering schedule, allowing the soil to dry out slightly between waterings. Fertilize with a balanced, water-soluble fertilizer during the growing season to support healthy foliage and abundant harvests.

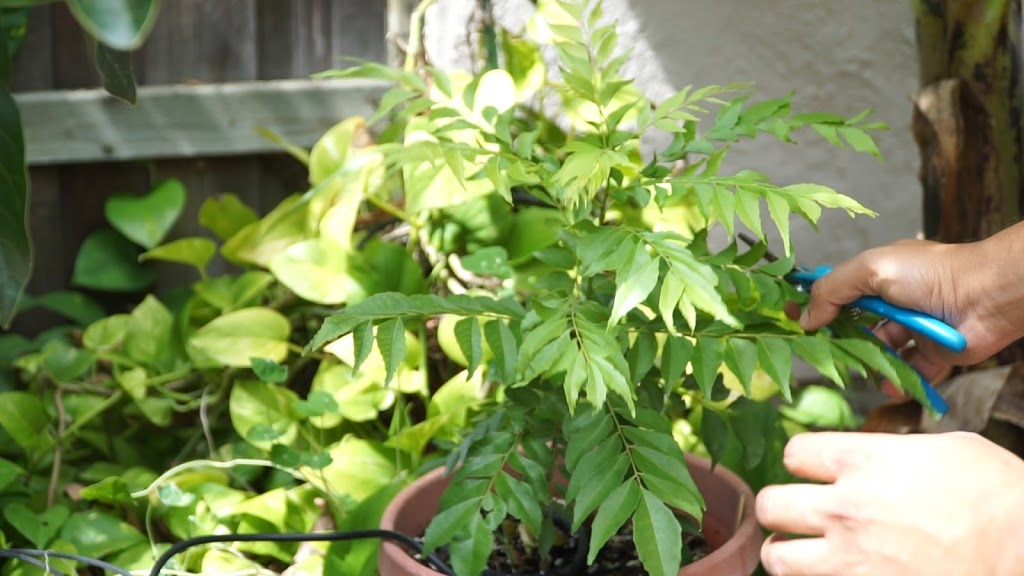
Harvesting Curry Leaves:

Harvest leaves regularly once the plant is well-established. Prune the stems carefully, allowing new growth to emerge. Freshly harvested curry leaves can be used immediately or dried for future culinary endeavors.

Curry leaf plant Propagation, Pruning, Repotting and Harvest

A Bounty of Aromatic Success:

Growing a curry leaves plant from stem cuttings is a fulfilling journey that rewards not only with a fragrant addition to your garden but also with the joy of nurturing life from a single cutting. With careful attention to each step, you can cultivate a thriving curry leaves plant, ready to infuse your culinary creations with a touch of aromatic bliss.

Blossom Beyond Basics: How to Grow Anthurium Plant

How to Grow Anthurium Plant

How to grow Anthurium plant , with their exquisite heart-shaped flowers and glossy foliage, bring a touch of tropical allure to any space. Cultivating these botanical gems requires a nuanced approach. In this detailed guide, we embark on a journey into the art of growing Anthurium plants, exploring every facet from optimal conditions to propagation methods, ensuring that enthusiasts can cultivate these stunning plants with success.

Anthurium. | Anthurium, is a genus of about 1000 species of … | Flickr

Understanding Anthurium Plants:

Anthuriums, belonging to the Araceae family, are prized for their distinctive spadix and spathe flower structure. Before diving into the cultivation specifics, it’s crucial to understand the natural habitat of Anthuriums. Originating from the rainforests of Central and South America, these plants thrive in warm, humid conditions with filtered light.

Choosing the Right Anthurium Variety:

Anthuriums offer a spectrum of varieties, each with its unique characteristics. From the classic Anthurium andraeanum with its heart-shaped, red spathes to the exotic Anthurium crystallinum with velvety, dark-green leaves, selecting the right variety sets the tone for successful cultivation. This section will guide readers through the diverse Anthurium landscape, helping them choose a variety that aligns with their preferences and care capabilities.

How to Grow Anthurium Plant, Optimal Growing Conditions:

Creating a conducive environment is fundamental to Anthurium plant care. From light requirements to temperature and humidity preferences, this section will provide a detailed breakdown of the optimal conditions for Anthurium growth. Understanding the intricacies of these factors ensures that the plants not only survive but thrive, displaying vibrant foliage and a profusion of blooms.

anthuriums | Anthurium Hawaii

Anthurium Planting and Potting:

How to grow Anthurium plant , Proper planting and potting techniques form the backbone of Anthurium care. This section will delve into selecting the right potting mix, addressing drainage needs, and guiding readers through the process of repotting. An in-depth exploration of the symbiotic relationship between Anthuriums and their containers ensures a healthy root system and robust growth.

Watering and Humidity Management:

Anthuriums have specific watering requirements that differ from other houseplants. Understanding the delicate balance between providing adequate moisture and preventing waterlogged soil is crucial. Additionally, this section will explore strategies for maintaining optimal humidity levels, especially in indoor environments where Anthuriums may face challenges related to dry air.

Feeding Anthurium Plants:

Nourishing Anthuriums involves more than just watering. This section will outline a comprehensive feeding regimen, detailing the types of fertilizers, their application frequency, and the importance of micronutrients. A well-fed Anthurium rewards its caretaker with lush foliage and a consistent display of vibrant flowers.

Propagation Methods:

For enthusiasts looking to expand their Anthurium collection or share these beauties with friends, understanding propagation methods is essential. From division to stem cuttings and even seed propagation, this section will provide step-by-step guidance on each technique, empowering readers to propagate Anthuriums successfully.

Pest and Disease Management:

How to grow Anthurium plants, Every thriving garden faces challenges, and Anthuriums are no exception. Recognizing common pests and diseases, such as aphids, mealybugs, and root rot, is the first step in effective management. This section will offer organic solutions and preventive measures to keep Anthuriums resilient and healthy.

What is Integrated Pest Management (IPM)?

Cultivating Anthurium Mastery:

As we conclude this comprehensive guide on how to grow Anthurium plants, the overarching theme is one of cultivating not just a plant but a connection with nature. From the selection of the perfect Anthurium variety to understanding the intricacies of light, water, and nutrients, each element contributes to a flourishing garden adorned with the elegance of Anthurium blooms.

Thaumatophyllum bipinnatifidum: Cultivation Tips and Care Guide

Thaumatophyllum Bipinnatifidum

Thaumatophyllum bipinnatifidum, colloquially known as the split-leaf philodendron or Swiss cheese plant, stands as a verdant symphony, captivating enthusiasts with its majestic size and distinctive allure. This comprehensive exploration aims to guide you through the intricacies of nurturing this botanical masterpiece, unveiling the secrets embedded in its origins, the poetry written in its distinctive features, and the meticulous care required to cultivate an indoor Eden.

210624 021 San Diego Botanic Gdn - Dickinson Family Conser… | Flickr

Botanical Background:

Provide a deeper understanding of the plant’s taxonomy. Delve into its classification within the Araceae family, exploring any noteworthy variations in species and subspecies. Discuss its native habitat, shedding light on the regions where it naturally thrives. Explain how Thaumatophyllum bipinnatifidum adapts to its surroundings, detailing growth patterns, and perhaps touching upon any seasonal variations in its appearance.

Distinctive Features:

Expand on the unique features of Thaumatophyllum bipinnatifidum. Dive into the anatomy of its split leaves, explaining how this adaptation serves the plant in terms of light absorption and water retention. Consider providing insights into the evolution of these distinctive features and their ecological significance. Use descriptive language to paint a vivid picture for readers, helping them appreciate the intricacies of this fascinating plant.

Ideal Growing Conditions:

Offer a nuanced discussion on the ideal conditions for Thaumatophyllum bipinnatifidum’s growth. Detail its sunlight preferences, considering the nuances of light intensity, duration, and potential adjustments needed for different environments. Discuss the importance of maintaining consistent temperature and humidity levels, drawing connections between these factors and the overall health and growth of the plant. Guide readers on selecting the right type of soil, emphasizing the importance of well-draining mixes.

Propagation Methods:

Break down each propagation method with meticulous instructions. Start with stem cuttings, explaining the best times for cutting, preparing the cutting, and facilitating root development. Move on to air layering and division, providing step-by-step guidance and addressing potential challenges. Share personal experiences or success stories related to propagation, creating a relatable and encouraging tone for readers attempting it for the first time.

File:Philodendron selloum1.jpg - Wikimedia Commons

Common Pests and Diseases:

Provide an exhaustive list of potential pests and diseases that Thaumatophyllum bipinnatifidum may encounter. Accompany each with detailed descriptions and images for easy identification. Offer natural and organic remedies, going beyond the typical pest control advice to include preventative measures and strategies for maintaining a healthy plant ecosystem. Encourage readers to adopt an integrated pest management approach.

Indoor and Outdoor Care:

Explore the challenges and rewards of cultivating Thaumatophyllum bipinnatifidum in various settings. Discuss container gardening tips for indoor enthusiasts, addressing issues such as pot size, watering frequency, and pruning. Transition to outdoor care, covering considerations for planting in garden beds or landscapes. Share strategies for optimizing its growth in different contexts and environments.

Popular Varieties:

Feature a few standout varieties, providing in-depth information on each. Discuss their unique characteristics, growth habits, and any historical or cultural significance. Include anecdotes about how these varieties have gained popularity in different regions or among specific plant communities. Consider incorporating images or illustrations to showcase the visual distinctions between each variety.

Decorating with Thaumatophyllum Bipinnatifidum:

Paint a detailed picture of how readers can integrate Thaumatophyllum bipinnatifidum into their living spaces. Discuss various decorative styles, from minimalist arrangements that highlight the plant’s architectural beauty to lush, jungle-inspired designs that emphasize its tropical nature. Provide tips on creating focal points, considering the plant’s size and growth patterns, and offer guidance on harmonizing Thaumatophyllum bipinnatifidum with other plants in a cohesive and visually appealing manner.

Philodendron bipinnatifidum Schott ex Endl, Philodendron bipinnatifidum does climb trees, Philodendron selloum, Exotic Rainforest rare tropical plants

Craft a compelling conclusion that not only summarizes the article but also inspires readers to embark on their journey of Thaumatophyllum bipinnatifidum cultivation. Reinforce the joy and satisfaction that comes from successfully nurturing this unique plant. Encourage readers to share their own experiences and discoveries, fostering a sense of community among plant enthusiasts.


Nature’s Canopy: A Comprehensive Manual on How to Grow Banyan Tree

Nature's Canopy: A Comprehensive Manual on How to Grow Banyan Tree

How to grow banyan tree, In the world of horticultural splendor, few trees rival the majestic allure of the Banyan. Scientifically known as Ficus Benghalensis, growing this iconic tree is not just a gardening endeavor; it’s a journey into the heart of nature’s grandeur. This comprehensive guide unveils the secrets and intricacies of nurturing a Banyan tree, from selecting the right location to fostering its sprawling canopies, ensuring you can enjoy the green grandeur of this iconic species in your own garden.

Banyan Tree Hawaii Images – Browse 758 Stock Photos, Vectors, and Video | Adobe Stock

The Banyan tree, revered for its expansive canopies and distinctive aerial roots, stands as a testament to the magnificence of nature. Cultivating a Banyan isn’t merely about gardening; it’s an endeavor to foster a living masterpiece. This guide provides a detailed roadmap for growing and nurturing a Banyan tree, creating a harmonious blend of botanical grandeur and natural beauty in your backyard.

Choosing the Right Location:

How to grow banyan tree, Selecting an appropriate location is the first step in the art of growing Banyan trees.

Sunlight Symphony: Banyan trees thrive in full sunlight, necessitating a location that receives at least six hours of direct sunlight daily. This ensures optimal growth and the development of lush canopies.

Soil Selection: Well-draining soil, preferably sandy loam enriched with organic matter, provides a fertile foundation for the Banyan’s extensive root system.

Ample Space: Banyan trees are known for their sprawling canopies. Choose a location with ample space, allowing the tree to spread its branches and create a stunning visual impact.

Planting the Banyan Tree:

How to grow banyan tree, Once the ideal location is secured, the process of planting the Banyan tree begins.

Sapling Selection: Start with a healthy sapling from a reputable nursery, ensuring a well-developed root system and vibrant foliage.

Planting Procedure: Dig a hole twice the width of the root ball, plant the sapling at the same depth as it was in the nursery container, and water thoroughly.

Mulching Magic: Encircle the base of the tree with a layer of organic mulch to retain moisture, suppress weeds, and create a conducive environment for growth.

How to Grow Banyan Tree, Caring for Banyan Trees:

Ongoing care is vital to ensure the Banyan tree thrives and reaches its full potential.

Watering Rituals: Provide consistent watering, especially during dry spells. Deep watering allows the roots to establish and prevents water stress.

Fertilization Routine: Feed the tree with a balanced fertilizer during the growing season to enhance its nutrient intake. Adjust the fertilizer application during the dormant season.

Pruning Symphony: Prune the Banyan tree to maintain shape, eliminate dead or diseased branches, and encourage healthy growth. Pruning also enhances the tree’s aesthetic appeal.

Banyan Tree With Many Branches · Free Stock Photo

Dealing with Potential Challenges:

Pest Management: Monitor the tree regularly for pests like aphids and scale insects. Treat infestations promptly with natural or chemical solutions.

Root Awareness: Banyan trees are known for their extensive root systems. Plan landscaping and construction activities mindful of the tree’s roots to avoid damage.

Appreciating the Majesty:

Aerial Roots Appreciation: Banyan trees develop unique aerial roots that contribute to their majestic appearance. Appreciate and nurture these distinctive features.

Ecological Harmony: Banyan trees attract a variety of wildlife, including birds and insects. Embrace the ecological diversity the tree brings to your garden.

Harvesting the Green Grandeur:

How to grow banyan tree, While Banyan trees don’t produce traditional fruits, the real harvest lies in the visual and environmental rewards they offer.

Maturation Period: Banyan trees typically take several years to mature and develop their iconic canopies. Patience is key.

Year-Round Beauty: Once established, a well-cared-for Banyan tree provides year-round beauty, offering shade and enhancing the overall aesthetics of your garden.

Audrey Fig (Banyan Tree) - Ficus benghalensis – Wellspring Gardens

Cultivating a Banyan tree is a transformative journey, an artful process that turns your garden into a canvas of green grandeur. With careful planning, ongoing care, and a deep appreciation for the beauty of nature, your Banyan tree will stand as a living testament to the artistry of botanical cultivation, creating a harmonious sanctuary in your own backyard.

Growing Prosperity: A Comprehensive Guide on How to Grow Money Plant Indoor

how to grow Money Plant indoor

How to Grow Money Plant Indoor, Welcome to the world of greenery and abundance! In this guide, we’ll uncover the joys of growing a Money Plant indoors, sharing practical insights and care tips. Whether you’re a beginner or an experienced gardener, fostering a thriving Money Plant can enhance your indoor space and bring positive energy and prosperity.

Choosing the Perfect Money Plant:

Kickstart your indoor gardening journey by picking the right variety. The Epipremnum aureum, fondly known as Devil’s Ivy or Pothos, is a resilient choice. Head to a reputable nursery or garden center to find a healthy specimen that suits your space.

The Pothos Plant | The Flickr Lounge-Container(s) I potted t… | Flickr

Finding the Ideal Indoor Spot:

Money Plants thrive in indirect sunlight, making them perfect indoor companions. Opt for spots with filtered or low light, avoiding direct sunlight to prevent leaf scorching. Consider placing your Money Plant near a window with sheer curtains or in areas with bright, indirect light.

Potting Mix and Container Tips:

How to Grow Money Plant Indoor, Create the best environment for your Money Plant with a well-draining potting mix. A blend of potting soil, perlite, and peat moss does wonders. Choose a container with drainage holes to keep the roots healthy and happy.

Money Plant: How to Grow, and Care for Chinese Money Plant

Planting Your Money Plant:

How to Grow Money Plant Indoor, Ensure your Money Plant’s soil is evenly moist but not waterlogged during planting. Whether it’s a cutting or a young plant, position it at the same depth as its original container. After planting, water generously, letting excess water drain away for a solid growth foundation.

How to Grow Money Plant Indoor, Watering Wisdom:

Keep your Money Plant’s soil moderately moist. Water when the top inch feels dry, avoiding overwatering to steer clear of root rot. Adjust your watering routine based on the season and soil moisture, allowing the topsoil to slightly dry between waterings.

Temperature and Humidity Harmony:

Maintain a cozy temperature range between 65°F to 75°F (18°C to 24°C) for your Money Plant. While they can handle typical indoor humidity, give them an occasional mist or place a water-filled tray nearby for a humidity boost.

Feeding Your Money Plant:

Show your Money Plant some love by fertilizing every 4-6 weeks during the growing season with a balanced, water-soluble fertilizer. Dilute it to half the recommended strength to avoid overwhelming your green friend. Proper feeding results in lush, vibrant growth.

Pruning and Trimming Tips:

Give your Money Plant a little grooming to maintain its shape and encourage bushier growth. Trim back overgrown vines or yellowing leaves with clean, sharp scissors or pruning shears. This not only boosts its aesthetic appeal but also promotes overall health.

Providing Support and Training Tricks:

As your Money Plant stretches out, consider offering some support. Stakes or trellises can guide the vines, creating an eye-catching display. Training the vines helps control the plant’s size and shape, turning it into a versatile addition to your indoor decor.

Dealing with Hiccups:

How to Grow Money Plant Indoor, While Money Plants are generally resilient, pests (spider mites, aphids) or diseases (root rot, leaf spot) may make an appearance. Keep a vigilant eye, taking quick action when needed. Neem oil or insecticidal soap tackles pests, while proper watering prevents root rot.

Propagation Pleasures:

Expand your green haven by propagating your Money Plant through stem cuttings. Snip a healthy vine below a node, and either place it in water or directly in soil. Within weeks, you’ll have a flourishing new plant ready to thrive.

Feng Shui and the Money Plant:

In line with Feng Shui principles, the Money Plant is thought to usher in positive energy, prosperity, and good luck. Position it in the wealth or prosperity area, typically the southeast corner of your home or office. Keep your plant vibrant to maximize its Feng Shui benefits.

Money Plant - Epipremnum aureum | Money Plant. This is a var… | Flickr

How to Grow Money Plant Indoor, Growing a Money Plant indoors is more than tending to a houseplant; it’s an invitation to prosperity and well-being. Provide the right care, sprinkle in some positive energy, and watch as your Money Plant not only graces your space but also ushers in abundance. Join this green journey, embrace the positive vibes, and let your indoor oasis bloom with the charm of the Money Plant. Happy growing!

Elevate Your Space with Green and White Leaf Plant: A Fusion of Beauty and Serenity

green and white leaf plant

Green and White Leaf Plant, stands out as a favored choice among plant enthusiasts, introducing a refreshing visual appeal to indoor spaces. Characterized by lush green leaves adorned with contrasting white patterns, these plants are diverse, coming in various species, each with its distinct leaf shapes and sizes.

What makes these plants especially appealing is their adaptability to indoor conditions, thriving with moderate light and forgiving watering requirements. Beyond their decorative role, these green and white leaf plant, including popular varieties like Pothos and Spider Plants, are recognized for their ability to purify indoor air, enhancing overall air quality.

Suitable for both beginners and experienced gardeners, these indoor plants are valued for their low-maintenance nature and resilience. Whether placed in hanging baskets, stylish pots, or on shelves, they infuse spaces with a natural charm, contributing to a serene and aesthetically pleasing atmosphere. The enduring popularity of green and white foliage underscores its timeless allure, making these plants integral to indoor gardening and interior design, fostering both beauty and well-being in indoor environments.

Pothos (Epipremnum aureum):

Green and White Leaf Plant, Commonly known as devil’s ivy, Pothos is the best choice for green and white foliage indoors. Its heart-shaped leaves have distinctive green, white or yellow hues and add elegance to any space. Pothos is incredibly adaptable and can thrive in a variety of lighting conditions, making it an excellent choice for beginners and gardeners alike. This perennial plant is known for its air-purifying properties, making it a beautiful and healthy addition to homes and offices.

Golden pothos (Epipremnum aureum) Flower, Leaf, Care, Uses - PictureThis

Chlorophytum comosum:

Green and White Leaf Plant Chlorophytum comosum, known for its curved leaves and air purifying properties, is a classic indoor plant with green and white leaves. This variegated variety displays green and white striped leaves, creating a visually stunning appearance. Spider plants are known for their hardiness and adaptability to different light conditions. They are especially suitable for hanging baskets and adding a new touch to vertical spaces. Requiring minimal maintenance and capable of producing spiders, this plant is perfect for those looking to enhance their indoor space with a beautiful growing option.

File:Starr 080117-1516 Chlorophytum comosum.jpg - Wikimedia Commons

Peace Lily (Spathiphyllum spp.):

Green and White Leaf Plant, Peace lilies are known for their beautiful white flowers and are also available in variegated options with green and white petals. A variety such as ‘Domino’ is characterized by bright green leaves decorated with white patterns. Peace lilies are known for their air-purifying properties and thrive in low to medium light, making them a good choice for indoor environments. With their beautiful appearance and tolerance for occasional neglect, peace lilies add tranquility to the living space while helping to improve air quality.

Houseplant of the month: Peace Lily - Frosts

Dieffenbachia spp.:

Dieffenbachia, or fool’s vine, is an excellent houseplant with large, tropical leaves in mixed shades of green and white. Its beautiful foliage makes it a popular choice for adding a touch of warmth to your interior. Dieffenbachia is a low-maintenance plant and can tolerate low light, but likes bright, indirect light. Although care with its water is necessary, proper drainage and regular watering make this plant a beautiful and easy-care addition to the home and garden.

Tropic Alix Dumb Cane ( Dieffenbachia sp.) | Brooklyn Botani… | Flickr

Calathea varieties:

Green and White Leaf Plant, Calathea species such as Calathea lancifolia (rattlesnake plant) and Calathea orbifolia are prized for their green leaves and green and white colors. Thanks to its unique response to light, the leaves open and close every day. Calathes love indirect light, moisture and regular soil, making them suitable for good care in a good indoor setting. The beautiful beauty of Calathea plants makes them attractive to those looking for beauty and visual beauty in the greenhouse.

Angel wings (Caladium lindenii) Flower, Leaf, Care, Uses - PictureThis

Ripe for the Picking: Your Ultimate Guide to Growing and Enjoying Succulent Red Tomatoes

red tomatoes

Indulge in the brilliance of red tomatoes – vibrant, succulent, and versatile. From refreshing salads to luscious sauces, they transform every dish. Bursting with vitamins, minerals, and antioxidants, red tomatoes not only tantalize your taste buds but also boost your well-being. Experience the culinary elegance of each juicy bite, a symphony of flavors embodying freshness and nutritional richness.

Royalty-Free photo: Tilt shift lens photo of round red fruits during daytime | PickPik

A Comprehensive Guide to Growing Red Tomatoes

1. Choose the Right Red Tomato Variety:

Immerse yourself in the wide world of red tomatoes, each with their own unique characteristics, texture and culinary uses. From classic steak to Roman variety to delicious tomato meringue, choose a variety to suit your cooking preferences and gardening goals.

2. Know your local climate:

Consider your location and local climate when you start your red tomato growing business. Tomatoes grow in warm climates, but temperature changes, rainfall patterns and slight differences in sunlight can affect their growth. Learn the microclimate in your area to adjust your growing practices accordingly.

3. Soil Preparation and pH:

Careful soil preparation guarantees success. Red tomatoes thrive in well-drained soil rich in organic matter. Conduct a soil test to determine pH, aiming for the slightly acidic to neutral range (6.0-7.0). This promotes the growth of healthy plants, ensuring efficient use and absorption.

4. Planting Time and Frost Considerations:

Time your planting carefully to match your frost pattern. Start growing tomatoes by sowing seeds indoors 6-8 weeks before the last expected frost. To prevent frost damage and allow your tomatoes to grow well, plant outdoors only when the soil temperature consistently exceeds 10°C (50°F).

5. Spacing and support:

Consider the placement of your tomatoes carefully. Proper spacing ensures adequate ventilation and reduces the risk of disease. For the indeterminate variety that continues to grow throughout the season, provide a stable support structure, such as a stake or trellis, to provide ample weight for the fruit.

6. Irrigation Practices:

Irrigation master to keep the soil moist, especially during drought. Avoid overhead watering to reduce leaf diseases. Applying a layer of mulch around plants helps retain moisture, regulate soil temperature and reduce plant growth.

7. Fertilize:

Keep the environment healthy by adding balanced fertilizer to your daily maintenance. Customize the fertilization method based on soil testing and the specific needs of your tomatoes at different growth stages, from seedling to fruiting.

8. Pest Control Strategies:

Proactively protect your tomatoes from pests such as aphids and aphids. Implement integrated management strategies such as planting companions, attracting natural enemies, or using organic pesticides. This ensures a harmonious, beautiful garden ecosystem.

9. Pruning Techniques:

Improve your pruning skills to control plant size and optimize airflow in the canopy. Regularly remove the suction cups and lower leaves to transfer the plant’s energy to the fruit. Pruning helps plants become healthier and more productive.

10. Tips for Harvesting:

Harvesting is an art in itself. Red tomatoes are ready to be picked when they are a plump color, firm when gently pressed, and yield a small amount. To increase the freshness of your tomatoes at home and preserve all their flavor, use scissors to cut the stems.

11. Cooking Adventure:

Grow your red tomatoes from the garden to the kitchen. Discover countless delicious recipes with products grown at home. From refreshing salads to rich and delicious sauces, try many recipes that showcase the vibrant and subtle flavor of red tomatoes.

Free image of red tomatoes | Free Photo - rawpixel

Growing red tomatoes is a challenging job, but it also brings some challenges 

1. Disease Prevention and Control:

Problems: Fungal diseases such as early blight and powdery mildew can affect red tomatoes.
Solutions: Use tomato resistant varieties, rotate crops and provide adequate air space

2. Pests:

Problems: Aphids, tomato hornworms and whiteflies are pests that can cause red tomatoes.
Solution: Introduce beneficial insects like ladybugs, use neem oil or insect repellent, and eliminate pests by hand. Regular check-ups and early intervention are important.

3. Blossom End Rot:

Problem: Dark, tough spots at the base of tomatoes indicate blossom end rot, usually caused by calcium deficiency, if water is constant.
Solution: Keep water consistent, maintain good calcium levels by amending soil and mulches to retain soil moisture.

4. Sunburn:

Problems: Excessive sun exposure can cause sunburn and cause pale, hard spots on your sun-exposed tomatoes.
Solution: Provide shade when the sun shines, especially for seedlings. Mulching can also help control soil temperature.

5. Poor fruit quality:

Problem: Poor pollination, high temperature or malnutrition can cause fruit loss. not good.
Solutions: Encourage pollinators, maintain appropriate temperature and ensure soil fertility through balanced fertilization.

6. Flowering:

Problem: Rapid changes in water availability, especially during heavy rains, can cause tomato flowers to bloom.
Solution: Save water, especially during the dry season, to avoid sudden changes in humidity. Mulch can help retain moisture.

Tomato Leaves Turning Yellow? Here's How to Fix It | HGTV

7. Yellow leaves:

Problem: Yellow leaves may indicate a deficiency of nutrients such as nitrogen or magnesium.
Solution: Treat the soil with appropriate fertilizers to have balanced content. Monitor plant health regularly and adjust fertilization as needed.

8. Wilt and root problems:

Problems: Wilt can be caused by many things, including root diseases or inadequate watering.
Solutions: Ensure good soil drainage, prevent overwatering and respond quickly to root diseases. Mulching helps retain soil moisture.

9. Wrinkled tomato leaves:

Problem: Curling or wrinkling of tomato leaves can be caused by physical factors such as heat and cold.
Solution: Provide even growing conditions, including temperature control, to prevent leaf breakage.

By following these thorough guidelines, you’re on a complete journey to become a red tomato growing expert. Enjoy the fulfillment of a rich harvest and the delight of nurturing not just tomatoes but a thriving garden. Happy gardening!

Growing Juicy Tomatoes: Unraveling the Secrets of the Best Soil for Tomatoes

Best soil for tomatoes

Best Soil for Tomatoes: sun-kissed tomatoes, plump and bursting with flavor, owe their glory to the earth beneath them. Crafting the perfect soil bed is more than gardening wisdom; it’s an art for tomato enthusiasts. This guide unravels the secrets of best soil for tomatoes, exploring the nuanced world of soil components, amendments, and cultivation practices that transform a garden into a tomato haven.

Tomato Plant Leaf Curling: Tips & Tricks for Healthy Growth

Understanding the Needs of Tomato Plants

Before we dive into soil science, let’s get into the mindset of tomatoes. They’re not just plants; they’re discerning consumers with unique nutritional cravings. Let’s cater to their tastes:

Well-Drained Soil:

Tomatoes are drama queens about soggy feet. Optimal soil must play the role of a diligent bouncer, keeping excess water away and potential diseases at bay.

Nutrient-Rich Composition:

These tomatoes are VIPs. They demand a nutrient-rich banquet—nitrogen, phosphorus, and potassium are their favorite courses. A fertile soil mix ensures a lavish spread throughout the growing season.

Balanced pH Levels:

Tomatoes have a pH preference, leaning towards a slightly acidic to neutral stage (around 6.0 to 7.0). Think of it as curating the perfect ambiance for a tomato gala.

Ample Organic Matter:

Imagine organic matter as the grand buffet. It enhances structure, locks in moisture, and ensures essential nutrients are served on a silver platter to the tomato roots.

Components of the Best Soil for Tomatoes

Loamy Soil:

It’s like crafting the perfect canvas for a masterpiece. Loamy soil, a blend of sand, silt, and clay, provides a smooth texture, allowing tomato roots to groove through easily. Think of it as a dance floor with excellent drainage moves.

Compost:

Best Soil for Tomatoes, Compost is the life of the party, rich in organic matter, elevating soil fertility and structure. Incorporate it generously, creating a continuous feast for your tomato plants.

Peat Moss:

Peat moss is the cool breeze in a summer soirée. It aids in soil aeration and keeps the mood (pH levels) just right for the tomatoes.

Perlite or Vermiculite:

Think of these as the supportive friends in your gardening circle. They enhance soil aeration, prevent compaction, and make sure the soil is light and fluffy—a perfect setting for root development.

Well-Aged Manure:

Aged manure is the secret sauce. Whether it’s from cows, chickens, or other critters, make sure it’s well-composted to avoid any ammonia-induced dramas with your tomato stars.

How To Replenish Soil After Tomatoes [Inc. Amending Soil Or What To Plant]

Preparing Your Soil for Tomato Planting

Soil Testing:

Before you roll out the red carpet, let’s do a soil test. It’s like sending out invitations, ensuring that the pH and nutrient levels match the expectations of your tomato VIPs.

Clearing and Tilling:

Time for some garden feng shui. Clear out the clutter, till the soil, and create a welcoming stage for your tomato stars. It’s all about ambiance.

Incorporating Amendments:

Based on the soil test results, it’s time for targeted enhancements. Think of it as giving your soil a makeover. Adjust pH with lime, address nutrient gaps with specific fertilizers—it’s all part of the glam routine.

Adding Organic Matter:

Now, let’s infuse the soil with life. Mix in generous amounts of compost, creating an atmosphere where fertility, drainage, and structure harmonize like a well-orchestrated symphony.

Best Practices for Planting Tomatoes in Optimal Soil

Choosing the Right Tomato Varieties:

Tomatoes have their personalities. Some are compact, some are wild. Pick determinate varieties for a neat garden, and go for the indeterminate ones if you’re up for a lively tomato dance.

Planting Depth:

It’s like giving your tomatoes a VIP table. Plant them deep, burying a chunk of the stem. This encourages extra roots, providing stability and enhancing nutrient absorption—like a backstage pass to tomato success.

Spacing:

Social distancing in the garden? Absolutely. Give your tomatoes room to breathe. Proper spacing ensures good airflow, preventing any drama with diseases. Follow the recommended guidelines for a harmonious tomato community.

Mulching:

Mulch is the red carpet for your tomatoes. Lay it around the base, and it’s like giving them the royal treatment. Mulch retains moisture, suppresses unwanted guests (weeds), and keeps the soil temperature just right.

When to Plant Tomatoes in Perth | Ultimate Backyard

Caring for Tomatoes in Optimal Soil

Watering:

It’s a delicate balance—consistent moisture without drowning. Tomatoes don’t like surprises, especially when it comes to watering. Ensure the soil stays evenly moist but not waterlogged to avoid any backstage tantrums like blossom end rot.

Supporting Tomato Plants:

Think of stakes, cages, or trellises as the bodyguards of your tomato stars. Indeterminate varieties, especially, need sturdy support as they rise to fame. Proper support prevents sprawling—no one wants tomatoes on the ground.

Pruning:

Pruning is like giving your tomatoes a spa day. Regular trims manage their size, improve airflow, and direct energy towards fruitful endeavors. Remove suckers and lower foliage as needed, keeping it sleek and focused.

Fertilizing:

Tomato plants are like gourmet diners. Monitor their nutrient cravings throughout the growing season. Side-dress with additional fertilizer, especially during growth spurts—it’s like serving them a gourmet dessert.

Common Soil-Related Issues and Solutions

Blossom End Rot:

A tomato tragedy caused by calcium deficiency. Avoid it by ensuring consistent moisture, maintaining proper calcium levels, and not overloading with nitrogen. Your tomatoes deserve a smooth journey from start to finish.

Soil-Borne Diseases:

Think of crop rotation as changing the venue every season. It prevents soil-borne diseases from taking root. Keep it fresh, remove debris, and address any issues promptly—tomatoes don’t like drama in their green room.

Yellowing Leaves:

Yellow leaves are like warning signals. It might be nutrient deficiencies stealing the show. Adjust fertilization based on soil tests, observe plant reactions, and ensure your tomatoes are always in the spotlight.

Tomatoes · Free Stock Photo

In the grand finale, cultivating the best soil for tomatoes isn’t just about gardening; it’s a prelude to a harvest symphony. Understanding your tomatoes, curating the perfect soil blend, and following the garden dance steps ensure a stage where vibrant, healthy tomato plants steal the show. May your gardening adventure be ripe with success, and may your tomatoes revel in the embrace of their ideal soil. Here’s to a season of happy gardening and

How to Grow and Crae for Teddy Bear Sunflowers

Teddy Bear Sunflower

Teddy Bear Sunflowers, the whimsical darlings of gardens, bring a cuddly charm to summer’s golden aura. Join us on a journey through the art and heart of growing and caring for these delightful blooms, ensuring your garden radiates with the warmth of sunlit delight.

Two types of sunflowers | I was told the ones in the front a… | Flickr

Embracing Teddy Bear Sunflowers

Discover the joy of Teddy Bear Sunflowers (Helianthus annuus), a delightful variety known for its fluffy, golden blooms reminiscent of a teddy bear’s softness. These compact sunflowers add a touch of whimsy to gardens and bouquets. Let’s explore the secrets to growing and caring for these charming sunlit companions.

Characteristics of Teddy Bear Sunflowers:

Fluffy Blooms:

Teddy Bear Sunflowers boast fully doubled, fluffy blooms, giving them a distinct appearance.

Compact Size:

Perfect for smaller spaces and containers, Teddy Bears stand shorter than traditional sunflowers.

Bright Yellow Petals:

Vibrant yellow petals infuse landscapes with a burst of sunshine, creating a cheerful ambiance.

Growing Teddy Bear Sunflowers: A Gentle Guide

1. Selecting the Right Location:

. Choose a sunny spot with well-draining soil to ensure optimal growth.
. Teddy Bear Sunflowers thrive in full sunlight, so select a location with at least 6-8 hours of direct sunlight daily.

2. Planting Seeds:

. Sow seeds directly into the soil after the last frost has passed, ensuring a warm and welcoming environment for germination.
. Plant seeds at a depth of 1 inch and space them about 6-12 inches apart, providing ample room for each sunflower to flourish.

Silver Falls Seed Company - Sunflower - Dwarf Sungold Teddy Bear

3. Watering Routine:

. Maintain a consistent watering routine, keeping the soil consistently moist but not waterlogged.
. Water at the base of the plants to prevent moisture on the foliage, reducing the risk of fungal issues.

4. Fertilization:

. Teddy Bear Sunflowers benefit from a balanced, all-purpose fertilizer applied during the growing season.
. Follow package instructions for application rates, promoting healthy growth and robust blooms.

Caring for Teddy Bear Sunflowers: Tips for Success

Support for Stems:

Provide support, like stakes, to prevent bending and keep the compact Teddy Bears upright.

Deadheading:

Regularly remove spent blooms to encourage continuous flowering and redirect energy toward new buds.

Pest Management:

Keep a vigilant eye for pests like aphids, addressing infestations promptly with natural remedies or insecticidal soap.

Overcoming Challenges: Common Issues and Solutions

Powdery Mildew:

Ensure proper air circulation and spacing to combat powdery mildew.
Apply fungicides as needed, following recommended guidelines.

Root Rot:

Prevent root rot by maintaining well-draining soil and avoiding overwatering.
Allow the topsoil to dry between watering for a healthy root environment.
Harvesting Teddy Bear Sunflowers: Bringing Sunshine Indoors

Bacterial Stem Rot, Sclerotinia Basal Rot and Sunflower Rust Developing in  Sunflower

Timing for Harvest:

Harvest when blooms are fully open and petals feel firm, ideally in early morning or late evening.

Cutting Technique:
Use clean, sharp scissors for longer stems and a longer vase life, removing excess foliage to prevent water contamination.

Reveling in Teddy Bear Sunflowers’ Radiance

Cultivating Teddy Bear Sunflowers is a journey of joy, marked by fluffy blooms and sunlit charm. With care and attention, these sunflowers will grace your garden with golden radiance. Embrace the warmth they bring to your outdoor haven, basking in the glow of nature’s whimsical treasures as you nurture these teddy bear-like blooms.

Radiator Plant Guide: Care Tips for Thriving Foliage

Radiator Plant

The Radiator Plant, also known as Peperomia, is a delightful addition to indoor gardens, cherished for its vibrant foliage and ease of care. In this guide, we’ll delve into the world of Radiator Plants, exploring their characteristics, ideal growing conditions, and essential care tips to ensure they thrive in your home.

8 Care Tips for the Beautiful Watermelon Peperomia Plant - Dengarden

The Charm of Radiator Plants:

Radiator Plants belong to the Peperomia genus, a diverse family of small, easy-to-care-for houseplants. Known for their captivating foliage and unique leaf shapes, these plants are popular choices for both novice and experienced plant enthusiasts.

Unique Characteristics of Radiator Plants:

Radiating Leaf Variety:

The charm of Radiator Plants unfolds through a captivating array of leaf shapes, each telling a botanical tale. From the whimsical heart-shaped leaves to the elegant teardrop formations, the diversity adds a botanical artistry that graces your indoor space. As you gaze upon these leaves, each with its unique silhouette, the visual tapestry of your home comes alive with an enchanting allure.

Vibrant Color Palette:

The foliage of Radiator Plants transforms your space into a living canvas adorned with nature’s hues. The leaves boast an extravagant palette, ranging from the profound depths of green to the intricate dance of variegated patterns. This lively spectrum creates a dynamic and vibrant display, turning every leaf into a brushstroke of botanical artistry. Radiator Plants, with their kaleidoscopic foliage, bring a burst of life to your surroundings, uplifting the ambiance with natural elegance.

There's a Unique Radiator Plant for Everyone - FineGardening

Compact Size, Abundant Charm:

In the world of indoor greenery, Radiator Plants stand out not just for their beauty but also for their thoughtful design. Embracing a compact growth habit, these plants become veritable gems for small spaces. Whether adorning a cozy apartment, gracing an office desk, or adding a touch of greenery to urban dwellings, Radiator Plants prove that abundance of charm can thrive within limited spaces. Their petite stature adds versatility, allowing you to incorporate nature’s beauty seamlessly into any corner of your life.

Ideal Growing Conditions:

Light Requirements: Radiator Plants thrive in medium to bright, indirect light. Avoid direct sunlight, as it can scorch the leaves.

Temperature: Keep your plant in a warm environment, with temperatures between 65-75°F (18-24°C) for optimal growth.

Soil: Use well-draining potting mix to prevent waterlogging, as Radiator Plants prefer slightly moist but not waterlogged soil.

Watering Routine:

Moderate Watering: Allow the top inch of the soil to dry out before watering. Overwatering can lead to root rot, so maintain a moderate watering routine.

Humidity: Radiator Plants appreciate higher humidity levels, making them excellent choices for bathrooms or kitchens.

Propagation Techniques:

Leaf Cuttings: Propagate your Plant by taking leaf cuttings, ensuring the cutting has a node for successful root development.

Division: Divide mature plants to create new ones, ensuring each division has both roots and leaves.

Common Issues and Detailed Solutions:

Overwatering Woes:
The visual distress of yellowing leaves often signals an overwatering concern. To address this, delve into the intricacies of your plant’s moisture needs. Fine-tune your watering routine by allowing the top inch of the soil to thoroughly dry between watering sessions. This adjustment ensures a delicate balance, preventing waterlogged conditions and promoting a healthier root environment.

Pest Predicaments:
Vigilance against common pests such as spider mites or aphids is paramount for the well-being of your plant. Establish a routine leaf inspection, paying meticulous attention to the undersides where pests often hide. Should any infestations be detected, swift and targeted action becomes crucial. Employ organic or chemical treatments as needed, ensuring your plant remains pest-free and thrives in an environment of optimal health.

Radiator Plant - Peperomia - TruKisan

Radiator Plant Radiance:

Cultivating the beauty of Radiator Plants in your home is a rewarding experience. Their charming foliage, coupled with straightforward care requirements, makes them an excellent choice for plant enthusiasts of all levels. Elevate your indoor garden with the allure of Radiator Plants, and enjoy the radiant beauty they bring to your living space.