Dwarf Spirea Magic: Growing and Caring Guide

Dwarf spirea

Dwarf spirea, with its dainty blossoms and compact size, is a delightful addition to any garden. Whether you’re a seasoned gardener or a novice green thumb, this comprehensive guide will walk you through everything you need to know about growing and caring for these charming perennials.

Baby's breath spirea (Spiraea thunbergii) Flower, Leaf, Care, Uses -  PictureThis

Understanding Dwarf Spirea

Overview:

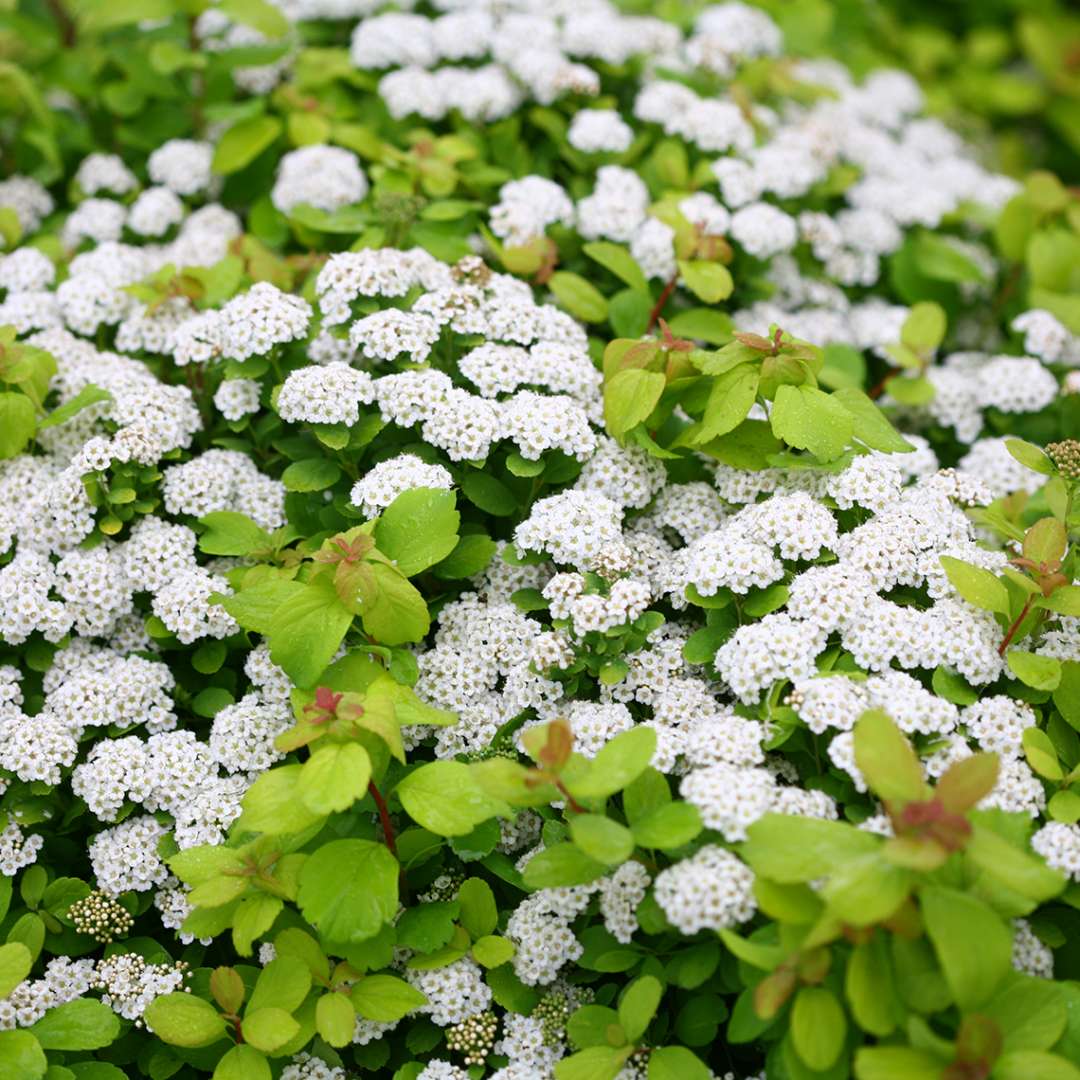
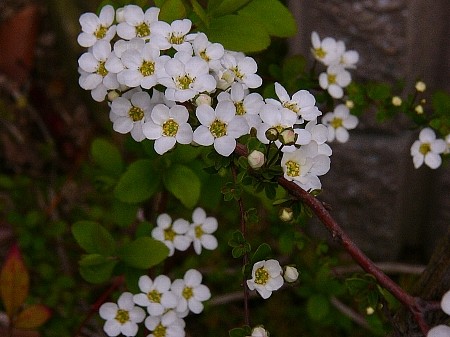
Dwarf spirea, scientifically known as Spiraea japonica, belongs to the rose family and is renowned for its vibrant flowers and low-maintenance nature. These deciduous shrubs are perfect for gardeners looking to add a burst of color and elegance to their landscapes without the need for extensive care.

Varieties:

Before diving into the cultivation process, familiarize yourself with the different varieties of spirea available. Popular choices include Goldflame, Little Princess, and Magic Carpet, each offering unique foliage colors and growth habits.

Planting Dwarf Spirea:

Location:

Choose a well-drained area with ample sunlight for planting dwarf spirea. These resilient plants can adapt to various soil types, but they thrive in moderately fertile, slightly acidic to neutral soil.

Planting Process:

Prepare the Soil: Loosen the soil and incorporate organic matter for improved drainage.

Digging Holes: Dig holes slightly larger than the root balls of your dwarf spirea.

Placement: Space the plants according to their mature width, ensuring proper air circulation.

Snowmound' Dwarf Spirea

Essential Care Tips:

Watering:

It is relatively drought-tolerant once established, but regular watering during dry spells is crucial, especially for young plants. Aim for deep, consistent watering rather than frequent shallow watering.

Pruning:

Maintain the compact shape of dwarf spirea by pruning in late winter or early spring. Remove dead or damaged branches and cut back one-third of the oldest stems to encourage new growth.

Fertilizing:

Apply a balanced, slow-release fertilizer in early spring to promote healthy growth and vibrant blooms. Avoid excessive use of nitrogen, as it may lead to leggy growth.

Double Play Big Bang® Spirea - Hardy Flowering Shrub - 4" Pot - Proven  Winners - Hirt's Gardens

Dealing with Common Issues of Dwarf Spirea:

1. Pest Management:

It is generally resistant to pests, but occasional encounters with aphids or spider mites may occur. Swiftly address these issues with natural remedies such as insecticidal soap or neem oil, ensuring a pest-free environment for your petite perennials.

2. Disease Prevention:

While hardy, It can face challenges like powdery mildew. Prevent diseases by maintaining proper spacing between plants to encourage air circulation. In cases of infection, promptly treat with fungicides to safeguard the health of your spirea.

3. Pruning Practices:

Maintain the compact and attractive shape of your dwarf spirea by implementing regular pruning. Focus on removing dead or damaged branches, and cut back a third of the oldest stems in late winter or early spring. This not only enhances aesthetics but also stimulates new and healthy growth.

4. Adequate Watering:

Though relatively drought-tolerant, dwarf spirea benefits from consistent watering, especially during dry spells and for younger plants. Ensure deep watering rather than frequent shallow sessions to promote robust root development and overall plant vitality.

Plant of the Week: GLOW GIRL® Spirea - Plant of the Week

Landscaping Ideas with Dwarf Spirea

Enhance the visual appeal of your garden by incorporating dwarf spirea into various landscaping ideas:

1.Borders and Edges: Create neat borders or edges along pathways with the low-growing varieties like ‘Little Princess.’

2.Mixed Flower Beds: Pair dwarf spirea with other perennials for a vibrant and textured flower bed display.

3.Container Gardening: Plant dwarf spirea in containers for a portable burst of color on patios or balconies.

Flower with its captivating blossoms and easy maintenance, is a fantastic choice for any garden. Whether you’re a beginner or an experienced gardener, cultivating these petite perennials will surely add a touch of elegance to your outdoor space. Follow our guide, and watch your garden come alive with the beauty of dwarf spirea blooms.

Cultivating Captivating Blue Azaleas in Your Garden

Gardening enthusiasts seeking to add a touch of mystique and elegance to their outdoor sanctuaries need look no further than the mesmerizing world of blue azaleas. These enchanting blooms, with their captivating hues ranging from deep indigo to delicate sky blue, can transform any garden into a haven of serenity and beauty. In this comprehensive guide, we’ll explore the art of cultivating and caring for these stunning blue azaleas, unlocking the secrets to a garden awash with sapphire splendor.

Choosing the Right Blue Azaleas Varieties

Before embarking on your blue azalea journey, it’s crucial to choose the right varieties for your garden. Popular selections include the ‘Blue Danube,’ ‘Bluebird,’ and ‘Rosebud.’ Each variety boasts unique characteristics, from bloom size to growth habits. Consider factors such as climate, soil conditions, and available space when making your selection to ensure optimal growth and a harmonious integration into your garden landscape.

blue azaleas

Optimal Growing Conditions

Blue azaleas thrive in specific growing conditions that mimic their native habitats. These plants prefer well-draining, acidic soil rich in organic matter. To achieve this, amend your soil with compost or well-rotted leaves. Ensure your chosen location provides partial shade, as too much direct sunlight can scorch the delicate blooms. Consistent moisture is also key, so mulch the base of the plants to retain soil moisture and regulate temperature.

Planting with Precision

Planting blue azaleas with care sets the foundation for their growth and vibrancy. Dig a hole twice the size of the root ball and place the plant in the hole, ensuring the top of the root ball sits slightly above the soil surface. Backfill the hole with a mixture of soil and organic matter, then water thoroughly. Proper spacing between plants allows for adequate air circulation, reducing the risk of diseases.

Watering Wisdom

Maintaining optimal soil moisture is vital for the health of your blue azaleas. Water consistently, especially during dry spells, and ensure the soil remains consistently moist without becoming waterlogged. Mulching helps retain moisture and suppress weeds while providing insulation to the roots.

blue azaleas

Fertilizing for Brilliance

Blue azaleas benefit from regular feeding during the growing season. Use a balanced, acidic fertilizer formulated for azaleas and apply it in early spring as new growth begins. Follow the package instructions for quantities, and avoid over-fertilizing, as this can lead to salt buildup and root damage. A second application in late spring can support ongoing healthy growth and vibrant blooms.

Pruning Practices

Pruning is essential for shaping and maintaining the health of your blue azaleas. Perform light pruning after the bloom period to shape the plants and remove dead or diseased wood. Avoid heavy pruning during the growing season, as this can compromise next year’s flower buds. Deadheading spent blooms encourages additional flowering and keeps the plants looking tidy.

Guarding Against Pests and Diseases

Vigilance is key in preventing pests and diseases that may affect your blue azaleas. Keep an eye out for common azalea pests such as lace bugs and spider mites, treating them promptly with insecticidal soap or neem oil. Proper spacing, good air circulation, and avoiding overhead watering can help prevent fungal diseases.

blue azaleas

Reveling in Blue Blooms

With thoughtful care and attention to detail, your garden can soon be graced with the breathtaking beauty of blue azaleas. These captivating blooms not only add a touch of sophistication to your outdoor space but also serve as a testament to the rewards of dedicated gardening. From the moment the first buds unfurl to reveal their sapphire splendor, you’ll find yourself immersed in the enchanting world of blue azaleas.

In conclusion, cultivating captivating blue azaleas in your garden is an art that combines science, patience, and a deep appreciation for the wonders of nature. As you embark on this journey, remember that each azure blossom is a testament to your commitment and care, turning your garden into a canvas painted with the brilliance of sapphire hues.

Growing a Vibrant Yellow Rose Bush in Your Garden

In the world of gardening, few blooms exude the timeless charm and warmth that a vibrant yellow rose bush brings to a garden. If you’ve ever dreamed of creating your own haven of golden hues, this comprehensive guide will walk you through the steps to successfully cultivate and nurture a stunning yellow rose bush in your garden.

Choosing the Right Yellow Rose Variety

Before you start your journey to a vibrant yellow garden, it’s essential to select the right rose variety. Not all yellow roses are created equal, and factors such as size, fragrance, and blooming patterns can vary widely. Some popular choices include the ‘Golden Celebration,’ ‘Midas Touch,’ and ‘Sunsprite.’ Research the specific characteristics of each variety to find the one that suits your preferences and garden conditions best.

three pink flower free image | Peakpx

Selecting the Ideal Location

Yellow roses, like their counterparts, thrive in locations with plenty of sunlight. Ensure your chosen spot receives at least 6 to 8 hours of direct sunlight daily. Well-draining soil is crucial for healthy root development, so amend your soil with organic matter if necessary. Adequate air circulation is also vital to prevent diseases, so avoid overcrowding and plant your yellow rose bush with enough space around it.

Planting with Care

When planting your yellow rose bush, dig a hole that is twice the diameter of the root ball. Loosen the roots gently before placing the plant in the hole, making sure the graft union (the bulging part where the rose is grafted onto the rootstock) is at least two inches below the soil surface. Backfill the hole with soil and water thoroughly to help the roots establish themselves.

Watering and Feeding Schedule

Yellow roses appreciate consistently moist soil, so water your bush regularly, especially during dry spells. However, it’s crucial to avoid waterlogged conditions, as this can lead to root rot. A layer of organic mulch around the base of the plant can help retain moisture and suppress weeds.

To encourage robust growth and abundant blooms, feed your yellow rose bush with a balanced fertilizer in early spring, just as new growth begins. Repeat this feeding in late spring and early summer, following the package instructions for quantities.

yellow rose bush

Pruning for Optimal Growth

Pruning plays a vital role in shaping your yellow rose bush and promoting healthy growth. Perform a hard pruning in late winter or early spring to remove dead or diseased wood and shape the plant. Throughout the growing season, deadhead spent blooms regularly to encourage continuous flowering.

Dealing with Pests and Diseases

Keep a watchful eye on your yellow rose bush for any signs of pests or diseases. Aphids and spider mites are common culprits, but they can be easily controlled with insecticidal soap or neem oil. Fungal diseases, such as blackspot, can be prevented by providing adequate air circulation and avoiding overhead watering.

Enjoying the Fruits of Your Labor

With proper care and attention, your yellow rose bush will reward you with a profusion of radiant blooms, filling your garden with a burst of sunshine. Whether you’re a seasoned gardener or a novice with a green thumb, the joy of growing a vibrant yellow rose bush is a gratifying experience that enhances the beauty of any outdoor space.

Yellow Rose Bush

In conclusion, creating a garden adorned with the splendor of a yellow rose bush is a journey filled with nurturing, patience, and the simple joys of watching nature unfold. By following these guidelines, you’ll be well on your way to cultivating a vibrant haven that not only captivates the eyes but also warms the heart with the timeless beauty of yellow roses.

How to Grow and Care for Orange Lily Flower

In the vibrant palette of garden blooms, the orange lily flower stands out as a beacon of warmth and elegance. If you’ve ever dreamed of adorning your garden with these radiant flowers, this guide is your key to success. Growing and caring for orange lilies requires a combination of passion and knowledge. Let’s delve into the secrets of cultivating these stunning blossoms and ensuring they thrive in your garden.

Selecting the Right Variety:

The first step in your orange lily flower journey is choosing the right variety for your garden. From the bold and bright Asiatic lilies to the fragrant and graceful Trumpet lilies, options abound. Consider factors such as size, color intensity, and fragrance to find the perfect match for your garden aesthetic. Popular orange lily varieties include the ‘Orange Pixie,’ ‘African Queen,’ and the show-stopping ‘Orange Electric.’

orange lily flower

Planting Your Orange Lily Bulbs:

Timing and location are critical when planting orange lily bulbs. Choose a well-drained soil location that receives ample sunlight. Plant bulbs in the fall, approximately 6 to 8 inches deep and spaced about 12 inches apart. Ensure the pointed end of the bulb is facing upward and cover with soil. Water thoroughly after planting to initiate root growth.

Soil and Sunlight Requirements:

orange Lily Flower thrive in well-draining soil enriched with organic matter. Aim for a slightly acidic to neutral pH level. These flowers appreciate full sunlight but can tolerate partial shade. Adequate sunlight not only promotes robust growth but also intensifies the vivid orange hues of the blossoms. Be mindful of the soil moisture, allowing it to dry out between waterings to prevent issues like root rot.

Watering and Feeding:

Consistent and adequate watering is essential for the health of your orange lilies. Water the plants at the base, keeping the foliage dry to minimize the risk of diseases. During dry periods, increase watering frequency, ensuring the soil remains consistently moist. To enhance blooming, apply a balanced fertilizer in early spring when new growth emerges, and again after the flowering season.

orange lily free image | Peakpx

Supporting Your Lily Stems:

As your orange lilies grow, they may benefit from support to prevent the stems from bending or breaking, especially in windy conditions. Install stakes or cages around the plants, being careful not to damage the bulbs or emerging shoots. Tie the stems gently to the support structures using soft garden twine, providing stability and allowing the flowers to stand tall and proud.

Deadheading for Continuous Blooms:

To encourage a prolonged bloom period, practice deadheading, the removal of spent flowers. Snip off faded blooms just below the base of the flower head. This not only promotes continuous flowering but also redirects the plant’s energy into bulb development. As the season progresses, remove the entire stalk once all the flowers on it have bloomed and faded.

Managing Pests and Diseases:

While orange lilies are generally hardy, keeping an eye out for common pests like aphids and diseases such as botrytis is crucial. Inspect the plants regularly and treat any issues promptly. Neem oil or insecticidal soap can be effective and environmentally friendly solutions to combat pests without harming beneficial insects.

Winter Care:

orange Lily Flower are generally hardy, but providing some winter care ensures their well-being during colder months. Apply a layer of mulch around the base of the plants to insulate the soil and protect the bulbs from frost. In extremely cold regions, consider lifting the bulbs and storing them indoors until the following spring.

Royalty-Free photo: Red orchid flower selective focus photography | PickPik

Orange lily flower Conclusion:

Growing and caring for orange lily flower is a rewarding endeavor that adds a burst of color and elegance to any garden. By following these expert tips, you’ll be well on your way to cultivating a stunning display of radiant orange blooms. Let your garden glow with the warmth and beauty of these remarkable orange lily flower, creating a haven of natural splendor for you to enjoy throughout the seasons. Happy gardening!

How to Care for Your Pink Rose Bush with Expert Tips

In the realm of garden aesthetics, few flowers rival the timeless elegance of a pink rose in full bloom. If you’ve been enchanted by the idea of nurturing a pink rose bush in your garden, you’re in for a delightful journey. With the right care and expert tips, you can cultivate a breathtaking display of pink petals that will be the envy of the neighborhood. Let’s dive into the essential guide on how to care for your pink rose bush and unlock the secrets to a thriving, blooming beauty.

Pink Rose Bush | Amanda | Flickr

Choosing the Right Variety:

Before you embark on your rose-growing adventure, it’s crucial to select the right variety of pink roses for your garden. Different varieties have unique characteristics, such as size, fragrance, and bloom time. Consider factors like climate, soil type, and sunlight availability to choose a variety that thrives in your specific conditions. Popular pink rose varieties include the classic ‘Pink Perfection,’ the vibrant ‘Pink Knock Out,’ and the fragrant ‘Queen Elizabeth.’

Planting Your Pink Rose Bush:

Once you’ve chosen the perfect variety, it’s time to plant your pink rose bush. Select a sunny location with well-draining soil enriched with organic matter. Dig a hole that accommodates the roots comfortably, ensuring the graft union (the bulging part of the stem near the base) is at least two inches below the soil surface. Water the plant thoroughly after planting to help settle the soil and eliminate air pockets.

Watering and Moisture Management:

Proper watering is essential for the health of your pink rose bush. Roses generally prefer deep, infrequent watering to encourage deep root growth. Water at the base of the plant to keep the foliage dry and prevent diseases. During hot summer months, increase watering frequency, and consider mulching around the base of the bush to retain soil moisture. Be mindful not to overwater, as this can lead to root rot and other issues.

Public Domain Images - Pink roses dew - PICRYL - Public Domain Media Search Engine Public Domain Image

Feeding Your Roses:

To promote robust growth and abundant blooms, feed your pink rose bush regularly. Use a balanced, water-soluble fertilizer formulated for roses, applying it according to the package instructions. Begin fertilizing in early spring as new growth appears and continue through the growing season. Additionally, consider supplementing with a slow-release fertilizer to provide a steady nutrient supply over an extended period.

Pruning for Shape and Health:

Pruning is a vital aspect of pink rose bush care, contributing to both the plant’s shape and overall health. Prune in late winter or early spring before new growth emerges. Remove dead, diseased, or crossing branches to improve air circulation and reduce the risk of pests and diseases. Shape the bush by cutting back about one-third of the plant’s height, encouraging a compact and bushy form. Don’t forget to deadhead spent blooms regularly to promote continuous flowering.

Pest and Disease Management:

Keeping an eye out for common pests and diseases is crucial in maintaining a healthy pink rose bush. Aphids, spider mites, and powdery mildew are common challenges. Regularly inspect the leaves and buds for signs of trouble, and treat promptly if necessary. Natural remedies, such as neem oil or insecticidal soap, can be effective in managing pests without harming beneficial insects.

Winter Care:

Preparing your pink rose bush for winter is essential to ensure its survival and thriving return in the spring. Mulch around the base of the plant to insulate the roots and protect them from extreme temperature fluctuations. Stop fertilizing in late summer to allow the plant to gradually enter a dormant state. Prune lightly in late fall to remove any dead or diseased wood, but save major pruning for the spring.

Polyantha-Rose "Muttertag" ( Crootendorst 1950 ) | Polyantha… | Flickr

Conclusion:

Caring for your pink rose bush requires a combination of knowledge, dedication, and a touch of gardening passion. With the expert tips provided in this guide, you’re well-equipped to nurture a flourishing pink rose bush that will be the highlight of your garden. Remember, each rose tells a story, and with the right care, your pink blooms will paint a picture of beauty that lasts for seasons to come. Happy gardening!

Iris Purple Delight: Exploring the Beauty Within

Iris Purple Delight: Exploring the Beauty Within

Nature has an uncanny ability to captivate us with its diverse and vibrant colors, and one shade that stands out for its elegance and charm is iris purple. In this exploration of “Iris Purple Delight,” we will delve into the mesmerizing world of this hue, discovering the beauty within nature’s palette and its significance in various aspects of our lives.

Iris Purple

The Allure of Iris Purple:

Iris, a shade that resonates between blue and violet, is renowned for its soothing and enchanting qualities. Found in the delicate petals of irises, this color symbolizes creativity, wisdom, and mystery. Its unique blend of warmth and coolness makes it a versatile and visually appealing choice for various applications, from fashion to interior design.

  1. In Nature’s Garden: The Iris Flower’s Elegance: The iris flower, with its distinctive petals and intricate patterns, is a living canvas showcasing the beauty of iris purple. Explore the different iris varieties that boast this enchanting hue, from the regal bearded iris to the delicate Siberian iris, each contributing to the kaleidoscope of nature’s wonders.
  2. Iris in Art and Culture: The influence of iris purple extends beyond the natural realm into art and culture. Renowned artists throughout history have been inspired by this hue, using it to evoke emotions and tell compelling stories on canvas. Delve into the cultural significance of iris purple in various societies and its representation in art across different eras.
  3. Fashion Forward: Styling with Iris : A color that effortlessly blends sophistication with a touch of mystery, iris purple has made its mark in the world of fashion. From runway couture to everyday attire, discover how designers incorporate this captivating hue into their collections. Learn tips on styling with iris purple to make a bold and fashionable statement.purple iris | 'purple iris' On Black | liz west | Flickr
  4. Iris in Home Design: Creating Tranquil Spaces: Bring the calming and elegant vibes of iris  into your living spaces. Explore interior design ideas that incorporate this hue, whether through accent pieces, wall colors, or floral arrangements. Discover how iris purple can transform your home into a tranquil haven, fostering a sense of calm and serenity.
  5. The Psychology of Iris : Colors have a profound impact on our emotions and psychology. Uncover the psychological effects of iris purple and how it can positively influence mood, creativity, and overall well-being. Whether in the workplace or at home, understanding the psychology behind iris purple allows you to harness its benefits in various aspects of life.Free Stock Photo of Iris Flowers | Download Free Images and Free Illustrations

Conclusion:

“Iris Purple Delight” invites us to explore the nuanced beauty within this enchanting hue, from the delicate petals of iris flowers to its cultural, artistic, and psychological significance. As we immerse ourselves in the captivating world of iris purple, we find a color that transcends mere aesthetics, touching our lives in profound and delightful ways. Embrace the elegance of iris , and let its beauty inspire and uplift your senses in every facet of your journey.

Blooming Brilliance: How to Grow Marigold from Flower Seeds

Blooming Brilliance: How to Grow Marigold from Flower Seeds

How to Grow Marigold from Flower, Marigolds, with their vibrant hues and warm presence, are a delightful addition to any garden. If you’ve ever admired a marigold bloom and wondered, “Can I grow more from this flower?” – the answer is yes! To Grow marigold from flower seeds is a rewarding journey, and we’re here to guide you through each step.

Signet marigold (Tagetes tenuifolia) Flower, Leaf, Care, Uses - PictureThis

How to Grow Marigold from Flower, Choosing the Right Marigold Variety:

Before you begin, it’s essential to choose the marigold variety that suits your garden and preferences. Marigolds come in various types, such as French marigold, African marigold, and signet marigold. Each type has its unique characteristics, so pick the one that aligns with your vision.

Harvesting Marigold Seeds:

The first step in growing marigold from a flower involves harvesting seeds. Allow the marigold flowers to mature on the plant. Once the petals begin to dry and the flower head turns brown, carefully pluck it. Open the flower head to reveal small, slender seeds.

How to Properly Plant Marigold Seeds for Spring

How to Grow Marigold from Flower, Preparing the Soil:

Marigolds thrive in well-drained soil enriched with organic matter. Choose a sunny location for planting, as marigolds love sunlight. Prepare the soil by loosening it to a depth of at least 6 inches and mix in compost or well-rotted manure for added fertility.

Sowing Marigold Seeds:

How to Grow Marigold from Flower, Sow the marigold seeds directly into the soil where you want them to grow. Plant the seeds about 1/8 inch deep and water gently. Ensure proper spacing between the seeds to avoid overcrowding as the marigold plants mature.

Providing Adequate Watering:

How to Grow Marigold from Flower, While marigolds are relatively drought-tolerant, consistent watering is crucial during the germination phase. Keep the soil consistently moist but not waterlogged. Once the plants are established, marigolds require less water but appreciate occasional deep watering.

Growing Marigolds – Planting & Caring for Marigold Flowers | Garden Design

Caring for Marigold Seedlings:

As the marigold seedlings emerge, thin them out to ensure proper spacing. This encourages healthy air circulation and prevents diseases. Apply a balanced fertilizer during the growing season, following package instructions for the correct dosage.

Protecting from Pests:

Marigolds are known for their natural pest-repelling properties, but they may still encounter pests like aphids or spider mites. Regularly inspect your plants, and if necessary, use organic pest control methods to keep unwanted visitors at bay.

Enjoying the Blooms:

With proper care, your marigold plants will reward you with vibrant blooms. Deadhead spent flowers regularly to encourage continuous blooming throughout the growing season. Marigolds are also known to attract beneficial insects to your garden.

Cheerful & Easy Tagetes Blooms: Growing Marigolds in Your Garden!

Harvesting Marigold Seeds for Next Year:

Towards the end of the growing season, allow some flowers to mature and go to seed. Harvest the seeds once the flower heads are dry. Store them in a cool, dry place for planting in the next growing season, continuing the cycle of marigold beauty.

The process of How to Grow marigold from flower seeds is a delightful experience that adds a burst of color to your garden. By following these steps, you’ll soon be surrounded by the cheerful blooms of your homegrown marigold plants. Happy gardening!

Blooming Wonders: Unveiling the Beauty of Agapanthus Flowers in Your Garden

Agapanthus

Agapanthus, also known as the Lily of the Nile or African Lily. It’s a star in the plant world, with six to ten captivating species. Picture vibrant blues, purples, delicate whites, and even bicolored beauties. These flowers, whether staying green all year or losing leaves, bring a touch of elegance to any garden. Dive into our guides to unlock the secrets of growing these stunners. Whether you’re a seasoned green thumb or just starting out, let Agapanthus add sophistication and natural charm to your outdoor haven. It’s the perfect way to elevate your garden game with these captivating blooms.

Agapanthus Care and Growing Guide:

1. Planting:

. Choose a well-draining location with full sun to partial shade.
. Plant Agapanthus in spring or fall, spacing them about 12-18 inches apart.
. Ensure the crown (where the roots meet the stems) is just above the soil surface.

2. Soil:

. It prefers fertile, loamy soil.
. Amend the soil with organic matter to improve drainage.

3. Watering:

. Keep the soil consistently moist but not waterlogged.
. Water sparingly during the dormant season.

4. Fertilization:

. Feed with a balanced, slow-release fertilizer in spring.
. Avoid excessive nitrogen, as it can hinder flowering.

5. Mulching:

. Apply a layer of mulch to retain soil moisture and suppress weeds.

6. Pruning:

. Deadhead spent flowers to encourage continuous blooming.
. Cut back foliage in late fall or early spring to tidy the plant.

7. Overwintering:

. In colder climates, provide a thick layer of mulch for winter protection.
. Container-grown Agapanthus can be moved indoors during frost.

8. Division:

. Divide overcrowded clumps every 4-5 years to rejuvenate the plant.

How to Grow Agapanthus in Containers | Gardener's Path

9. Pests and Diseases:

. It is relatively resistant to pests and diseases.
. Monitor for snails, slugs, and aphids, treating as necessary.

10. Blooming:

. Enjoy the stunning floral display in summer, with blooms lasting several weeks.
. Different varieties may have slightly different blooming times.

11. Container Growing:

. It adapts well to container cultivation.
. Use a well-draining potting mix and choose a large enough container.

By following these care guidelines, you can ensure the health and vibrancy of your Agapanthus, enjoying its spectacular blooms and lush foliage in your garden or container.